- Prerequisites
- Step 1. Provision Device
- Step 2. Provision Device from Klyff Edge to Klyff Professional Edition Server
- Step 3. Push data from Klyff Edge to Klyff Professional Edition Server
- Step 4. Create And Configure Dashboard
- Step 5. Provision Dashboard to Klyff Edge
- Your feedback
- Next steps
The aim of this tutorial is to guide you through the fundamental usage of the most widely-used features of Klyff Edge. Throughout this tutorial, you will learn how to:
- Connect local devices, such as sensors, to Klyff Edge;
- Provision sensors from Klyff Edge to the Klyff Professional Edition server;
- Transmit data from sensors to Klyff Edge and further propagate this data to the Klyff Professional Edition server;
- Construct real-time end-user dashboards in the cloud and provision them to the Edge.
To maintain simplicity, in this guide we will connect and visualize data from a temperature sensor.
Prerequisites
To start utilizing the Klyff Edge, it is essential to have an operational Klyff server that supports Edge functionality.
The easiest way is to use Klyff Cloud server.
Alternatively, you can install the Klyff Professional Edition server on-premise. For this, please refer to the Klyff Professional Edition installation guide.
Edge Hardware Requirements
The hardware specifications needed for Klyff Edge are determined by both the number of devices connected locally and the extent of GUI interaction:
-
Light Usage: If you intend to operate Klyff Edge with minimal GUI interactions (such as local dashboards and device management) and anticipate connecting fewer than 100 devices to a single machine, a minimum of 1GB of RAM should suffice.
-
Heavy Usage: Conversely, for heavy GUI interactions and connections to 100+ devices on a single machine, we recommend allocating at least 4GB of RAM to ensure optimal performance.
Provisioning a new Edge instance on the Klyff server
Additionally, you will need to provision Edge on the Klyff server.
-
Sign in to your Klyff PE instance and navigate to the “Edge Management” section -> “Instances” page. Click the “+” icon in the top right corner and select “Add new edge”.
-
Enter a name for your edge. For instance, “My New Edge”. If necessary, update the cloud endpoint. This URL should be accessible from the edge. If the edge is running in a Docker container, using “localhost” is incorrect. It must be the IP address of the machine where Klyff PE is running and accessible by the edge container. If you are using the Klyff Cloud server to evaluate the edge, leave this setting as it is. Click “Add” to confirm adding your new Edge.
-
Your new edge should now appear at the top of the list, as entries are sorted by creation time by default.
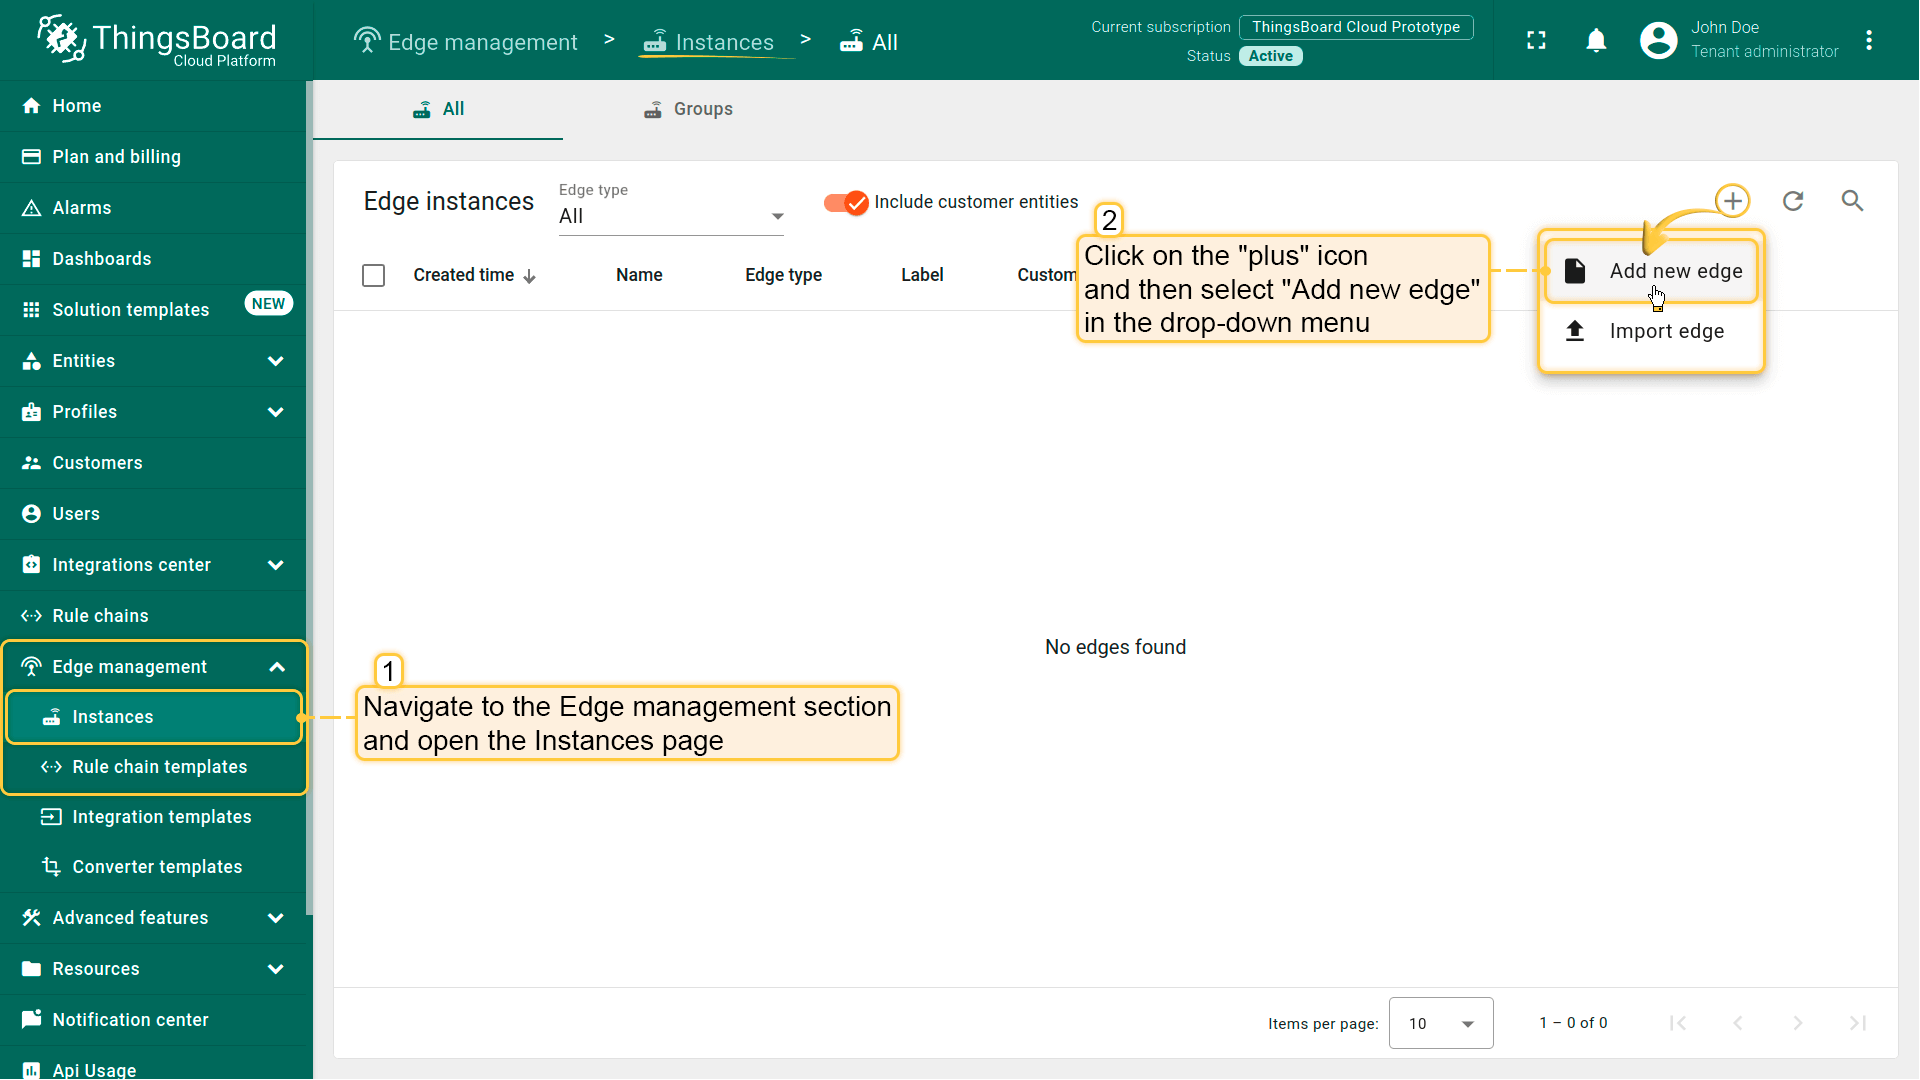
Sign in to your Klyff PE instance and navigate to the “Edge Management” section -> “Instances” page. Click the “+” icon in the top right corner and select “Add new edge”.
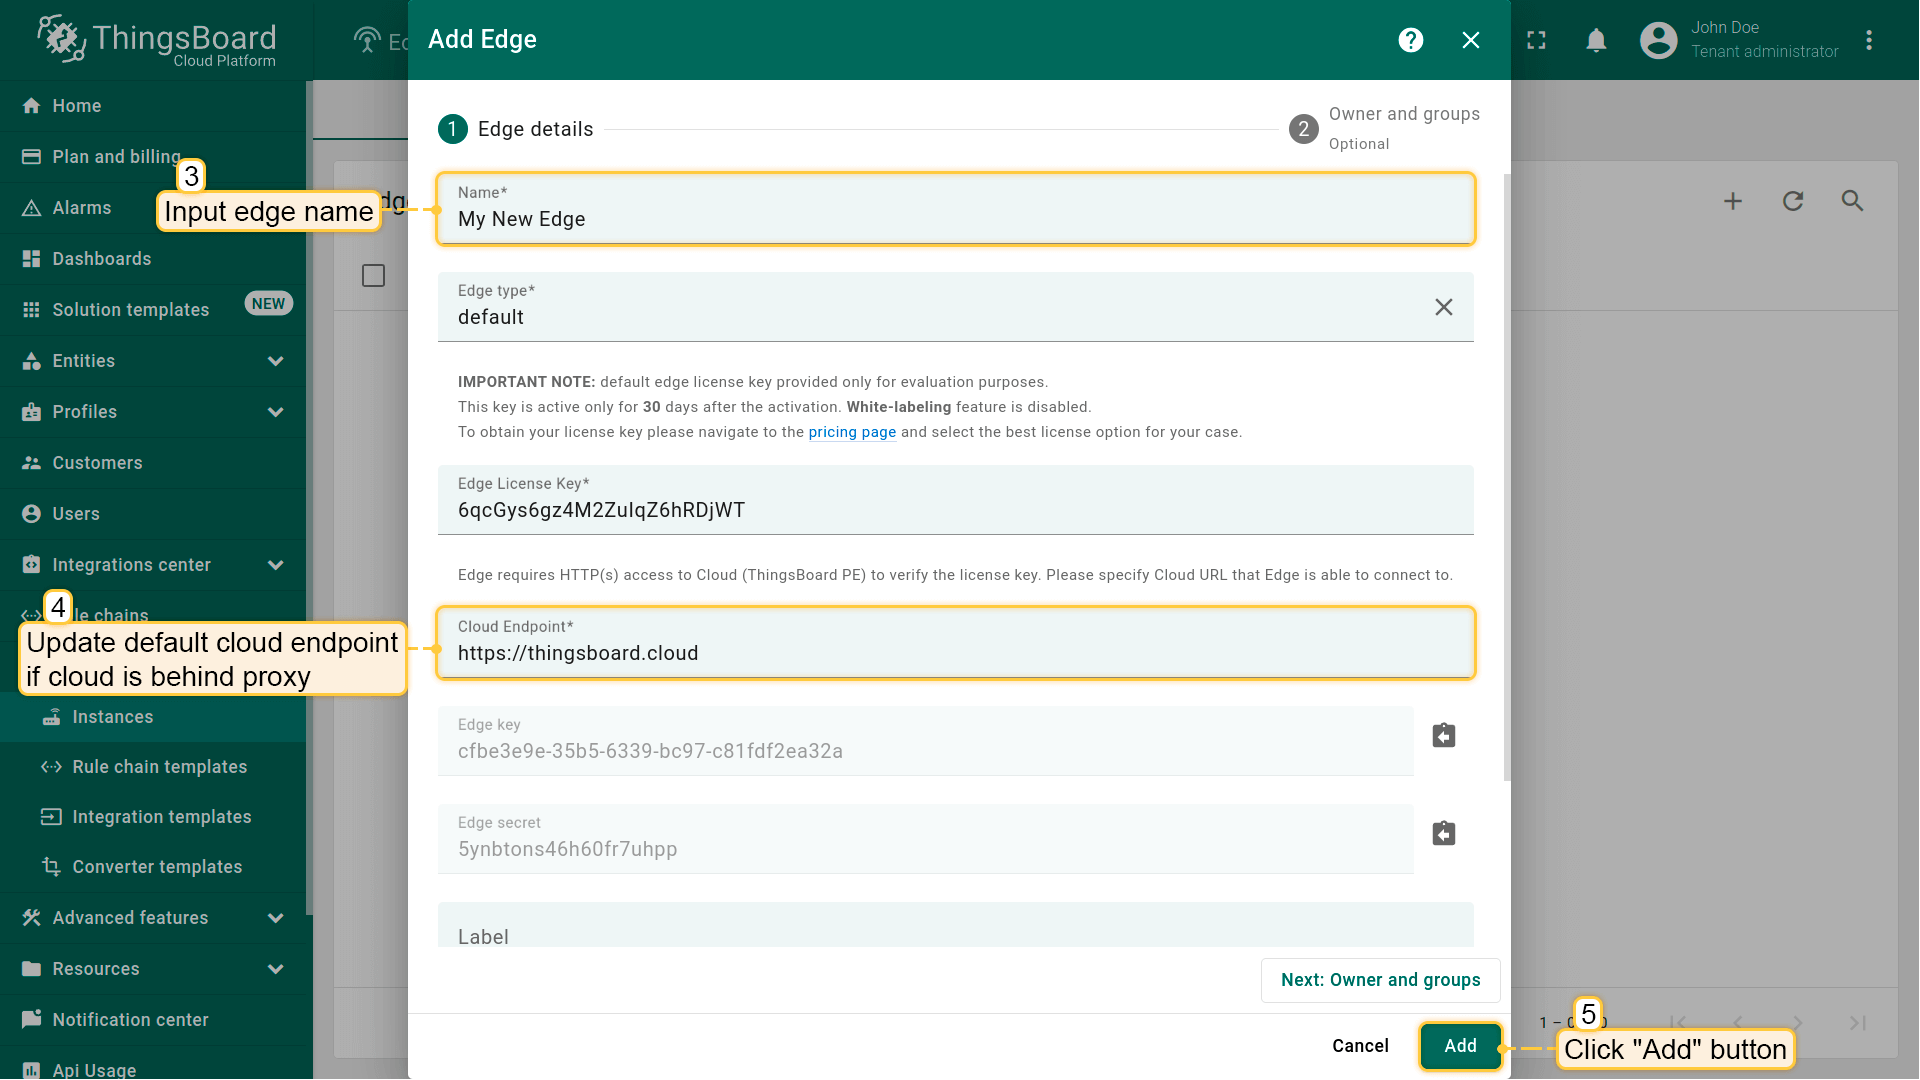
Enter a name for your edge. For instance, “My New Edge”. If necessary, update the cloud endpoint. This URL should be accessible from the edge. If the edge is running in a Docker container, using “localhost” is incorrect. It must be the IP address of the machine where Klyff PE is running and accessible by the edge container. If you are using the Klyff Cloud server to evaluate the edge, leave this setting as it is. Click “Add” to confirm adding your new Edge.
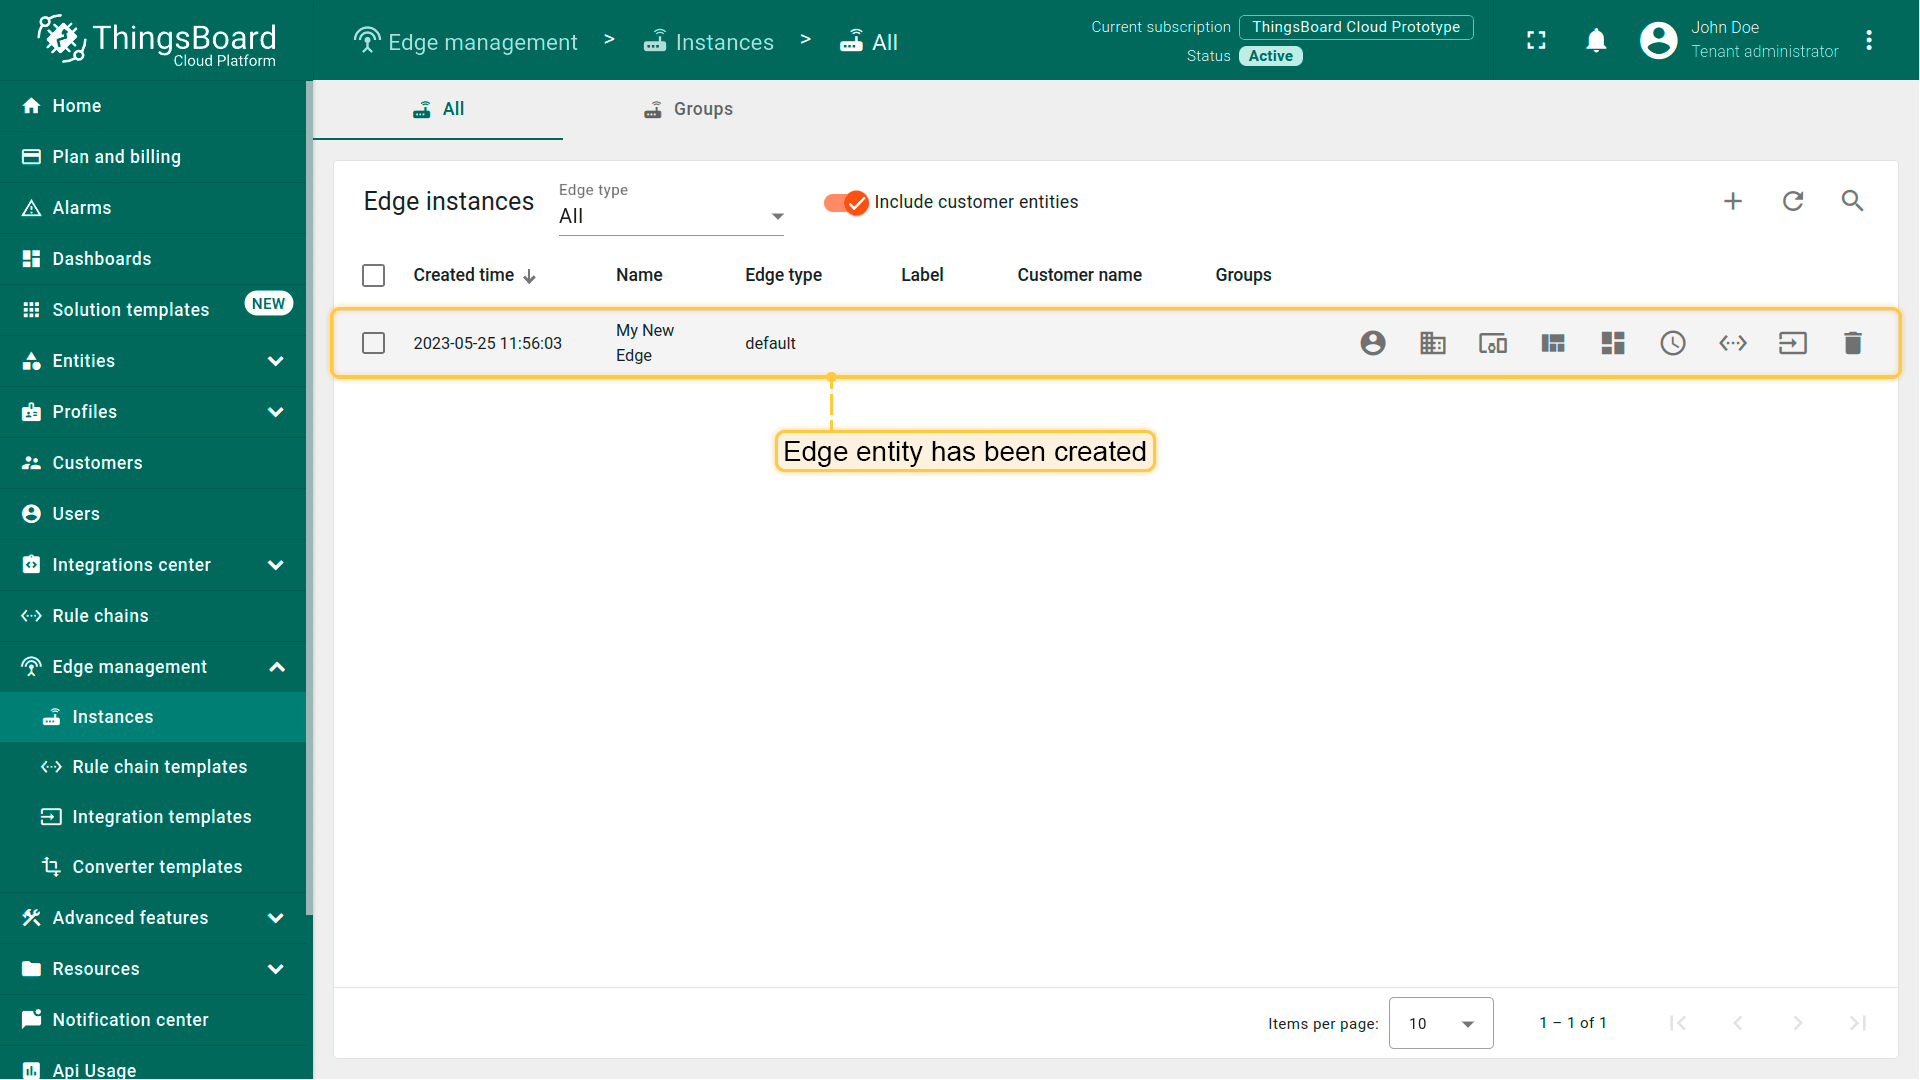
Your new edge should now appear at the top of the list, as entries are sorted by creation time by default.
Edge Installation and Configuration
Guided Installation Using Klyff Server Pre-configured Instructions
The most straightforward method to install and connect Edge to the Server is by utilizing the prepared installation instructions provided by the Klyff Server. For every Edge Entity, the Server has prepared instructions with already populated fields such as the Edge secret key, Edge routing key, Edge RPC host URI, etc. Please follow the steps below to use these prepared instructions:
-
Click an Edge entity row to open it's details;
-
Click on the “Install & Connection Instructions” button;
-
Follow instructions to install Edge and connect to the server.
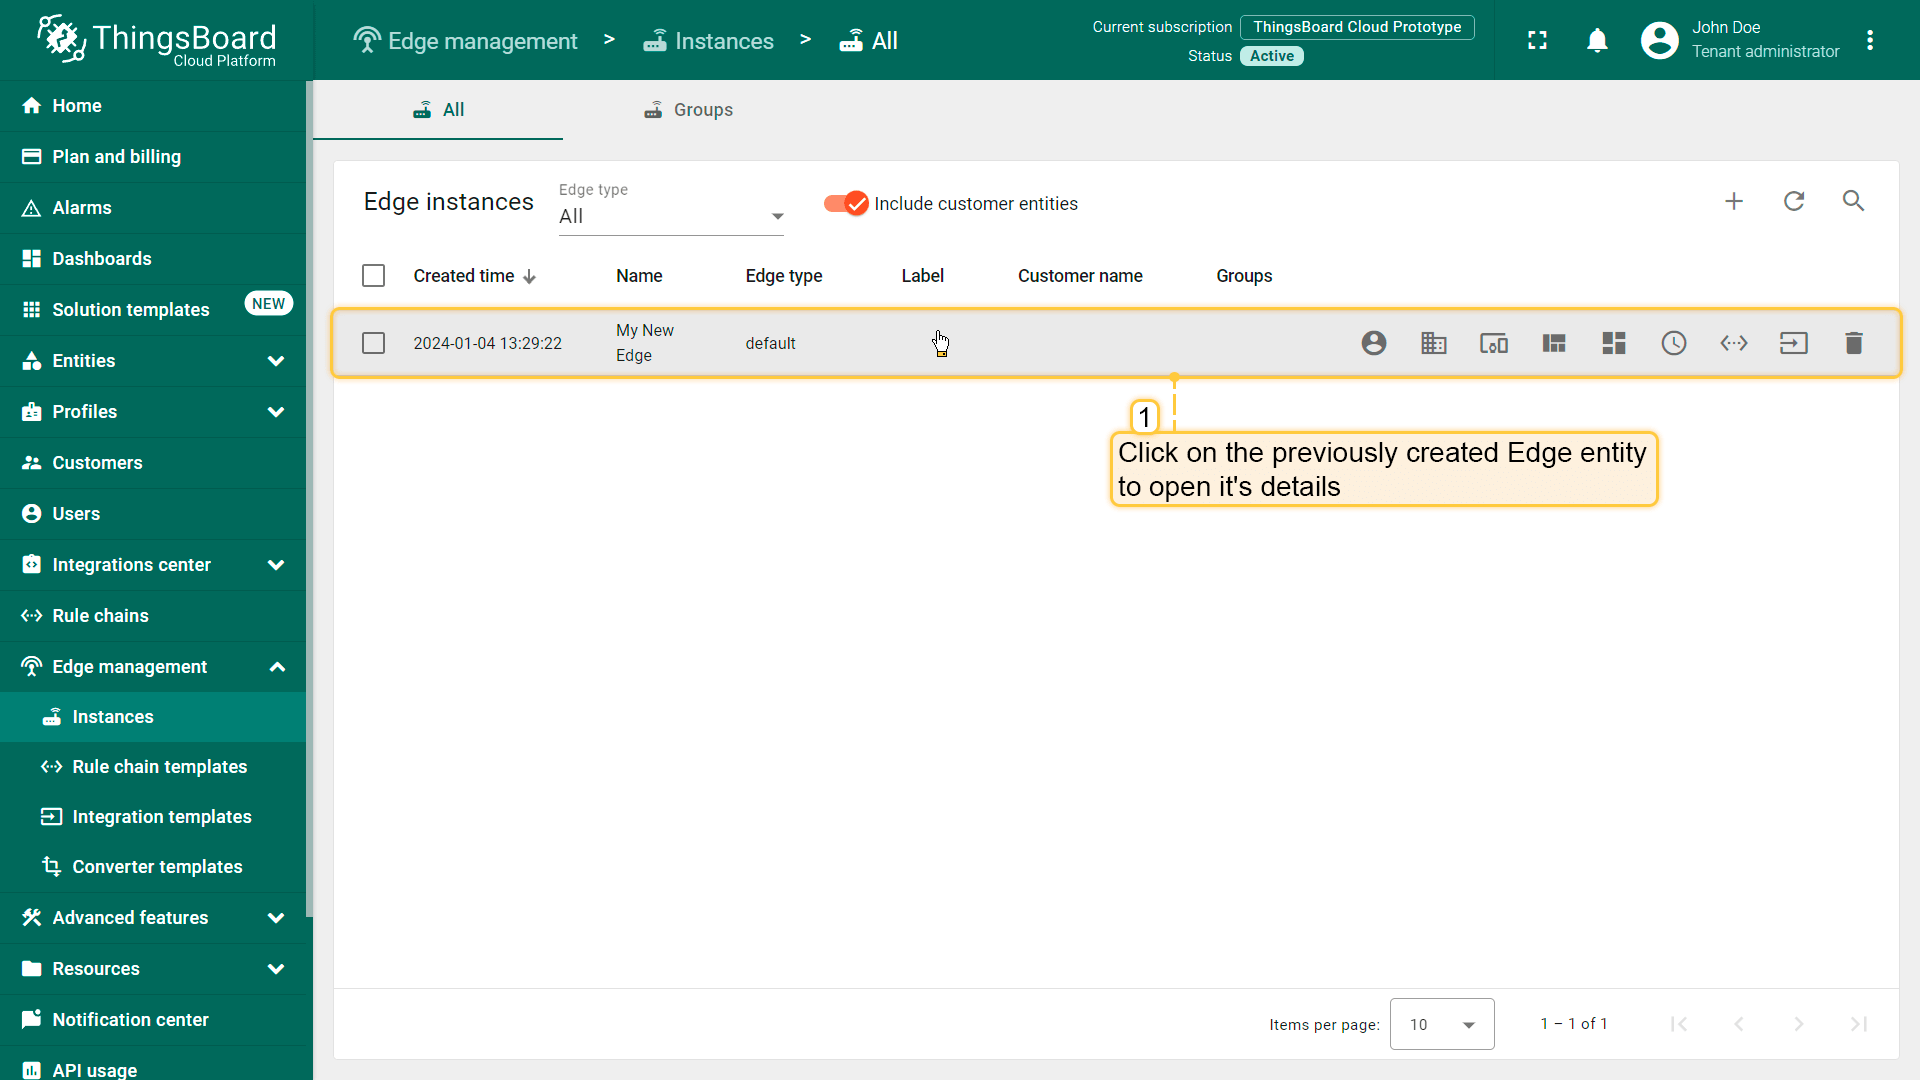
Click an Edge entity row to open it's details;
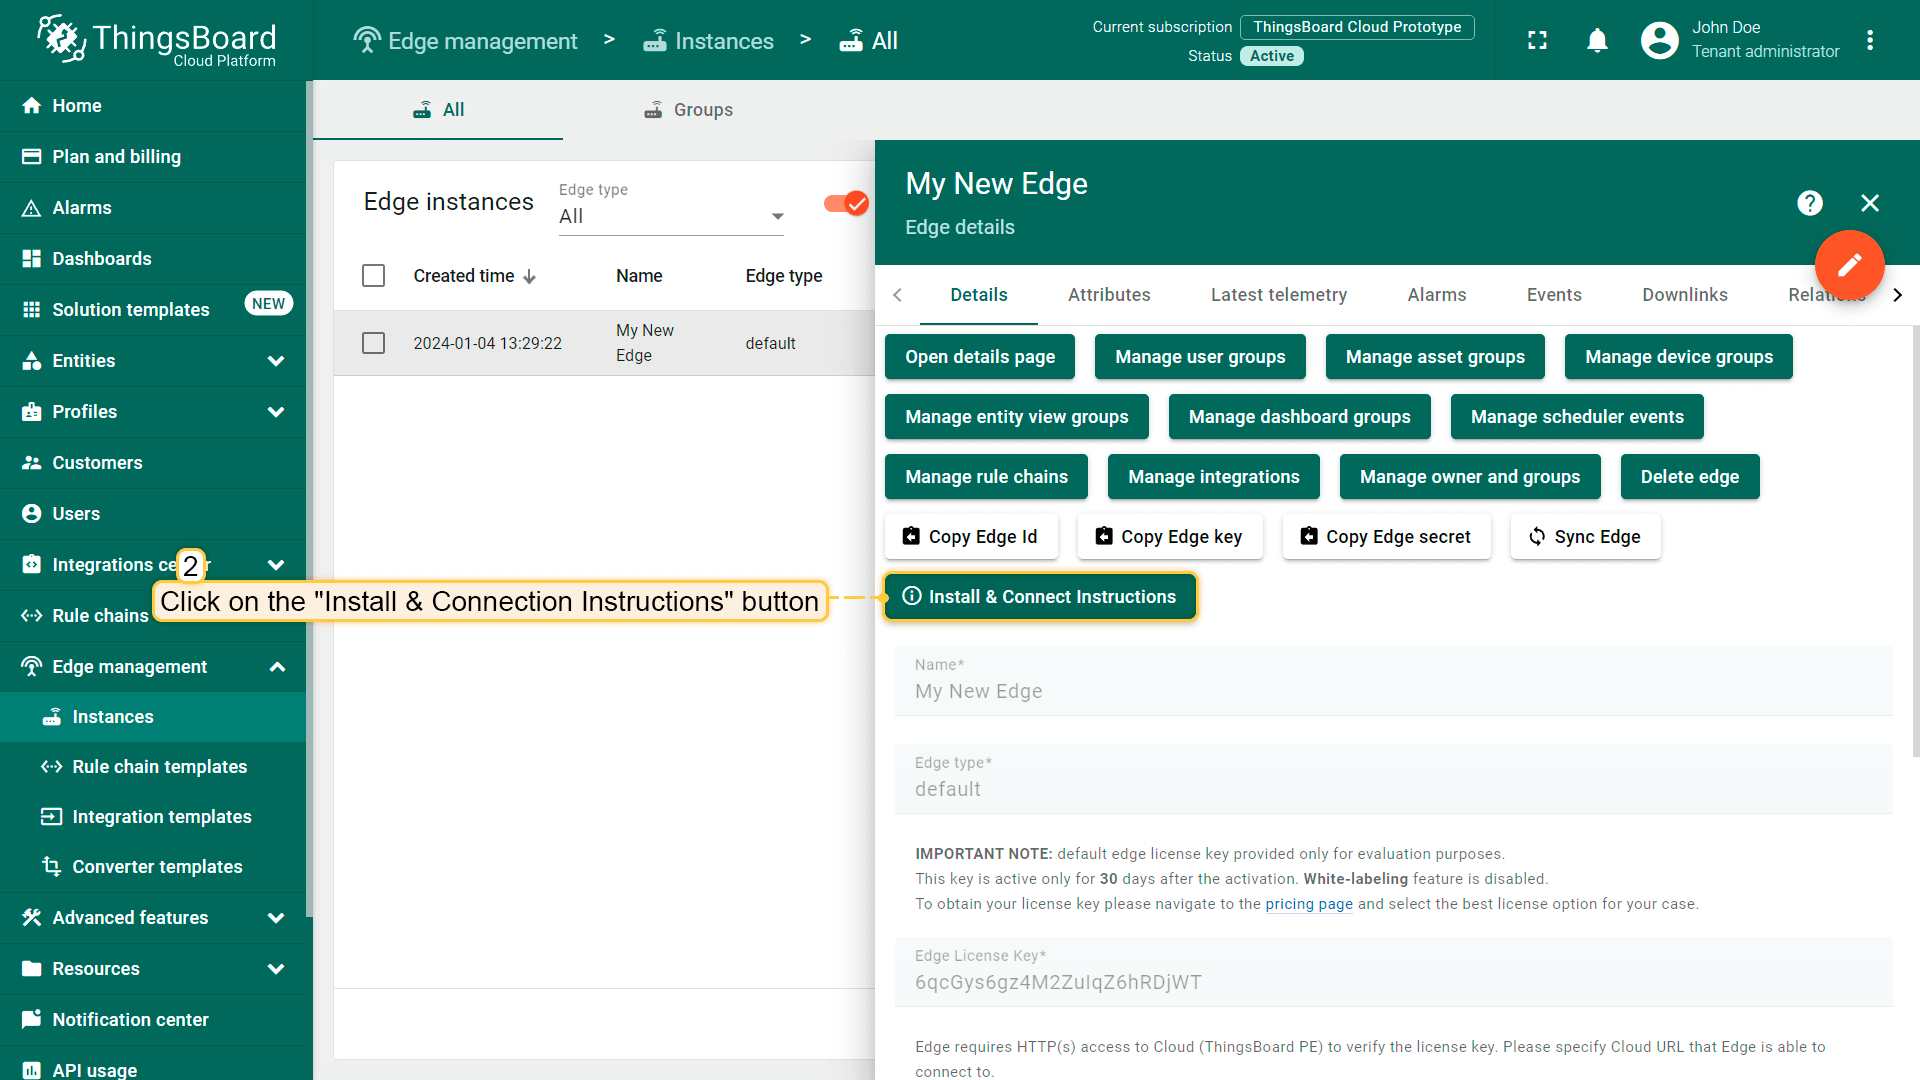
Click on the “Install & Connection Instructions” button;
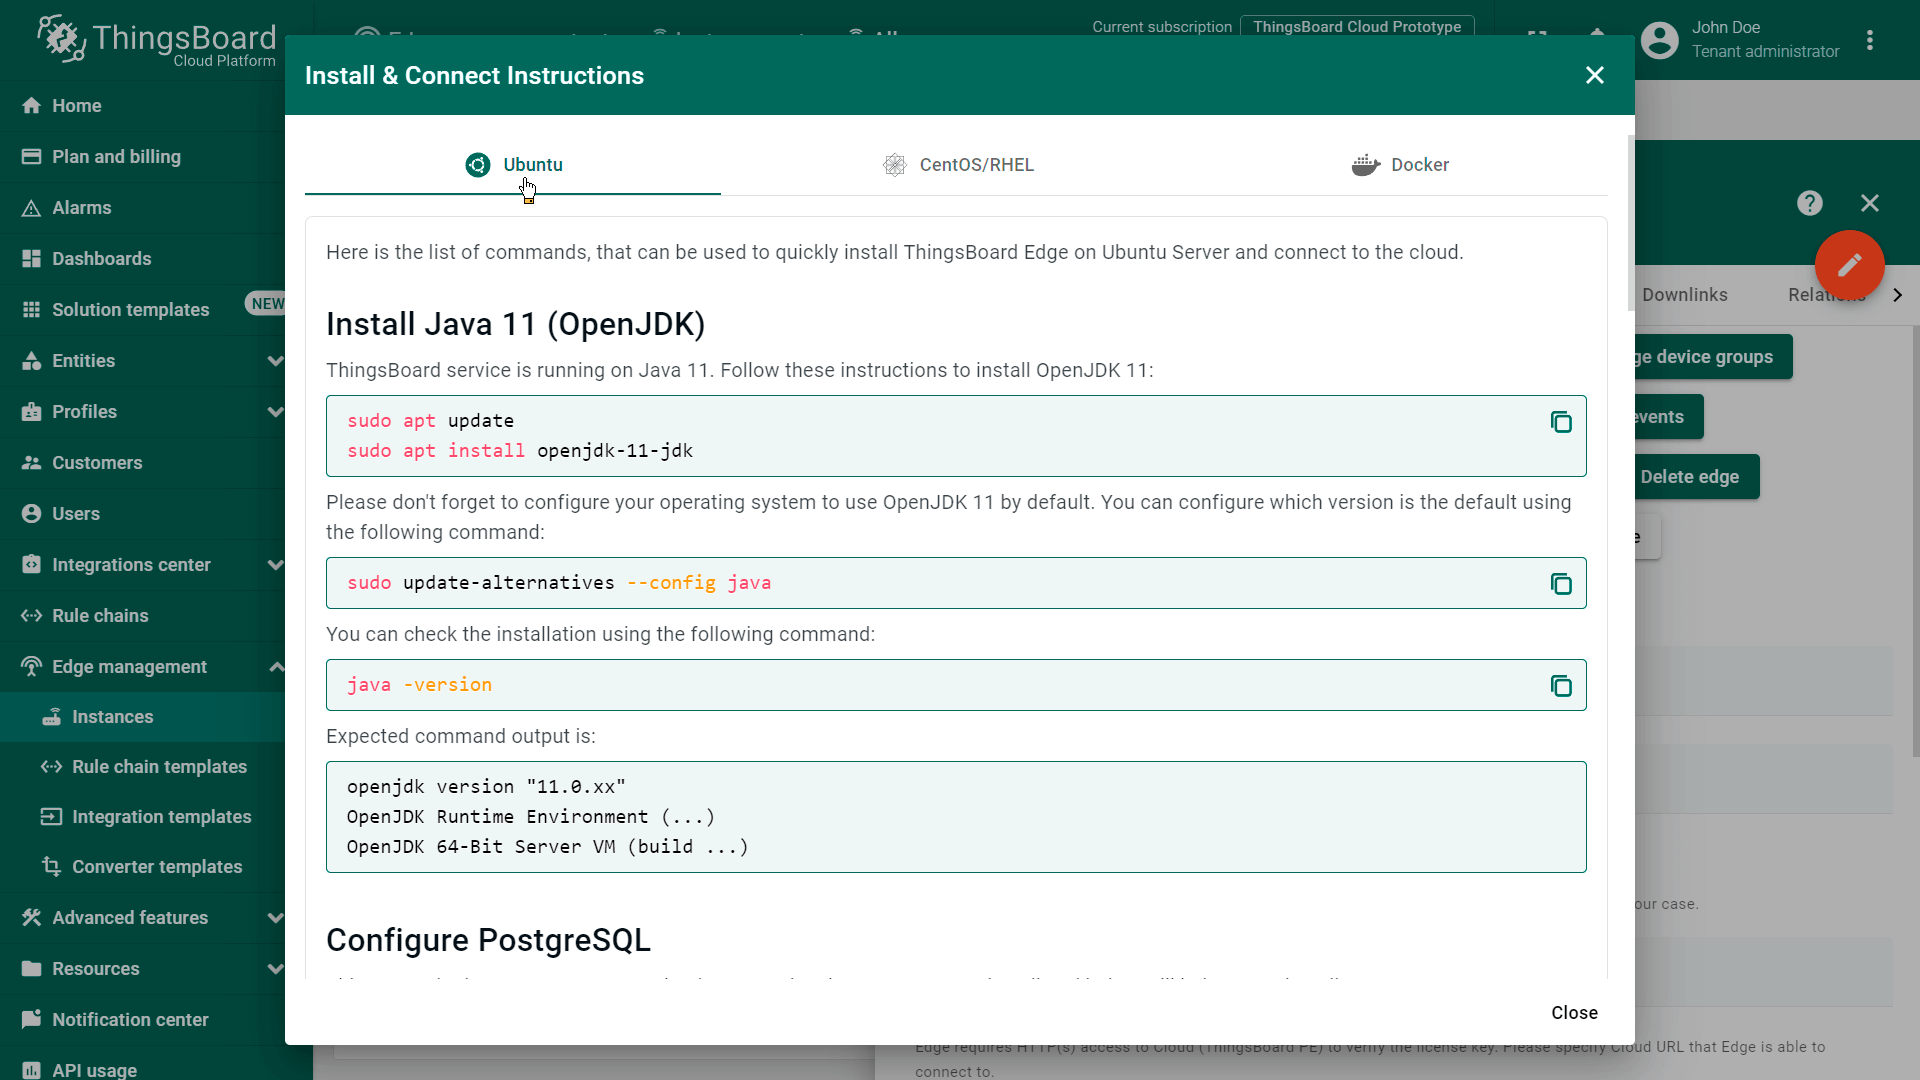
Follow instructions to install Edge and connect to the server.
Manual Installation and Configuration
If, for any reason, you are unable to use the prepared Klyff Server Instructions above, please follow the generic installation steps. These steps will guide you through installing and configuring the Edge by yourself.
Accessing User Interfaces: URLs and Credentials
The Server UI can be accessed through the following URL: Cloud. Please log in using your Cloud tenant credentials. Throughout this tutorial, we will refer to this URL as SERVER_URL. The Klyff Edge UI is accessible at |
The Server UI can be accessed through the following URL: The Klyff Edge UI is accessible at |
As of now, Edge does not support OAuth 2.0 for login purposes. If you wish to access Edge using your OAuth 2.0 user credentials, it is necessary to assign a password for this user on the Klyff server.
If you changed the Edge HTTP bind port to 18080 during Edge installation, use the following Klyff Edge UI link: http://localhost:18080.
Step 1. Provision Device
For simplicity, we will provision the device manually using the UI.
We are going to provision a device on the Edge. Please open the Klyff Edge UI using the URL EDGE_URL.
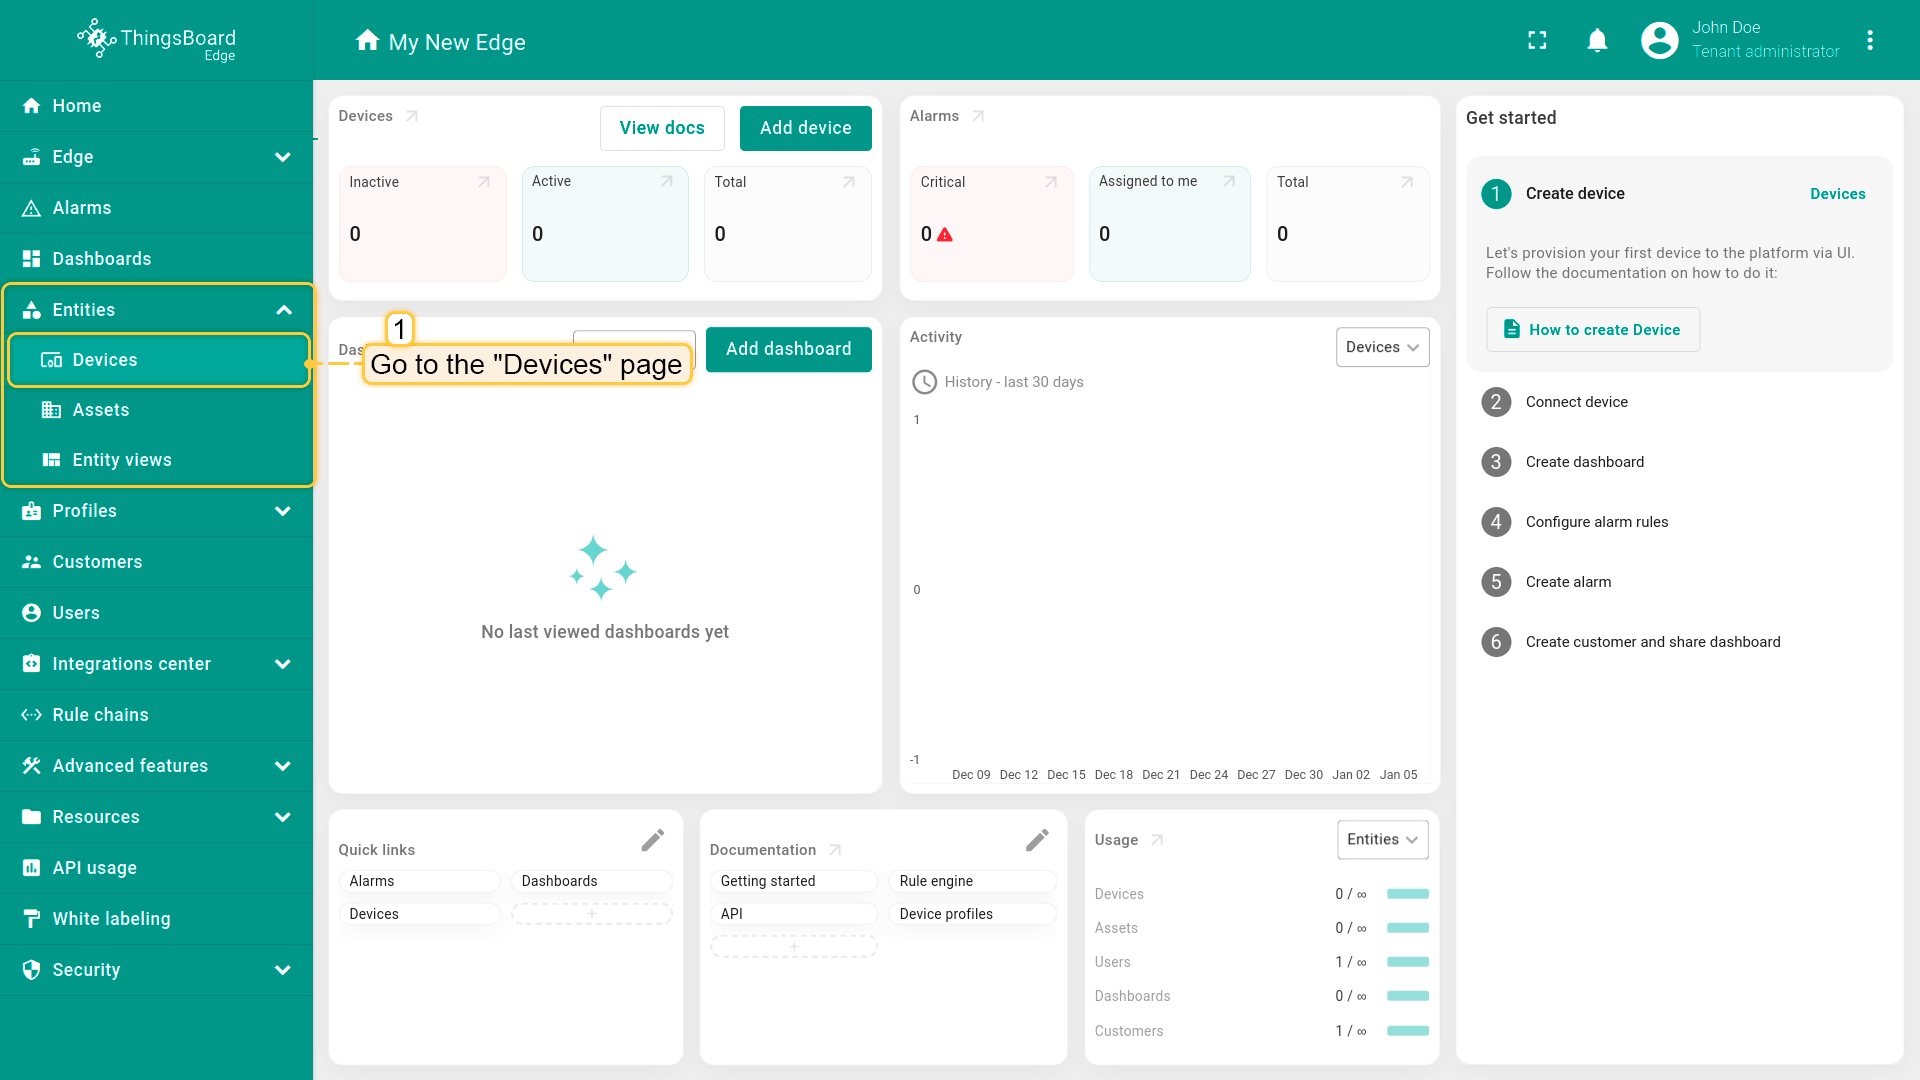
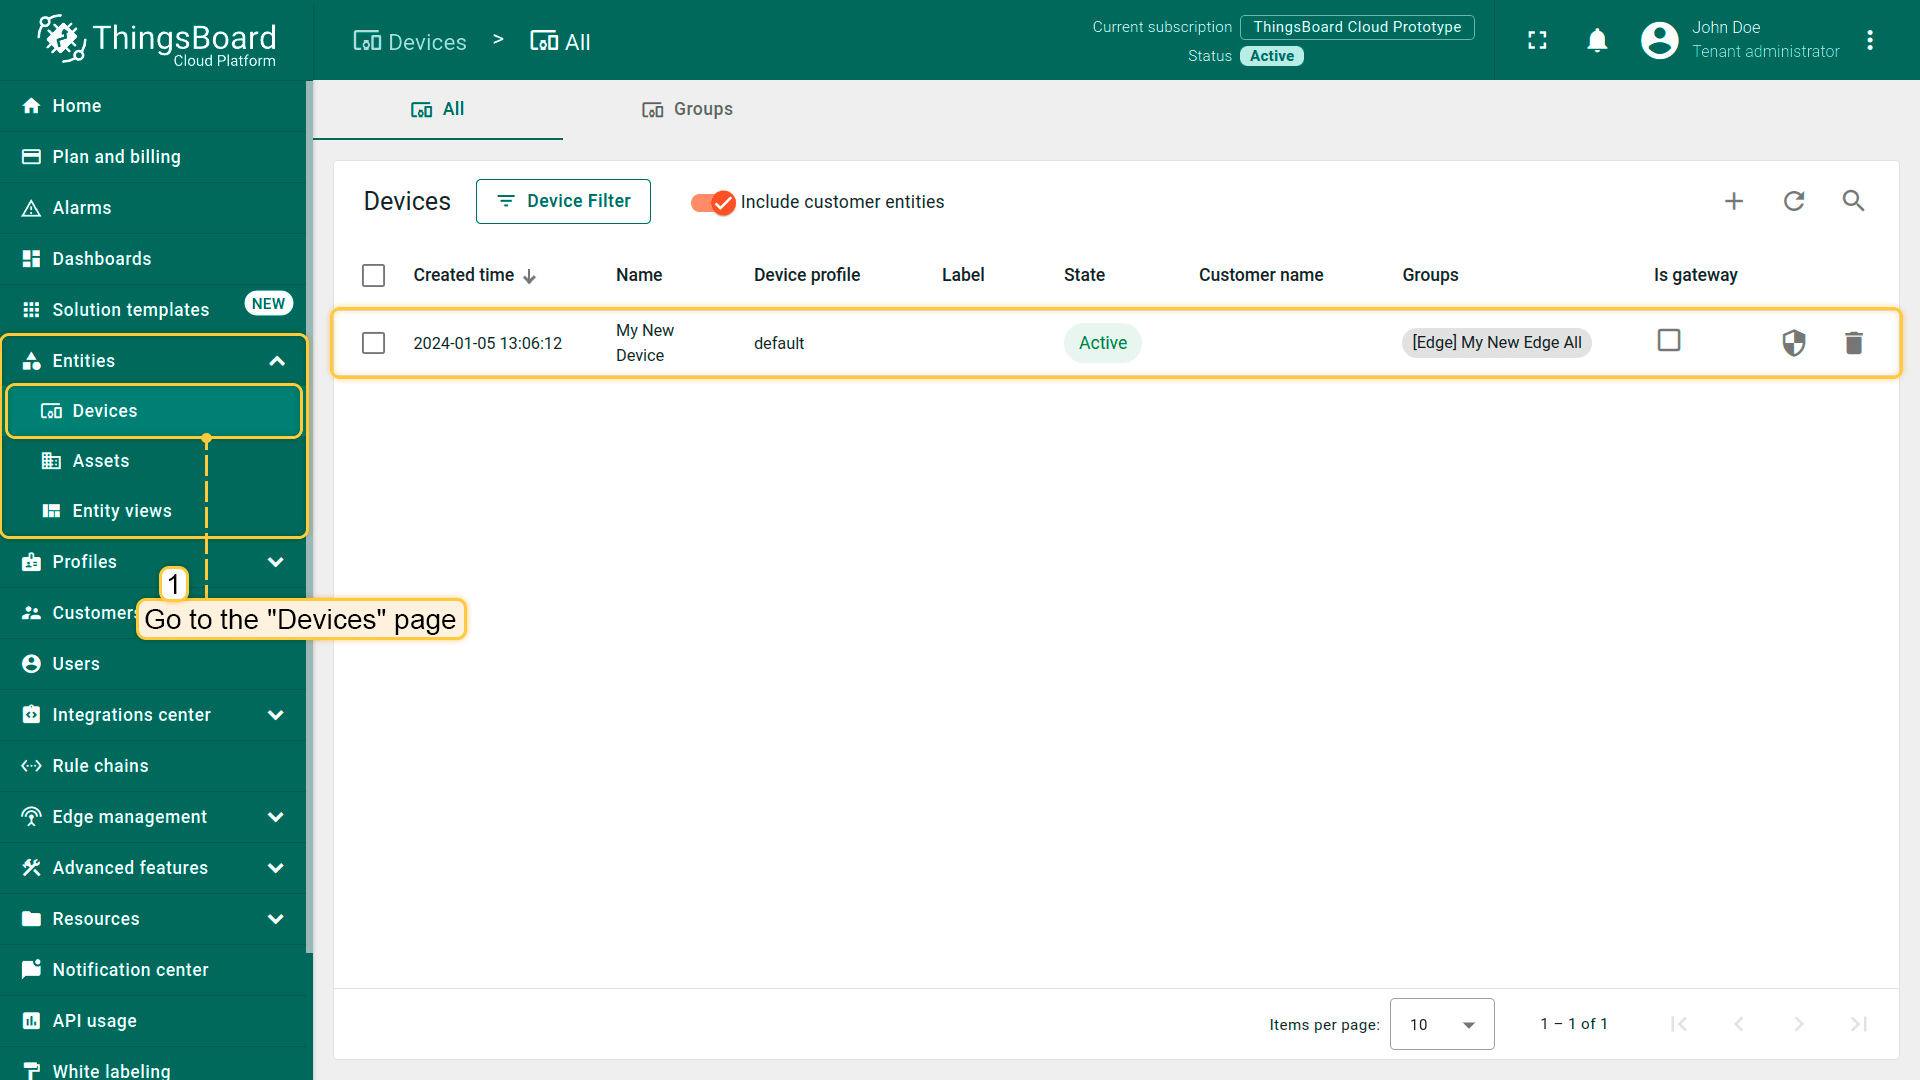
- Login to your Klyff Edge instance and navigate to the "Entities" section -> "Devices" page;
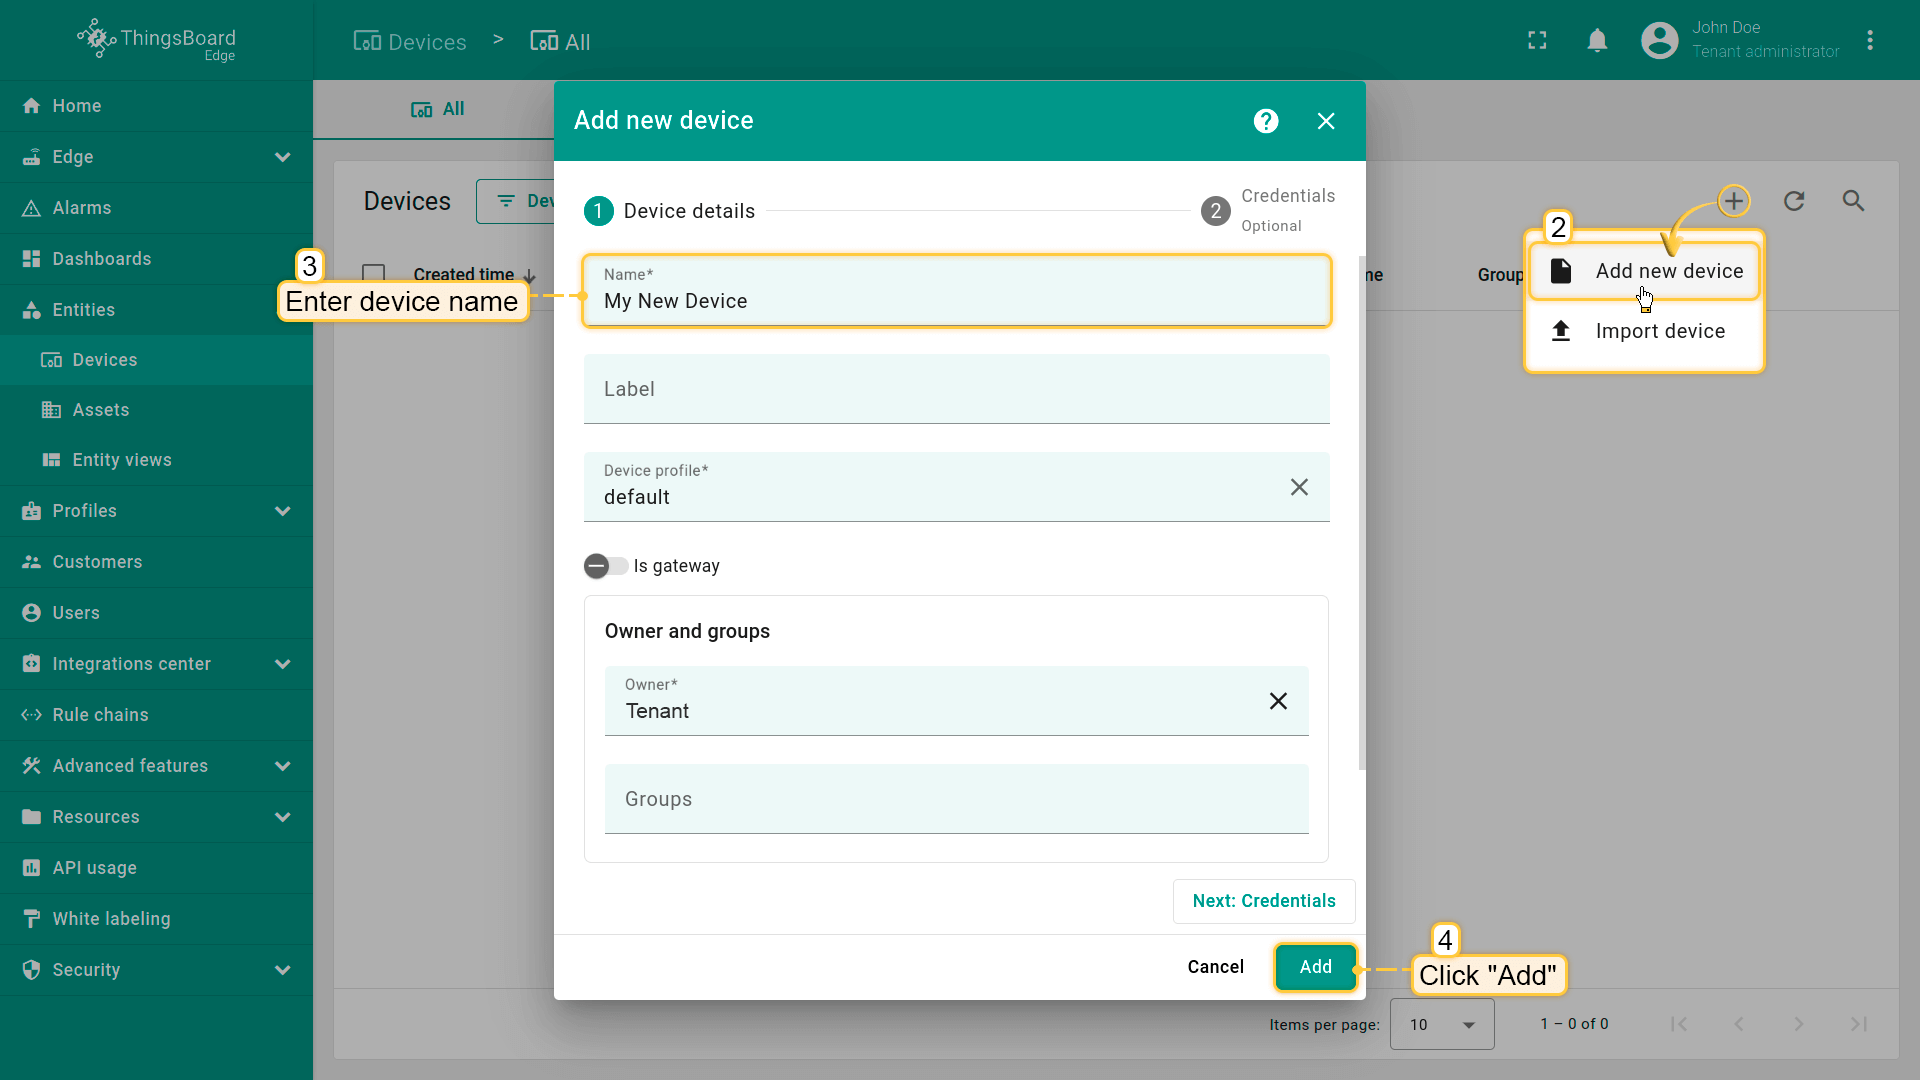
- Click on the "+" icon in the top right corner of the table and select "Add new device". Enter a name for the device, for example, "My New Device". No other changes are required at this time. Click "Add" to create the device;
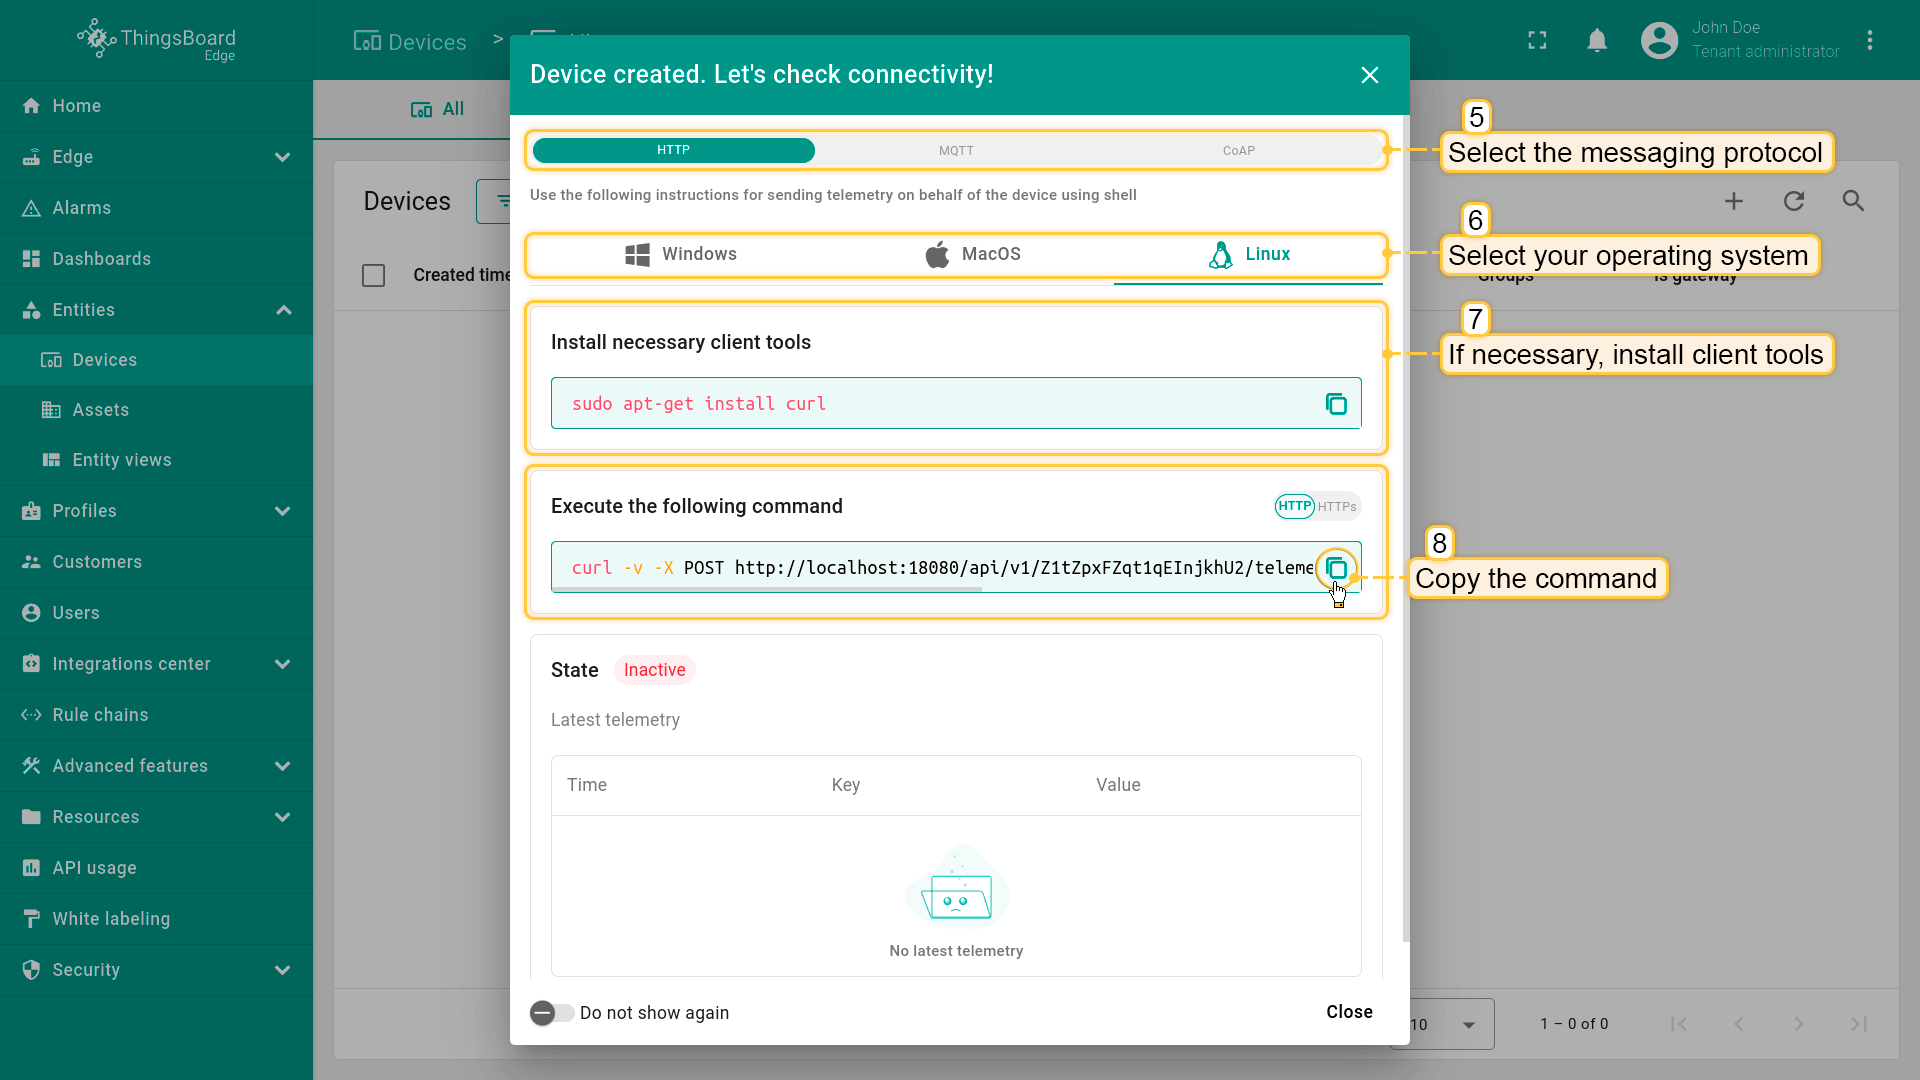
- The device is created. A window will open where you can check the device's connection to Klyff Edge. Select the messaging protocol and your operating system. Install the necessary client tools and copy the command;
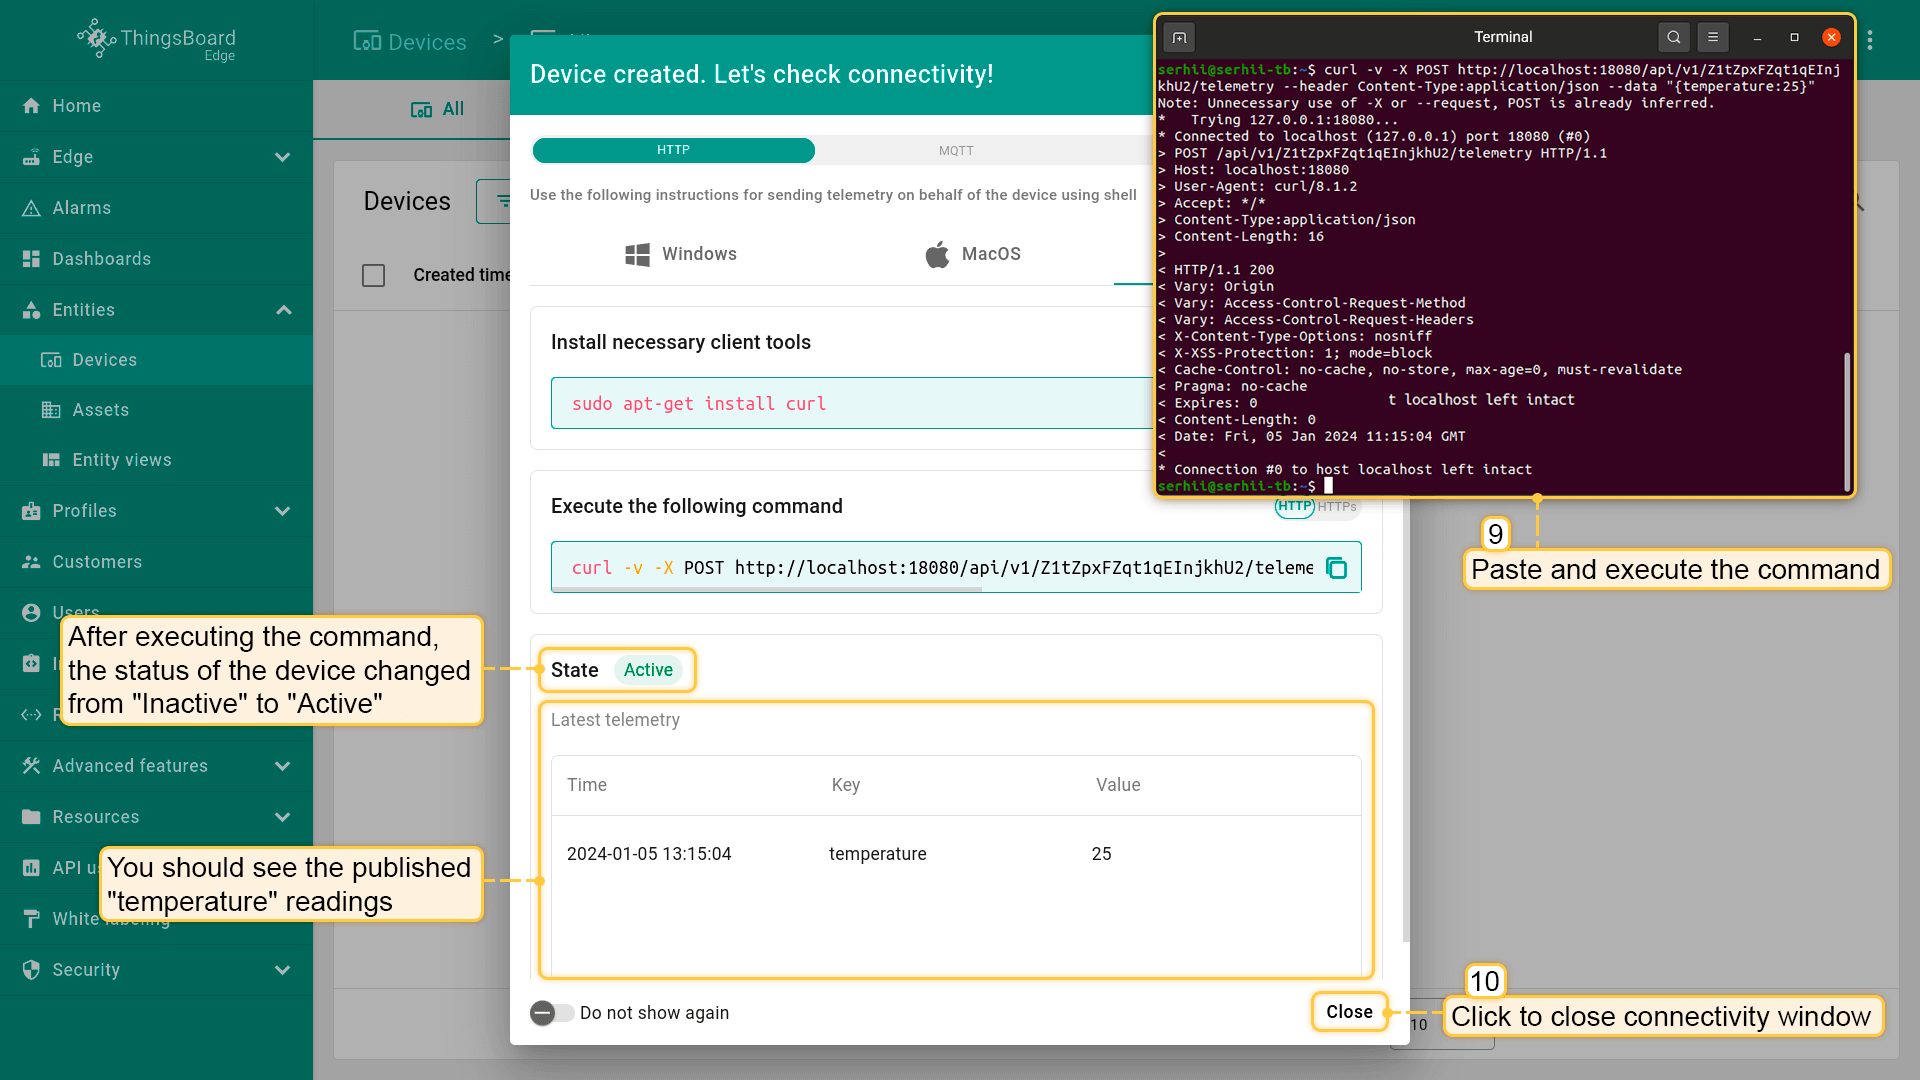
- Execute the previously copied command. Once you have successfully published the "temperature" readings, the device state should be changed from "Inactive" to "Active" and you should see the published "temperature" readings. Now, close the connectivity window;
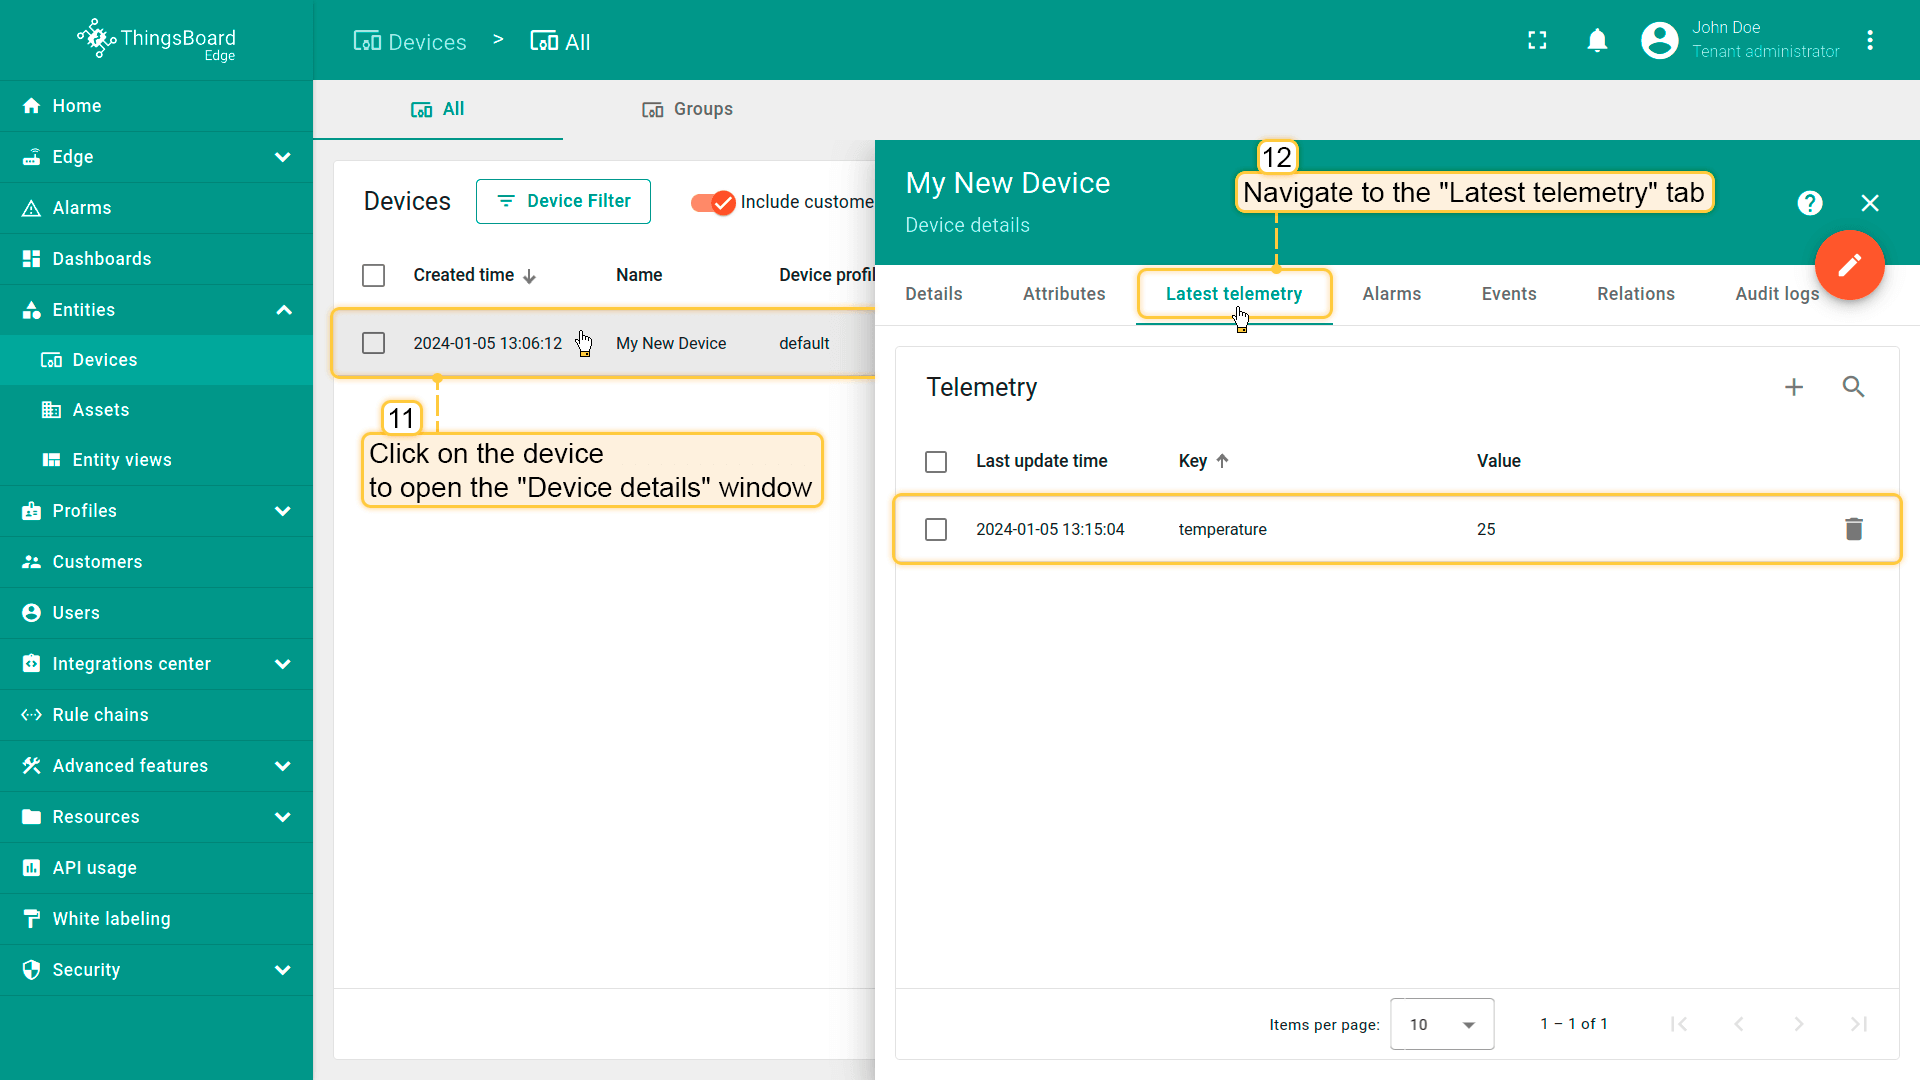
- Open the "Last Telemetry" tab in the device details to check the received telemetry.
You may also use:
- Bulk provisioning to provision multiple devices from a CSV file using UI;
- REST API to provision devices and other entities programmatically;
Step 2. Provision Device from Klyff Edge to Klyff Professional Edition Server
Device provisioning from the Edge to the Server is automatic, requiring no additional actions. Once a device is created on the Edge, it will be automatically published to the Klyff server.
To view the provisioned device, please open Klyff Professional Edition by visiting SERVER_URL.
- Log in to your Klyff Professional Edition instance and navigate to the "Devices" page. Confirm that the device "My New Device" has been created on the Klyff Community Edition cloud;
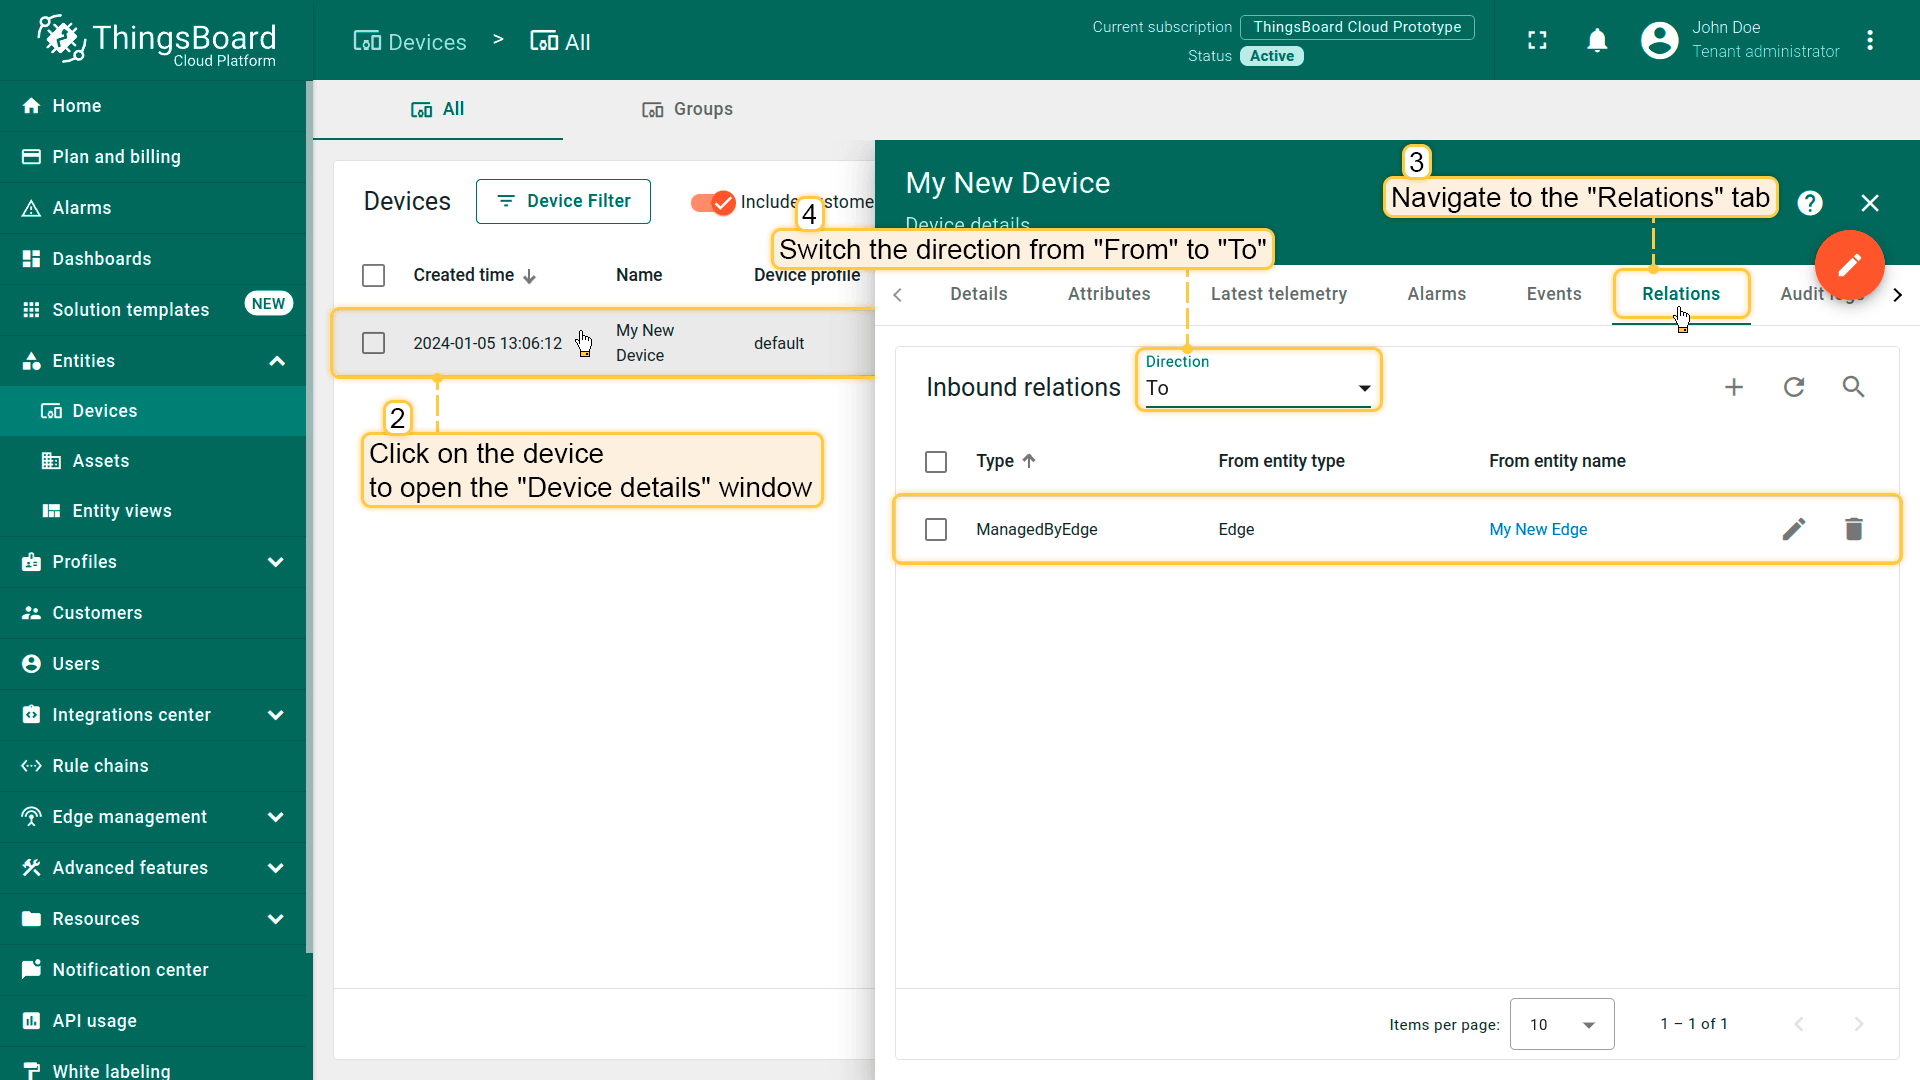
- Click om the "My New Device" to open "Device details" and navigate to the "Relations" tab. Switch the direction from "From" to "To" to view the relation to the Edge that provisioned this device.
Step 3. Push data from Klyff Edge to Klyff Professional Edition Server
Time series data and attributes are pushed to the Server according to the Edge Rule Chain Template. We will review the default Edge Root Rule Chain to understand how the temperature data is pushed from the Edge to the Server.
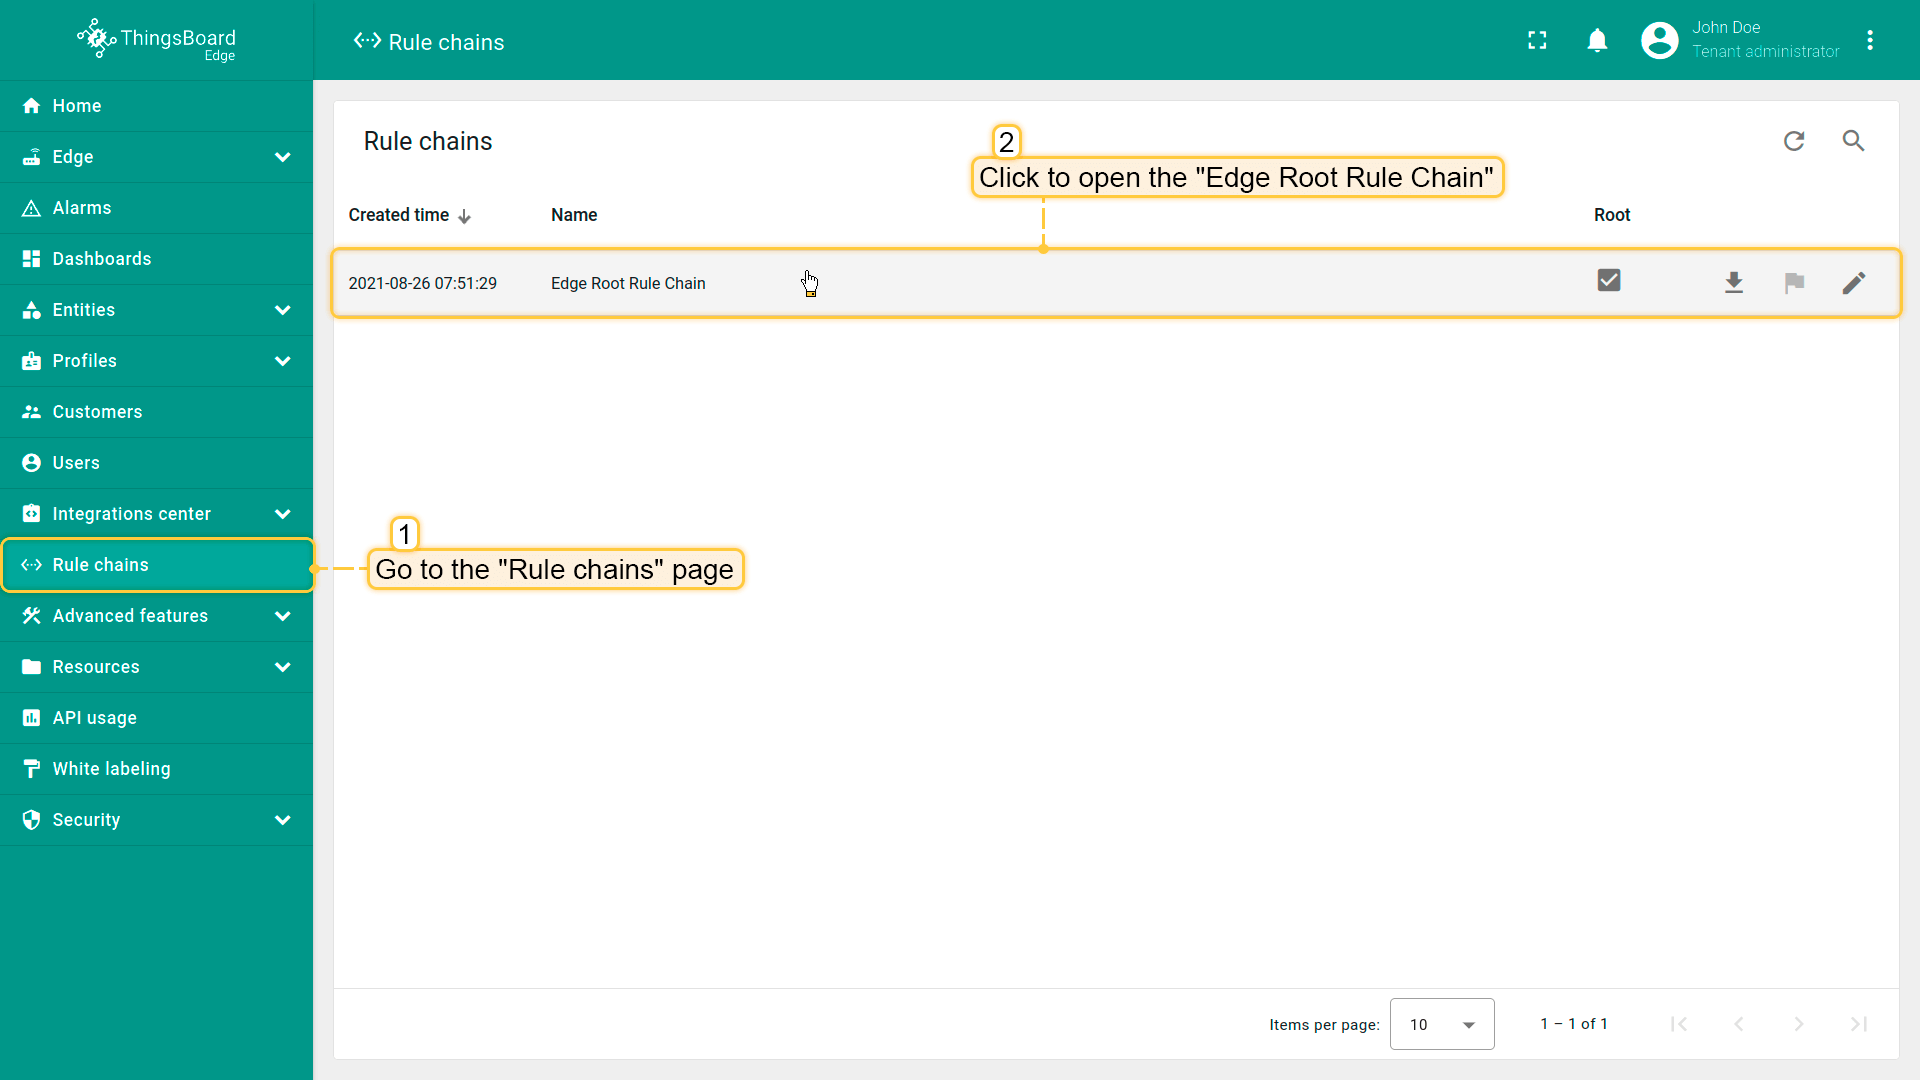
- Navigate to the "Rule Chains" page within your Klyff Edge instance and open the "Edge Root Rule Chain".
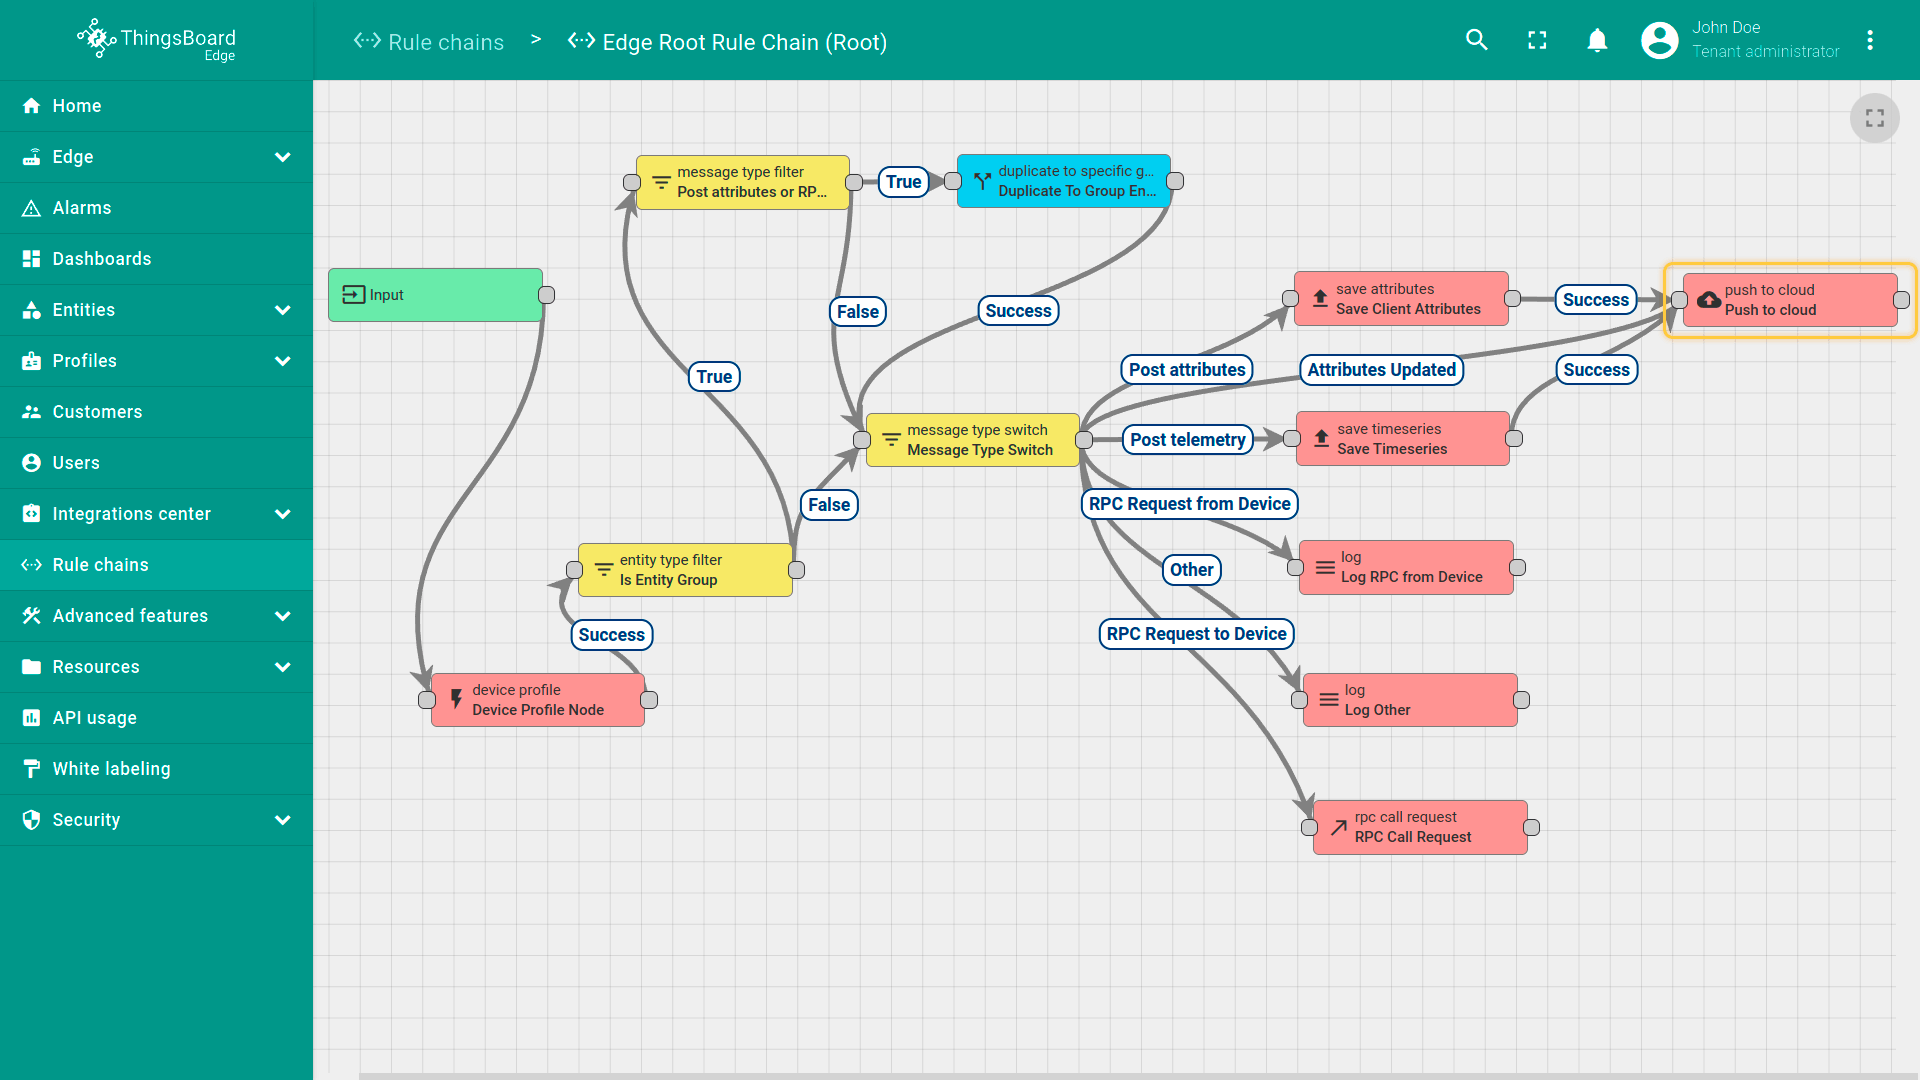
- The Push to Cloud rule node will transmit temperature time series data to the cloud once it has been stored in the local database.
Step 4. Create And Configure Dashboard
We will create a dashboard on the Klyff Community Edition server, and add both a table and a chart widget to view temperature data on the Server and on the Edge. Please see the instructions below.
To add the table widget, select it from the widget library, where widgets are organized into bundles. Each widget is associated with a data source, which determines the data it displays.
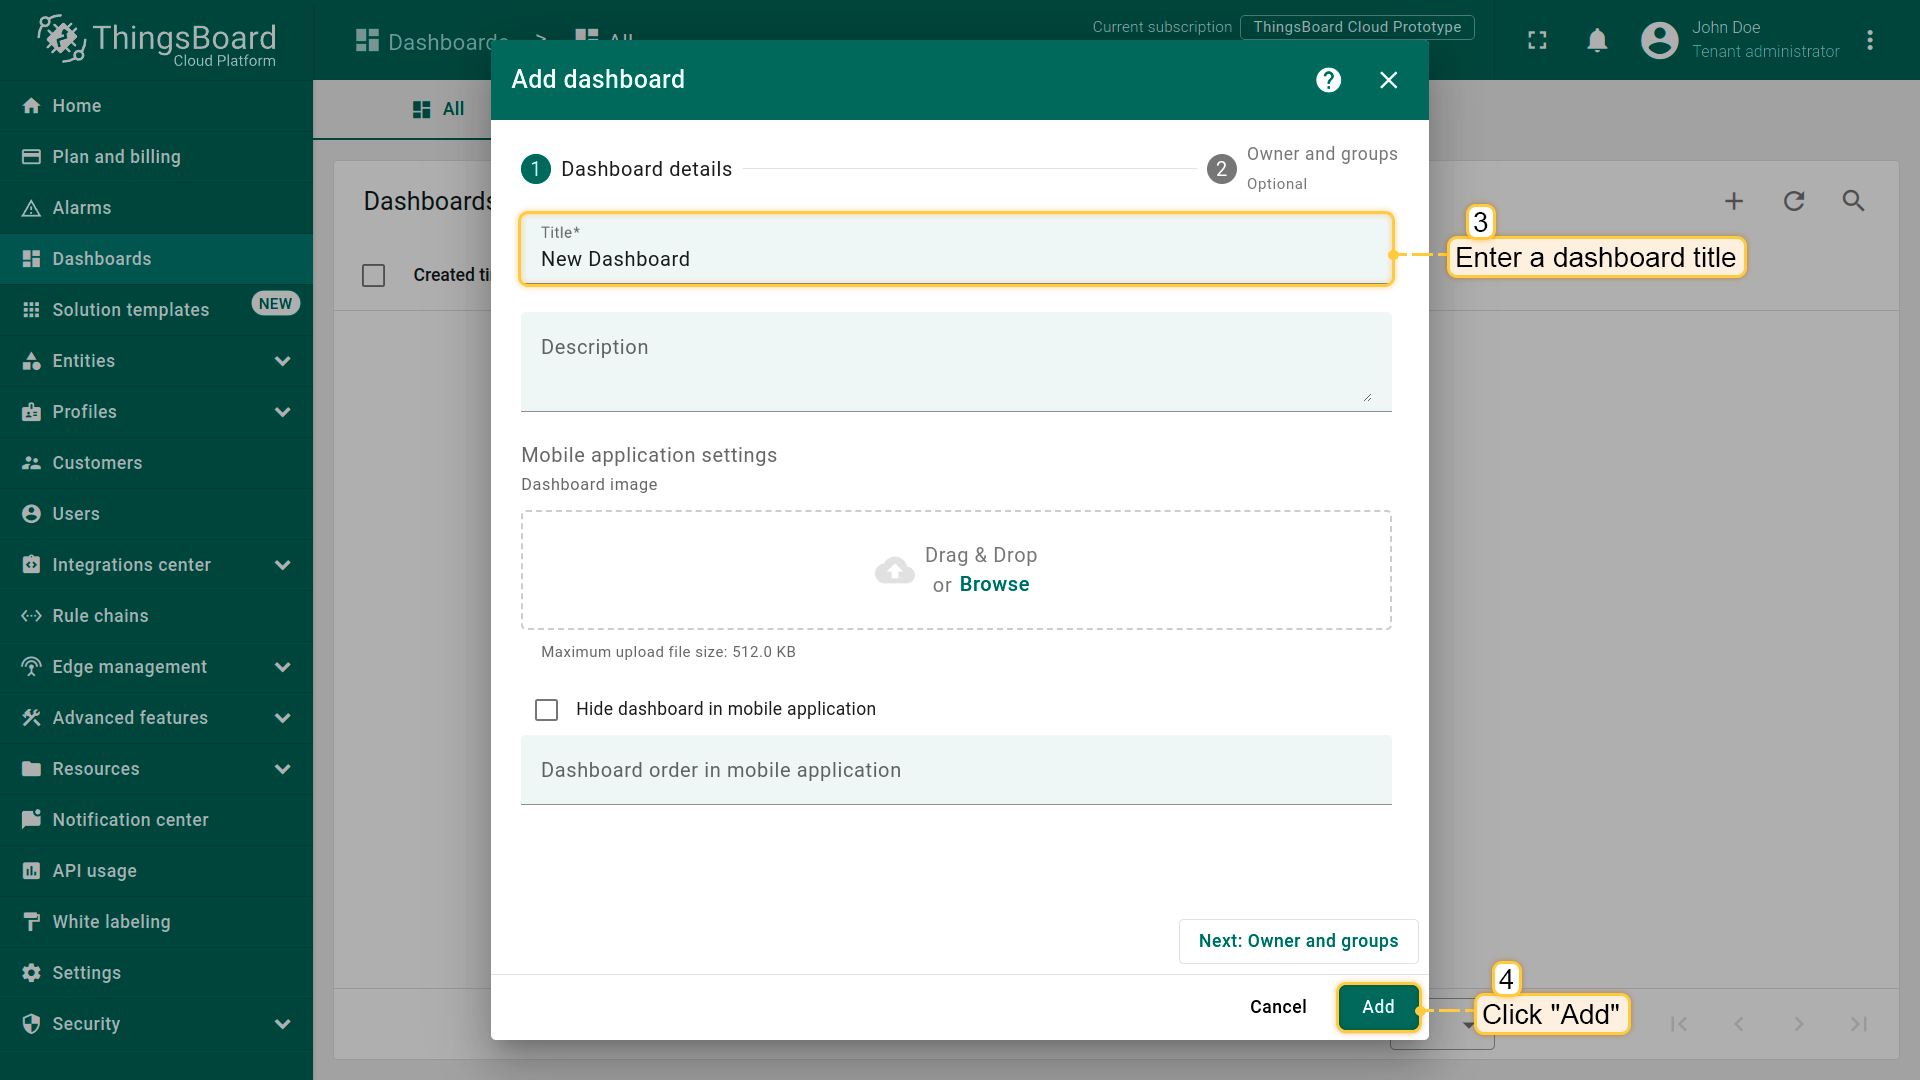
- Navigate to the "Dashboards" page through the main menu on the left of the screen. Then, click the "+" sign in the upper right corner of the screen, and select "Create new dashboard" from the drop-down menu;
- Input the dashboard name, for example, "New Dashboard", and click "Add" to create the dashboard;
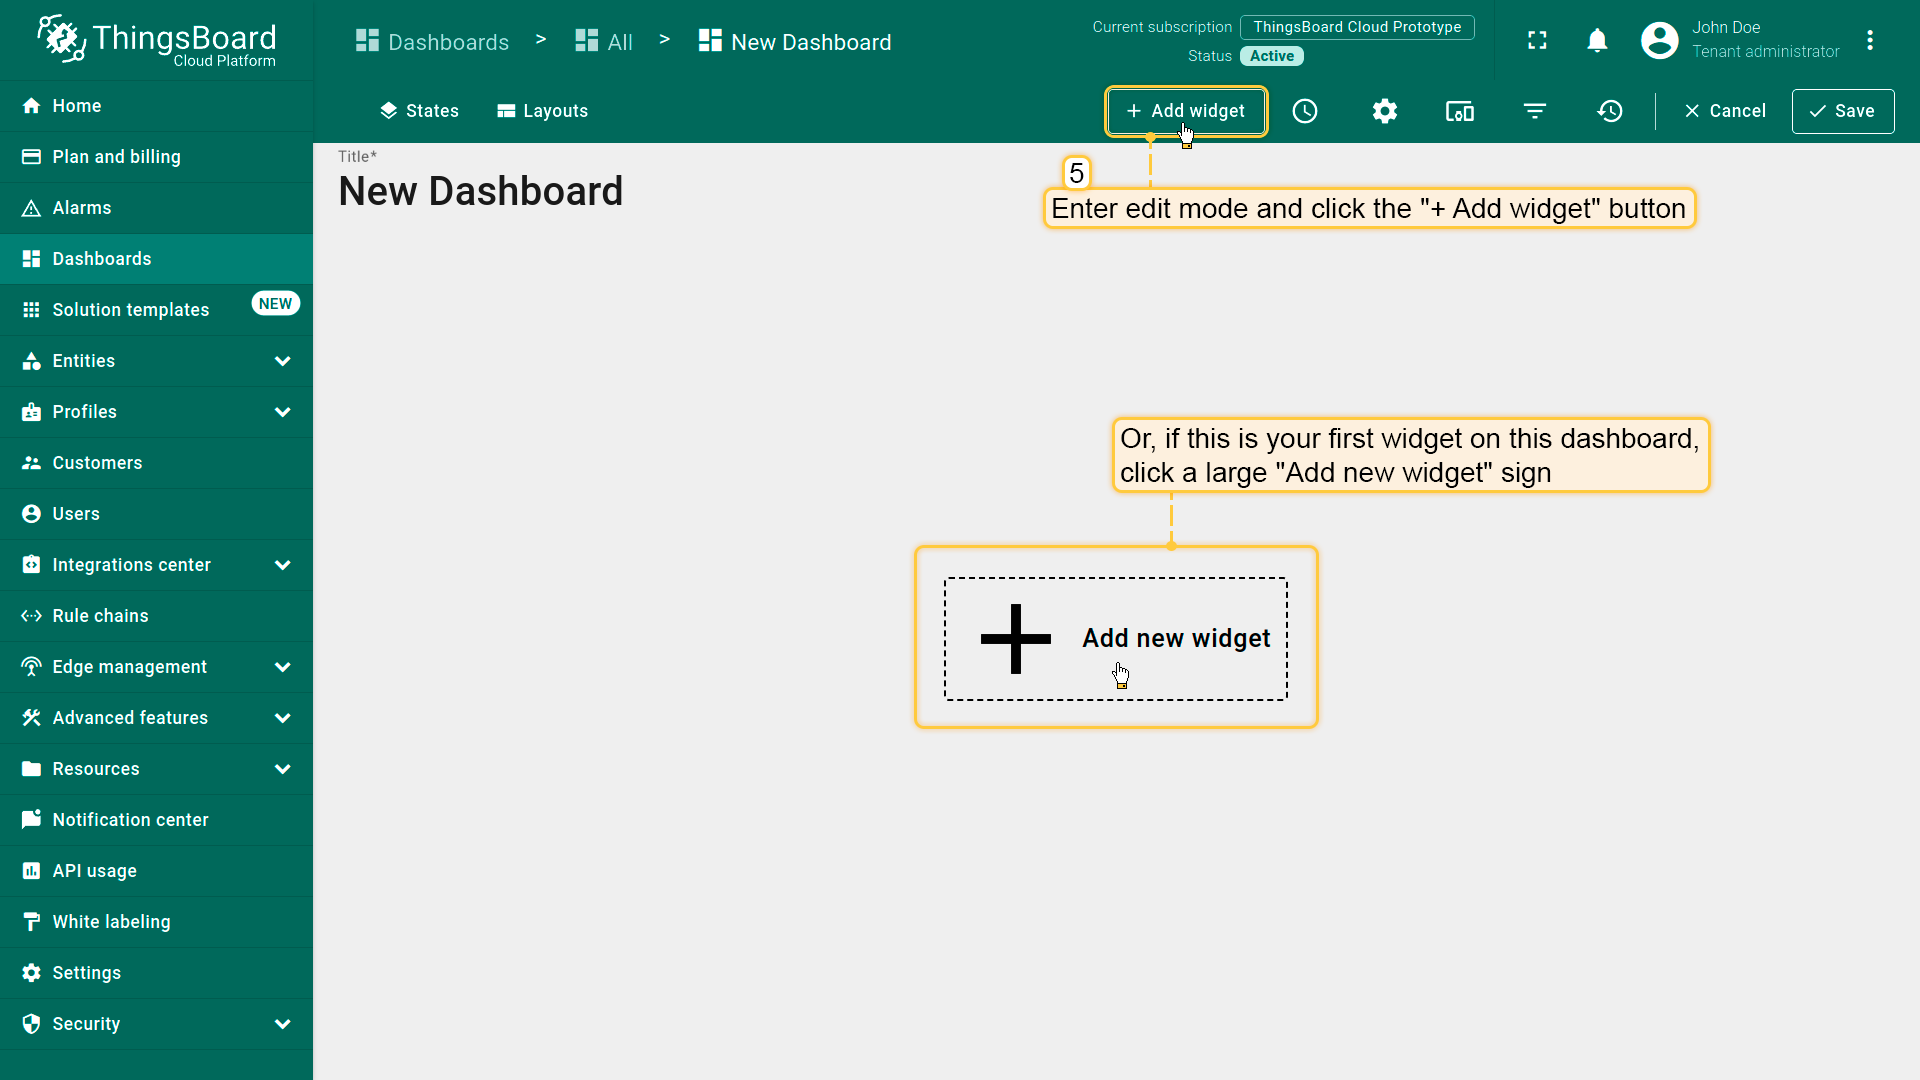
- Click the "Add widget" button at the top of the screen or click the large "Add new widget" icon in the center of the screen (if this is your first widget on this dashboard);
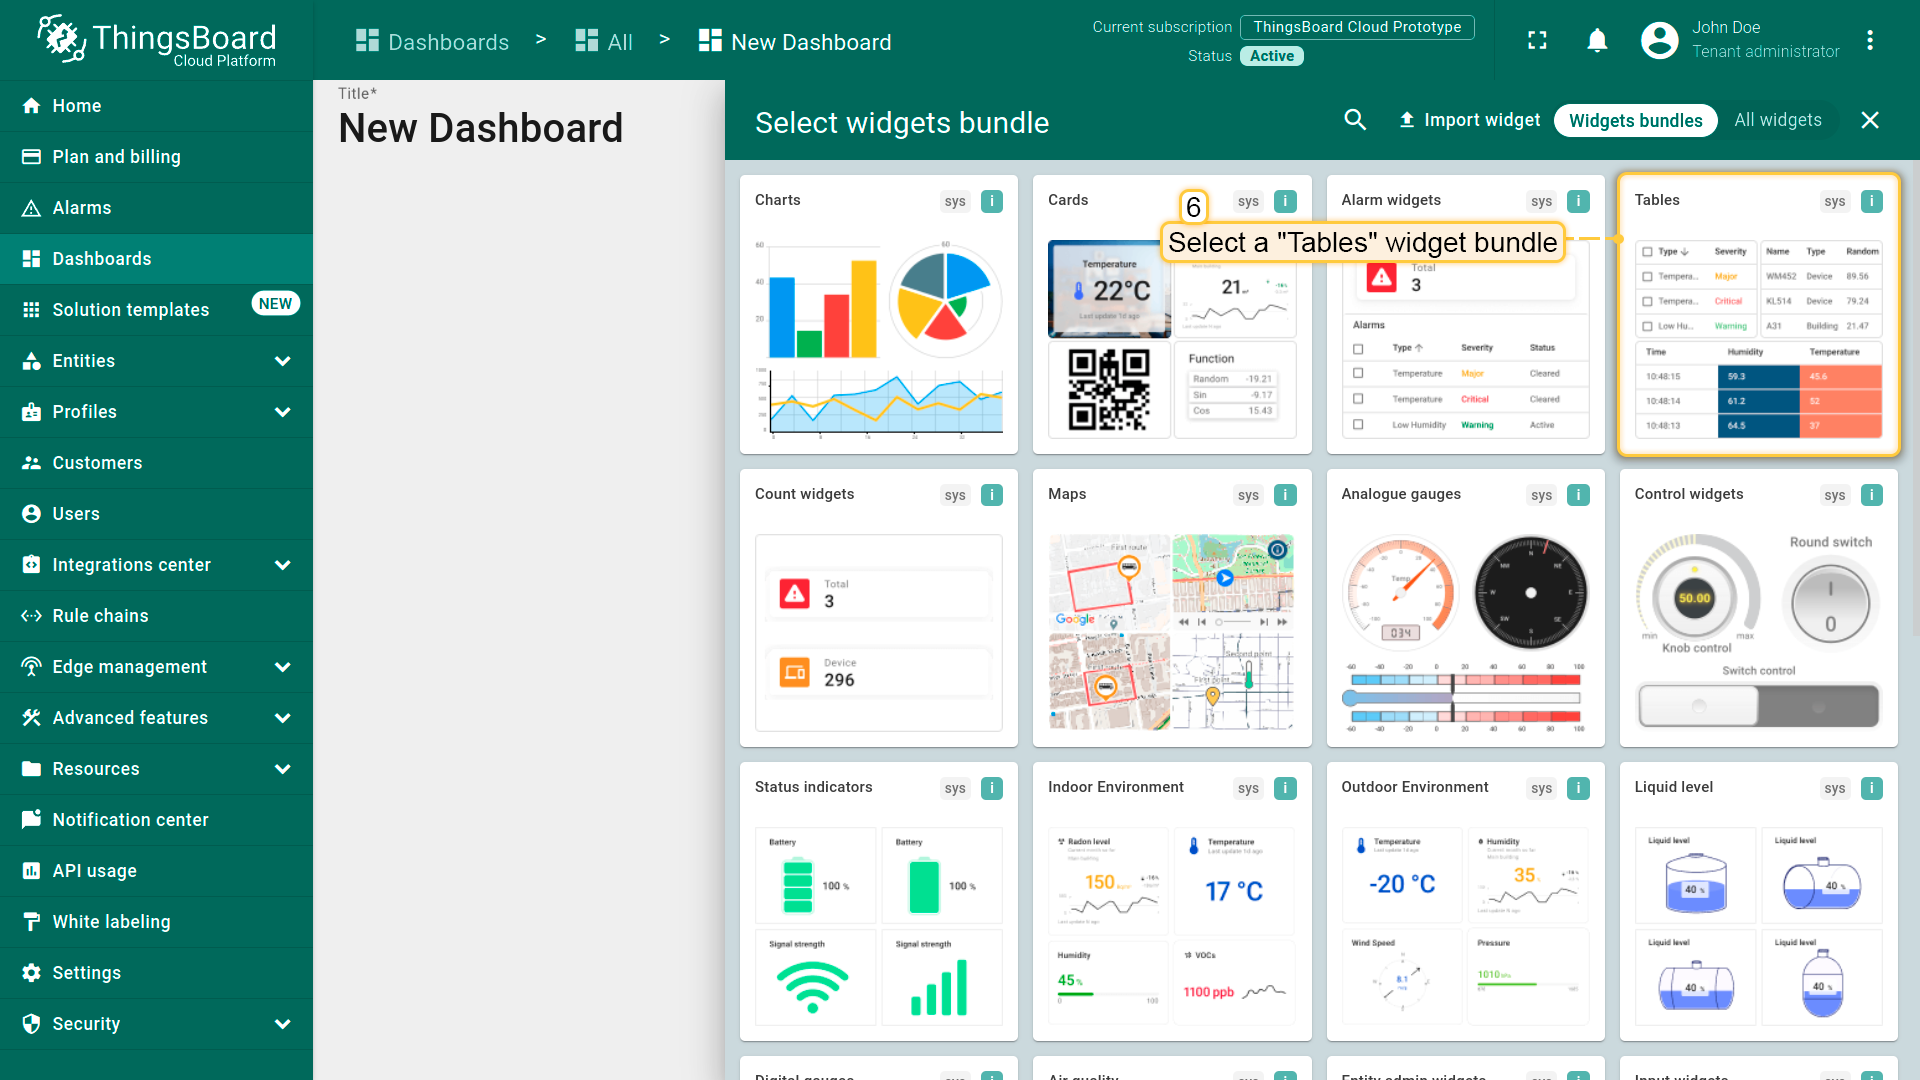
- Locate "Tables" in the list of widgets bundles and select this menu item;
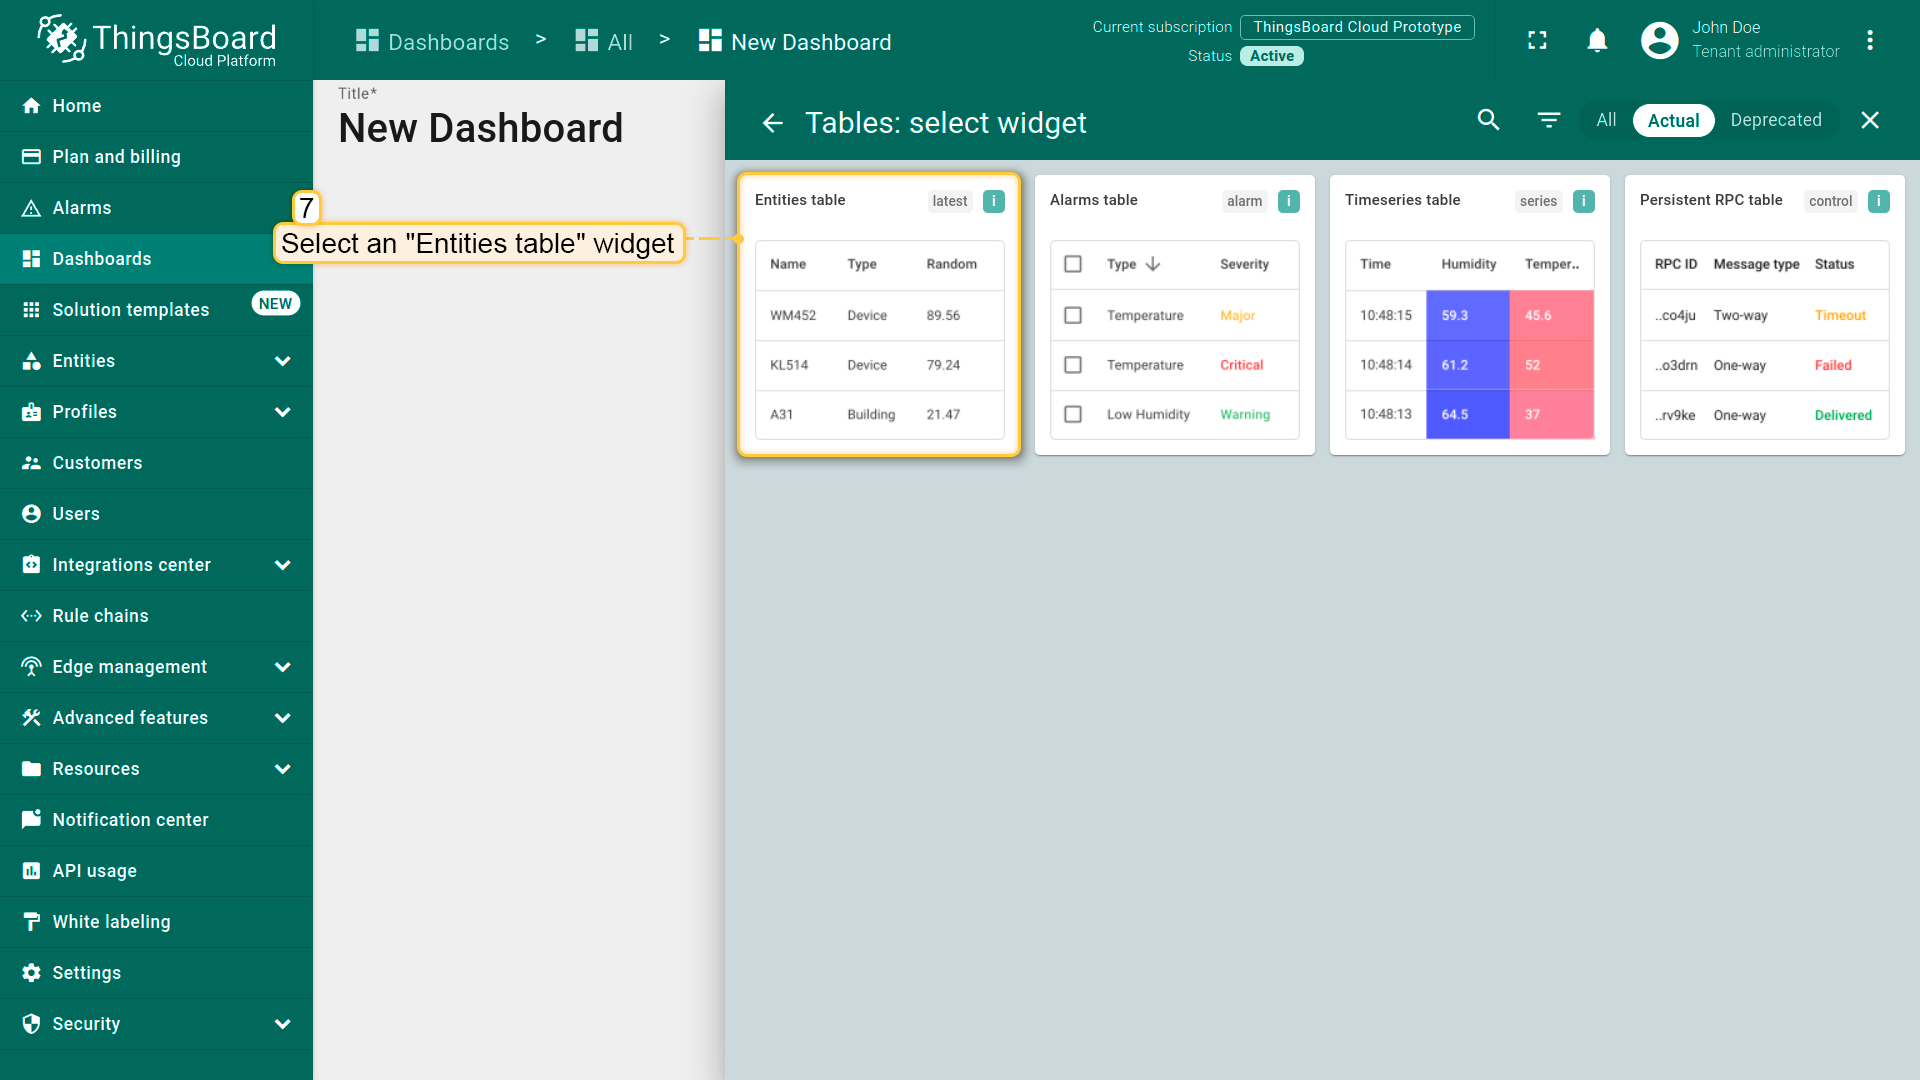
- Locate and select the "Entities table" widget;
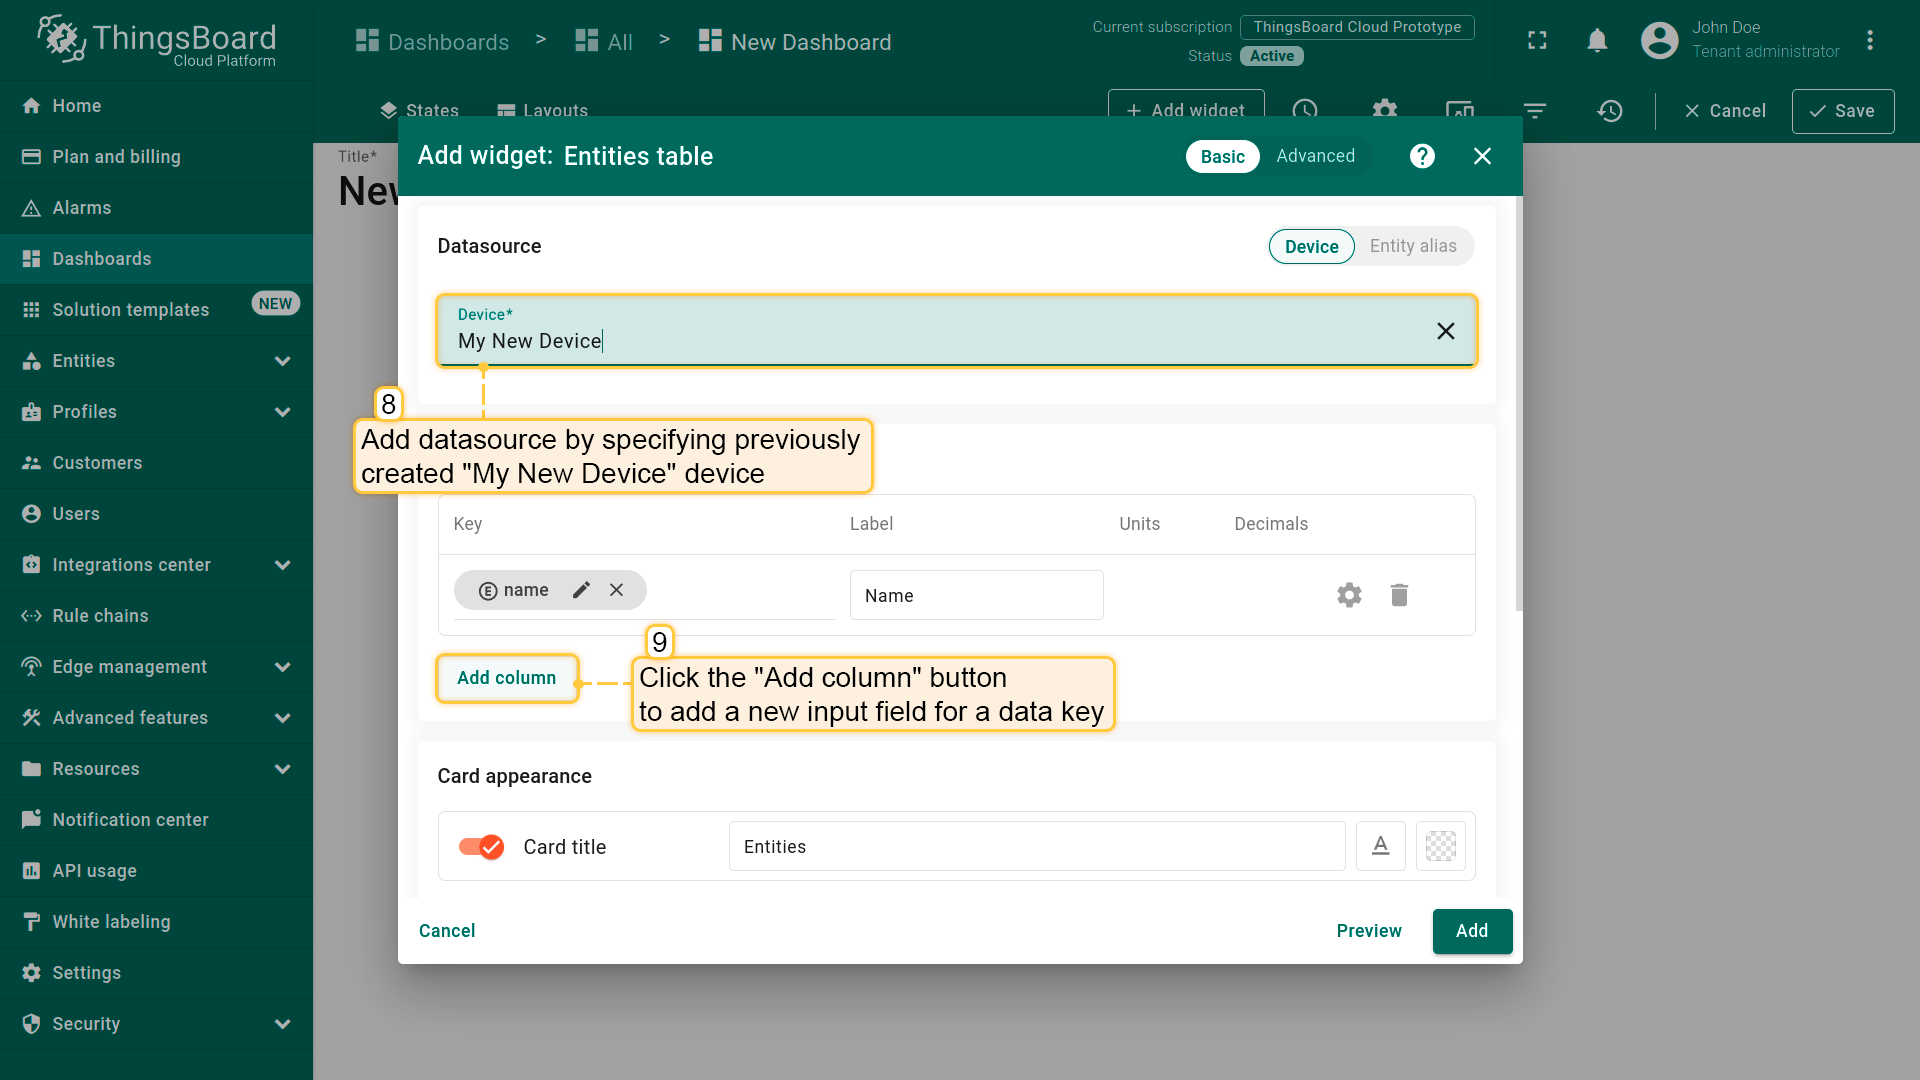
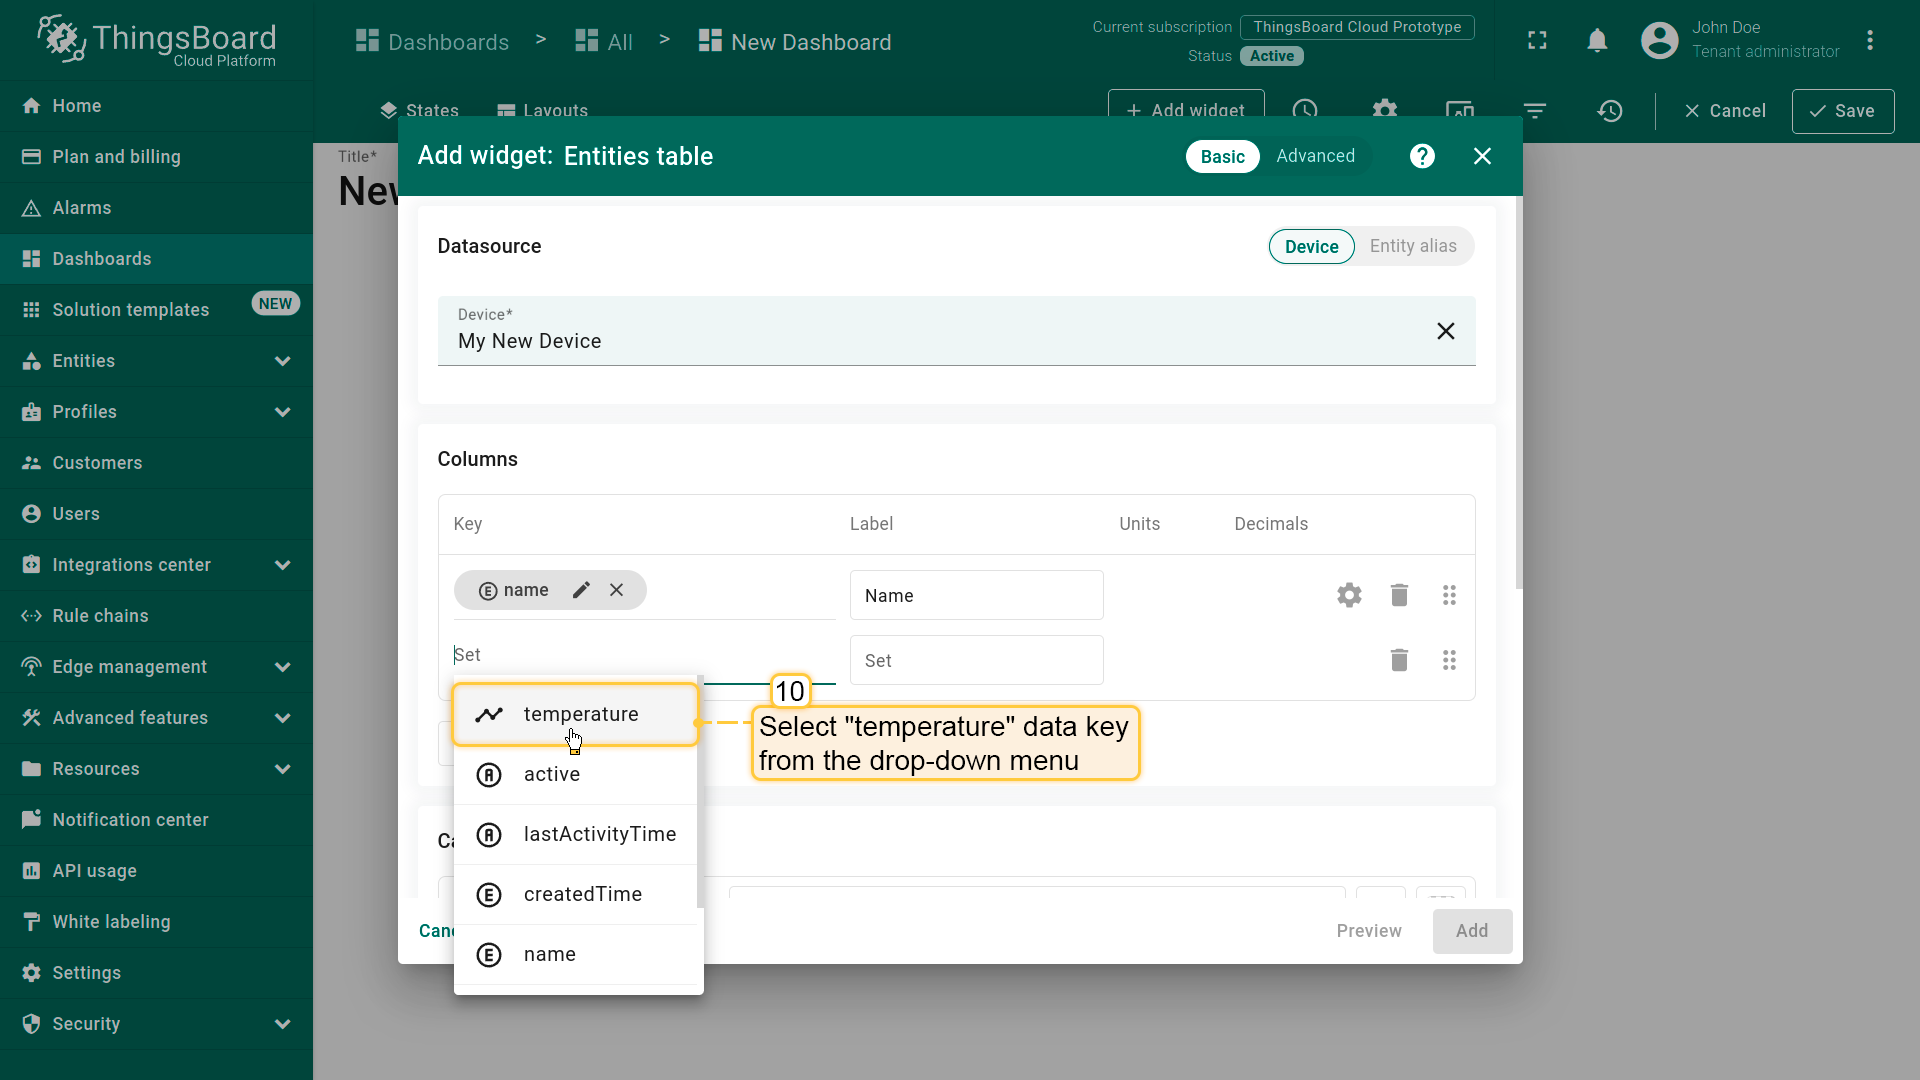
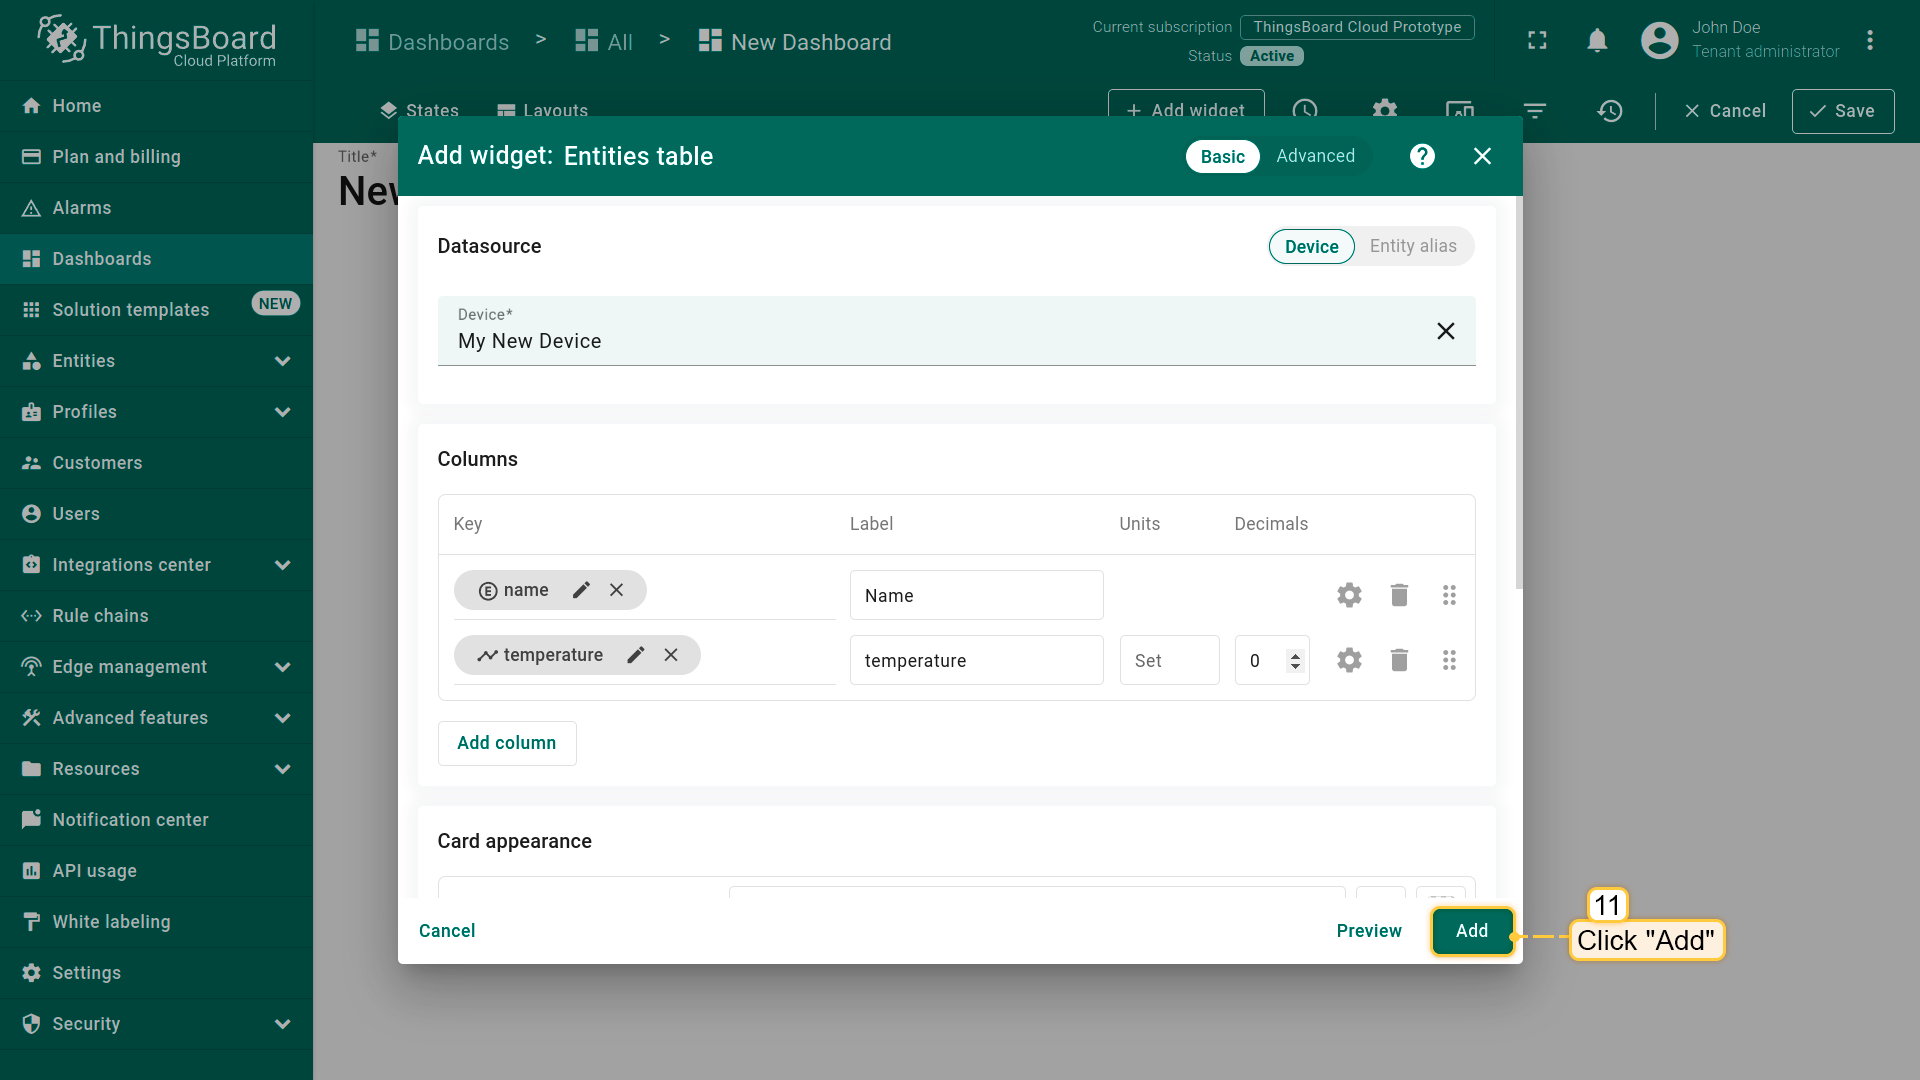
- The "Add Widget" window will appear. Specify the previously created device "My New Device" in the "Device" field. The “name” key has already been added to the “Columns” section, which is responsible for the column with the device name. You need to add another column that will display the value of the "temperature" key. To do this, click "Add column" to add a new field to enter the data key;
- Click on the newly appeared data key input field. A list of available data keys will open. Select "temperature" data key;
- Click the "Add" button in the bottom right corner of the widget to complete adding the widget;
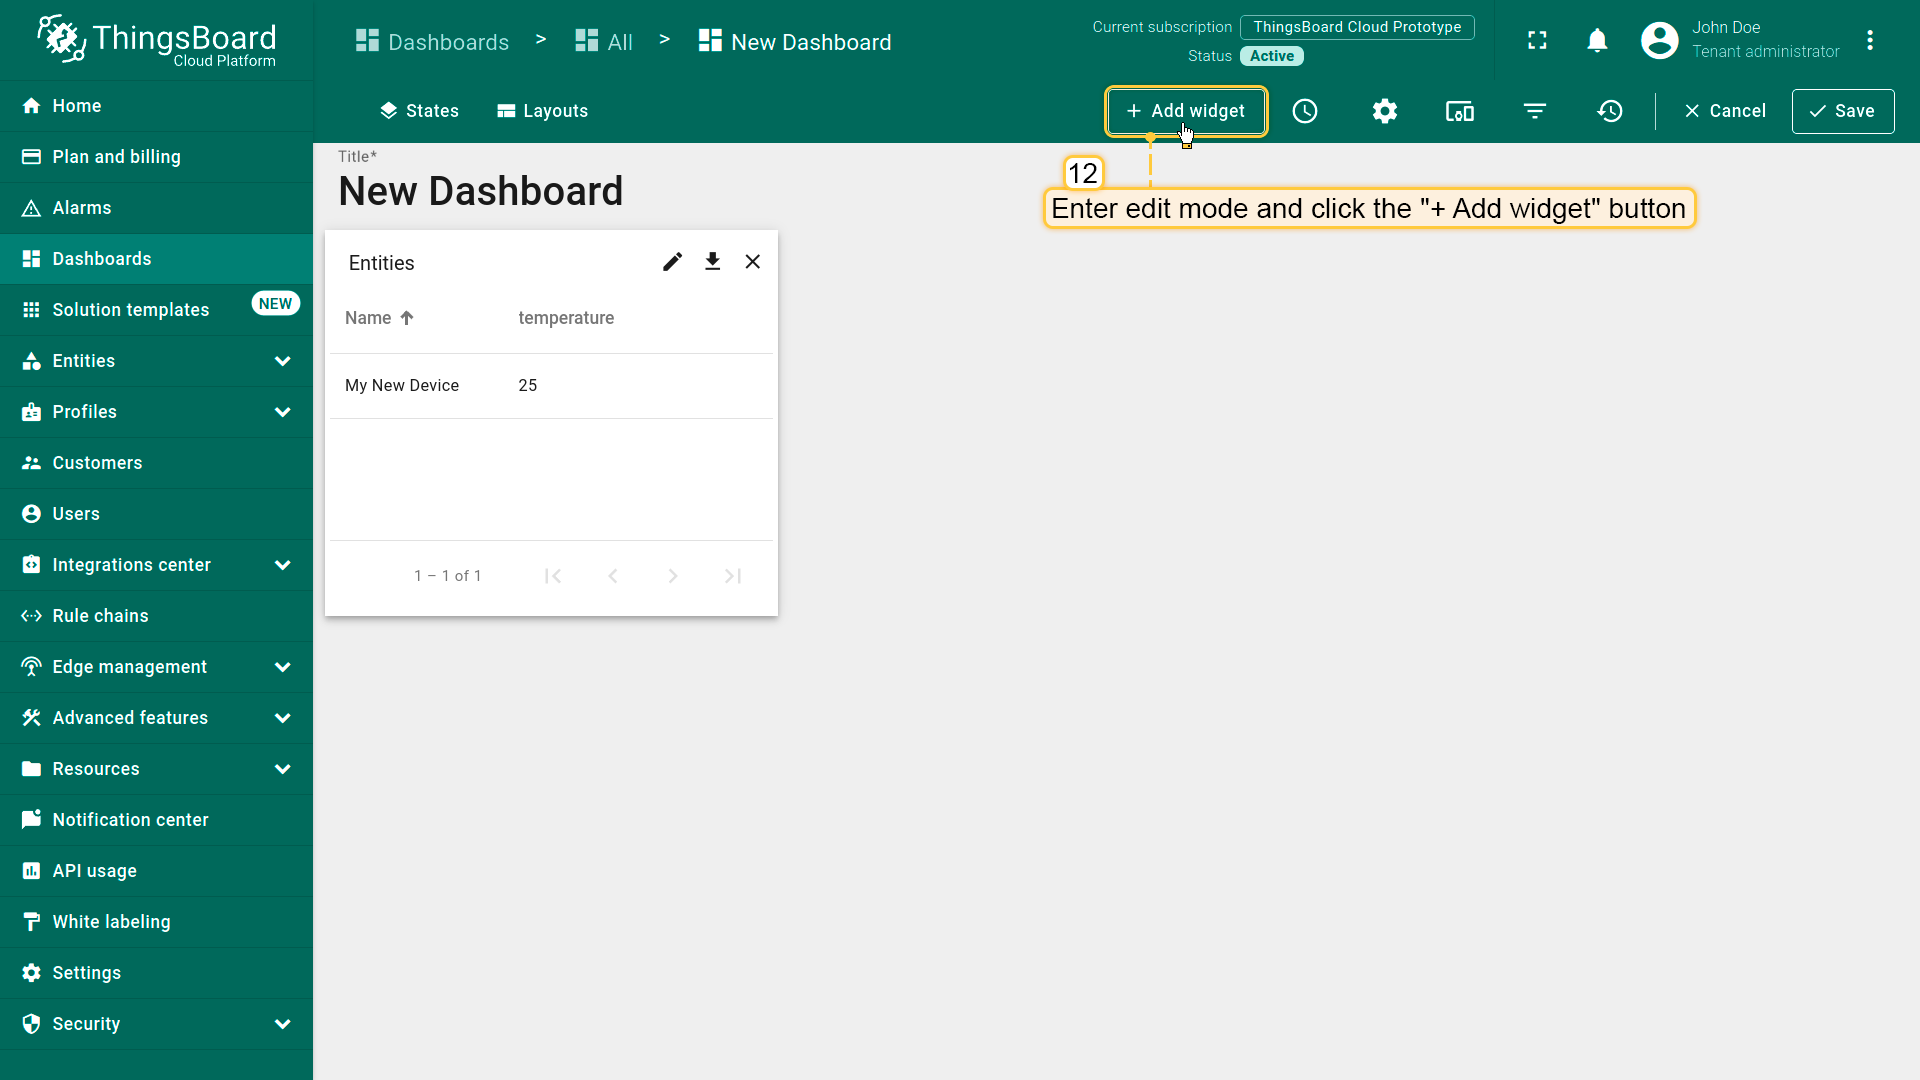
- The "Entities table" has been added, and "My New Device" is displayed in the list. Let's add another widget. Click the "Add widget" button;
- Find "Charts" in the list of widgets bundles and click on this menu item;
- Locate and click on the "Time series Line Chart" widget;
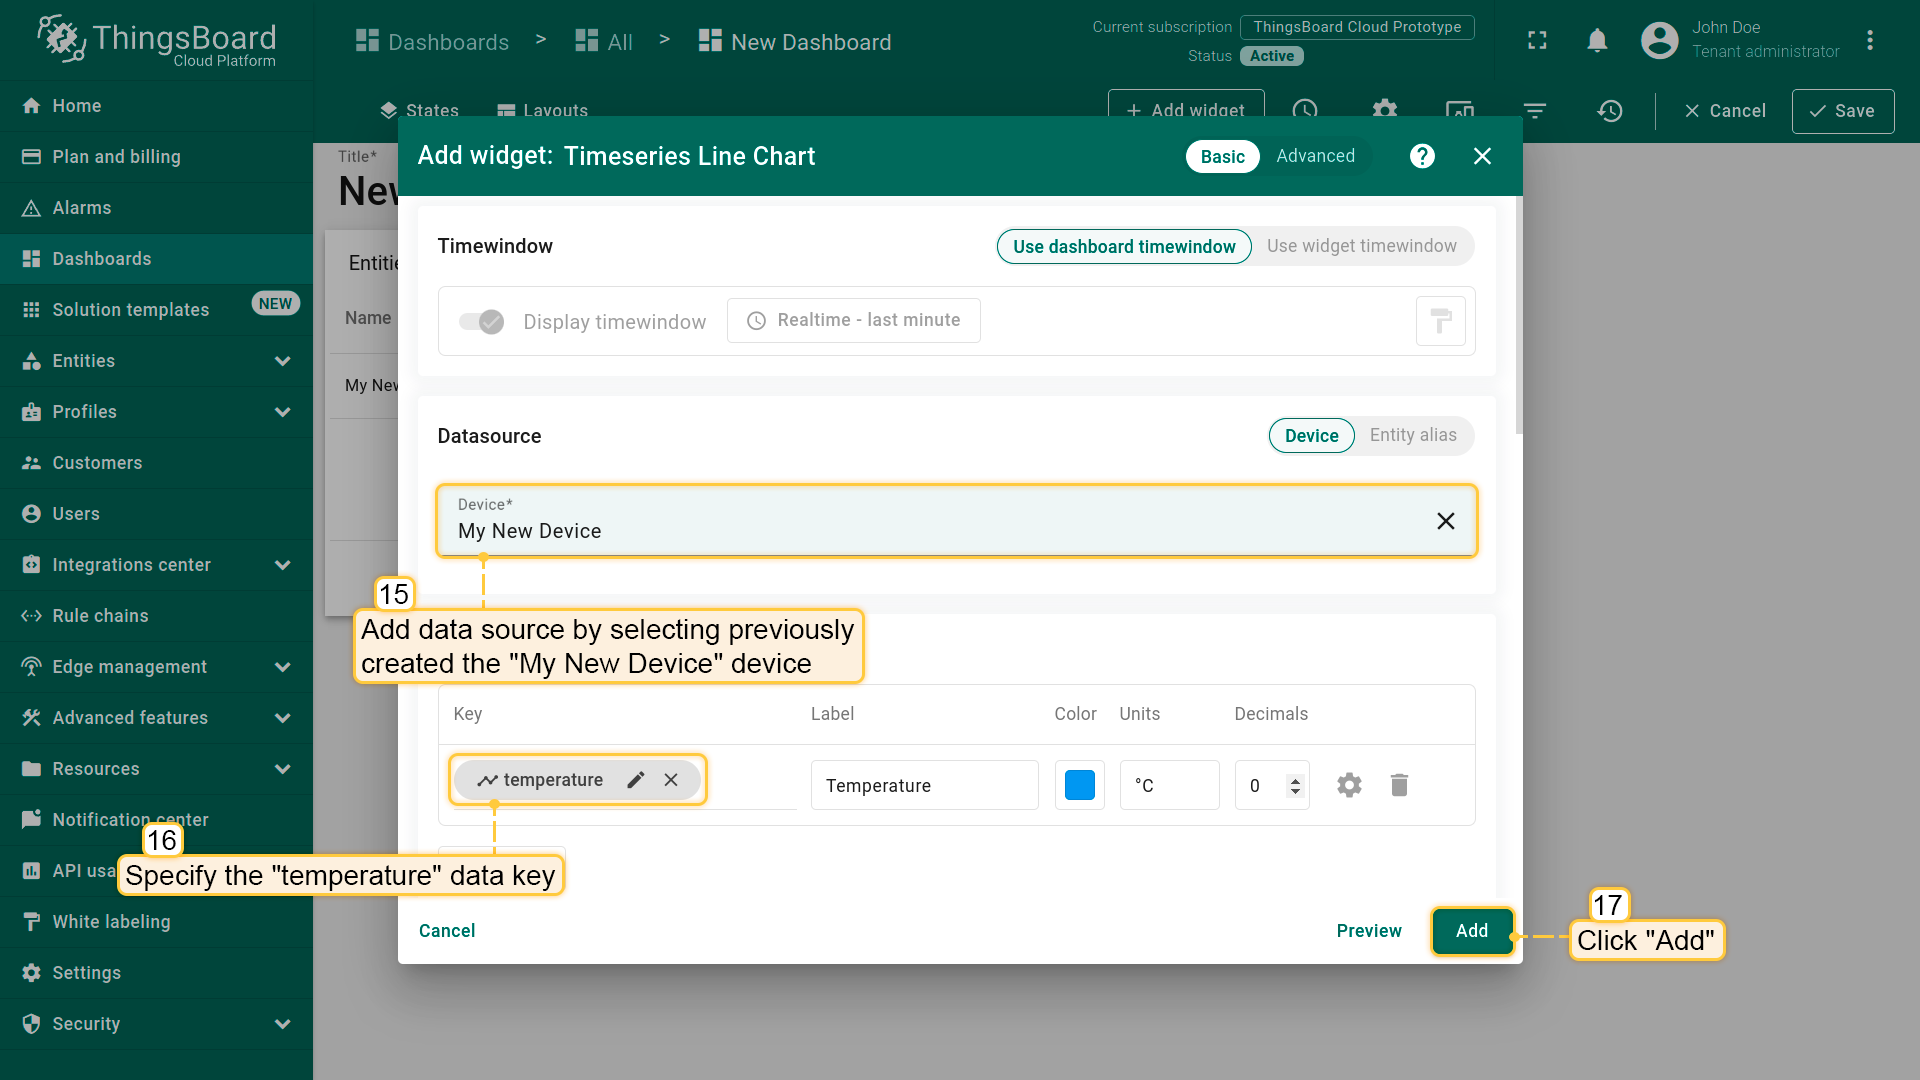
- From the devices list, select "My New Device" and click "Add" button;
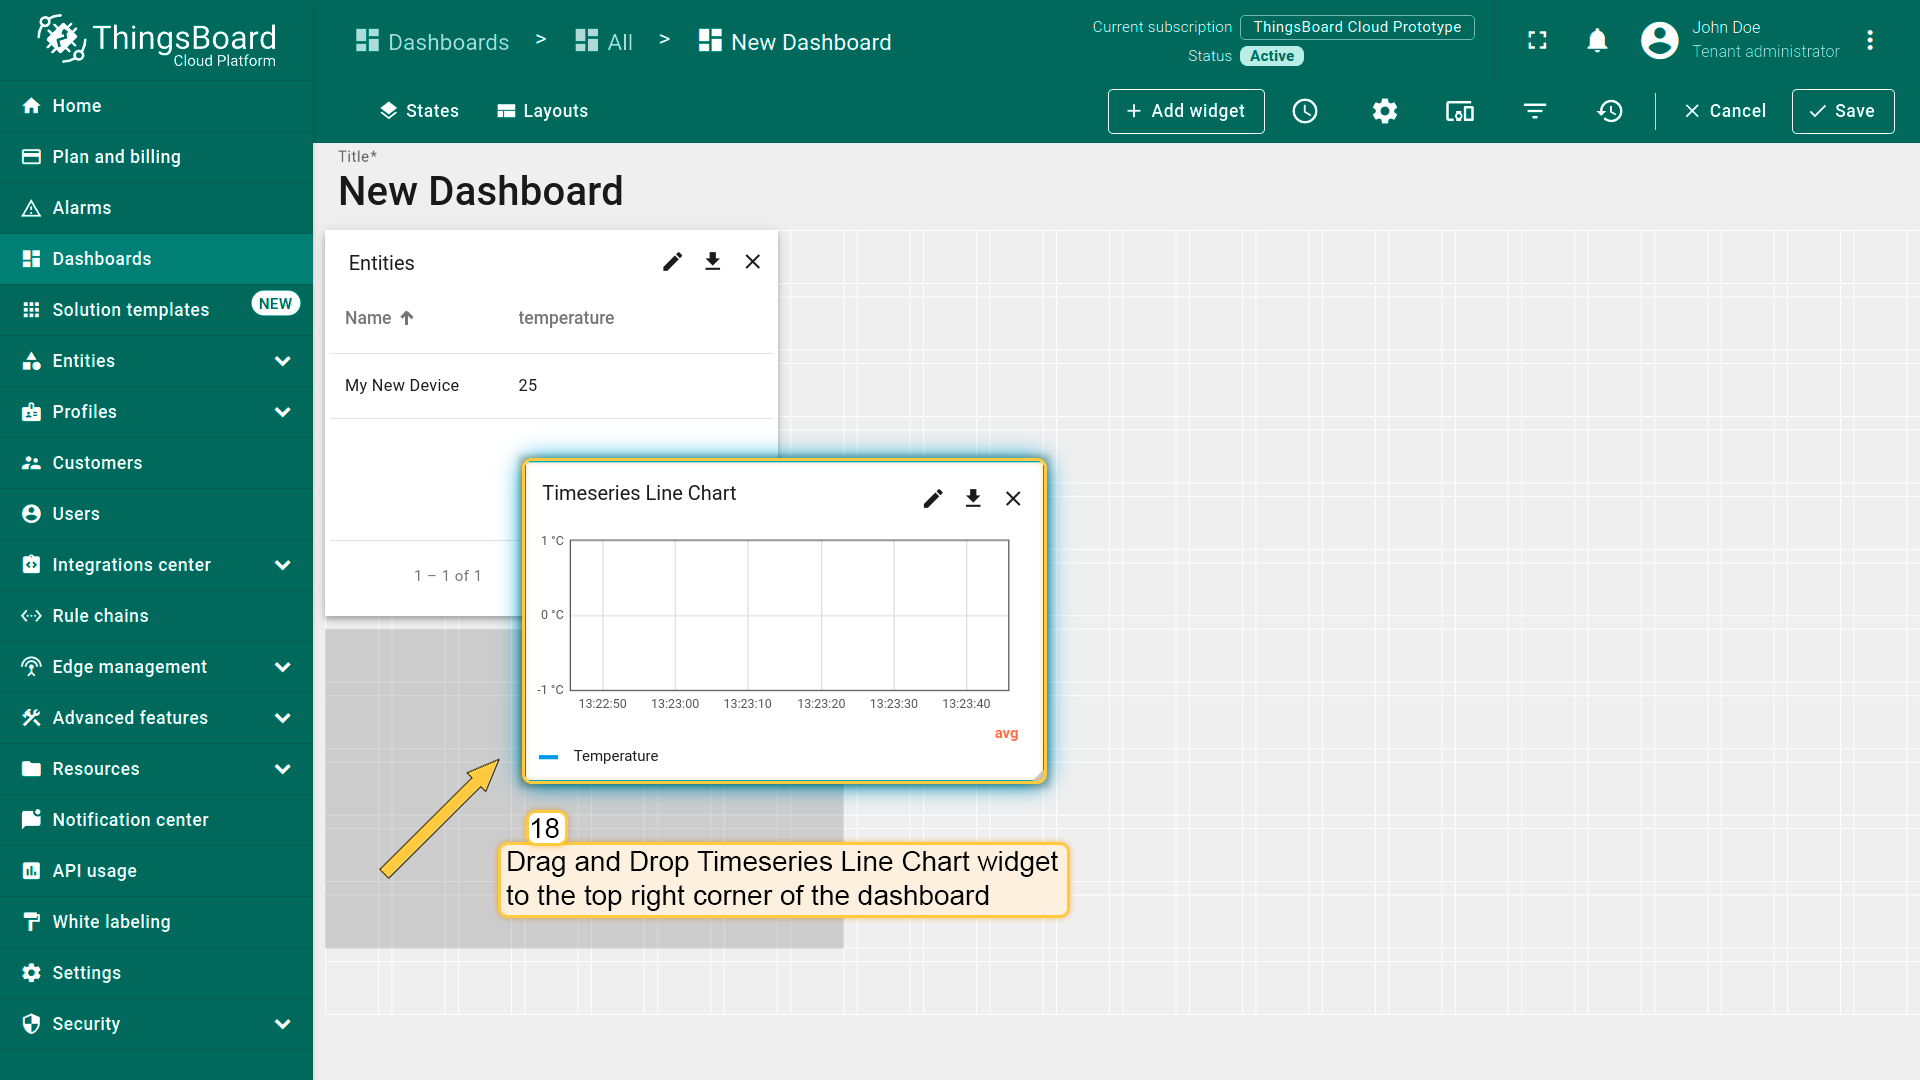
- The "Time series Line Chart" widget has been added to the dashboard. Drag and Drop the "Time series Line Chart" widget to the top right corner of the dashboard;
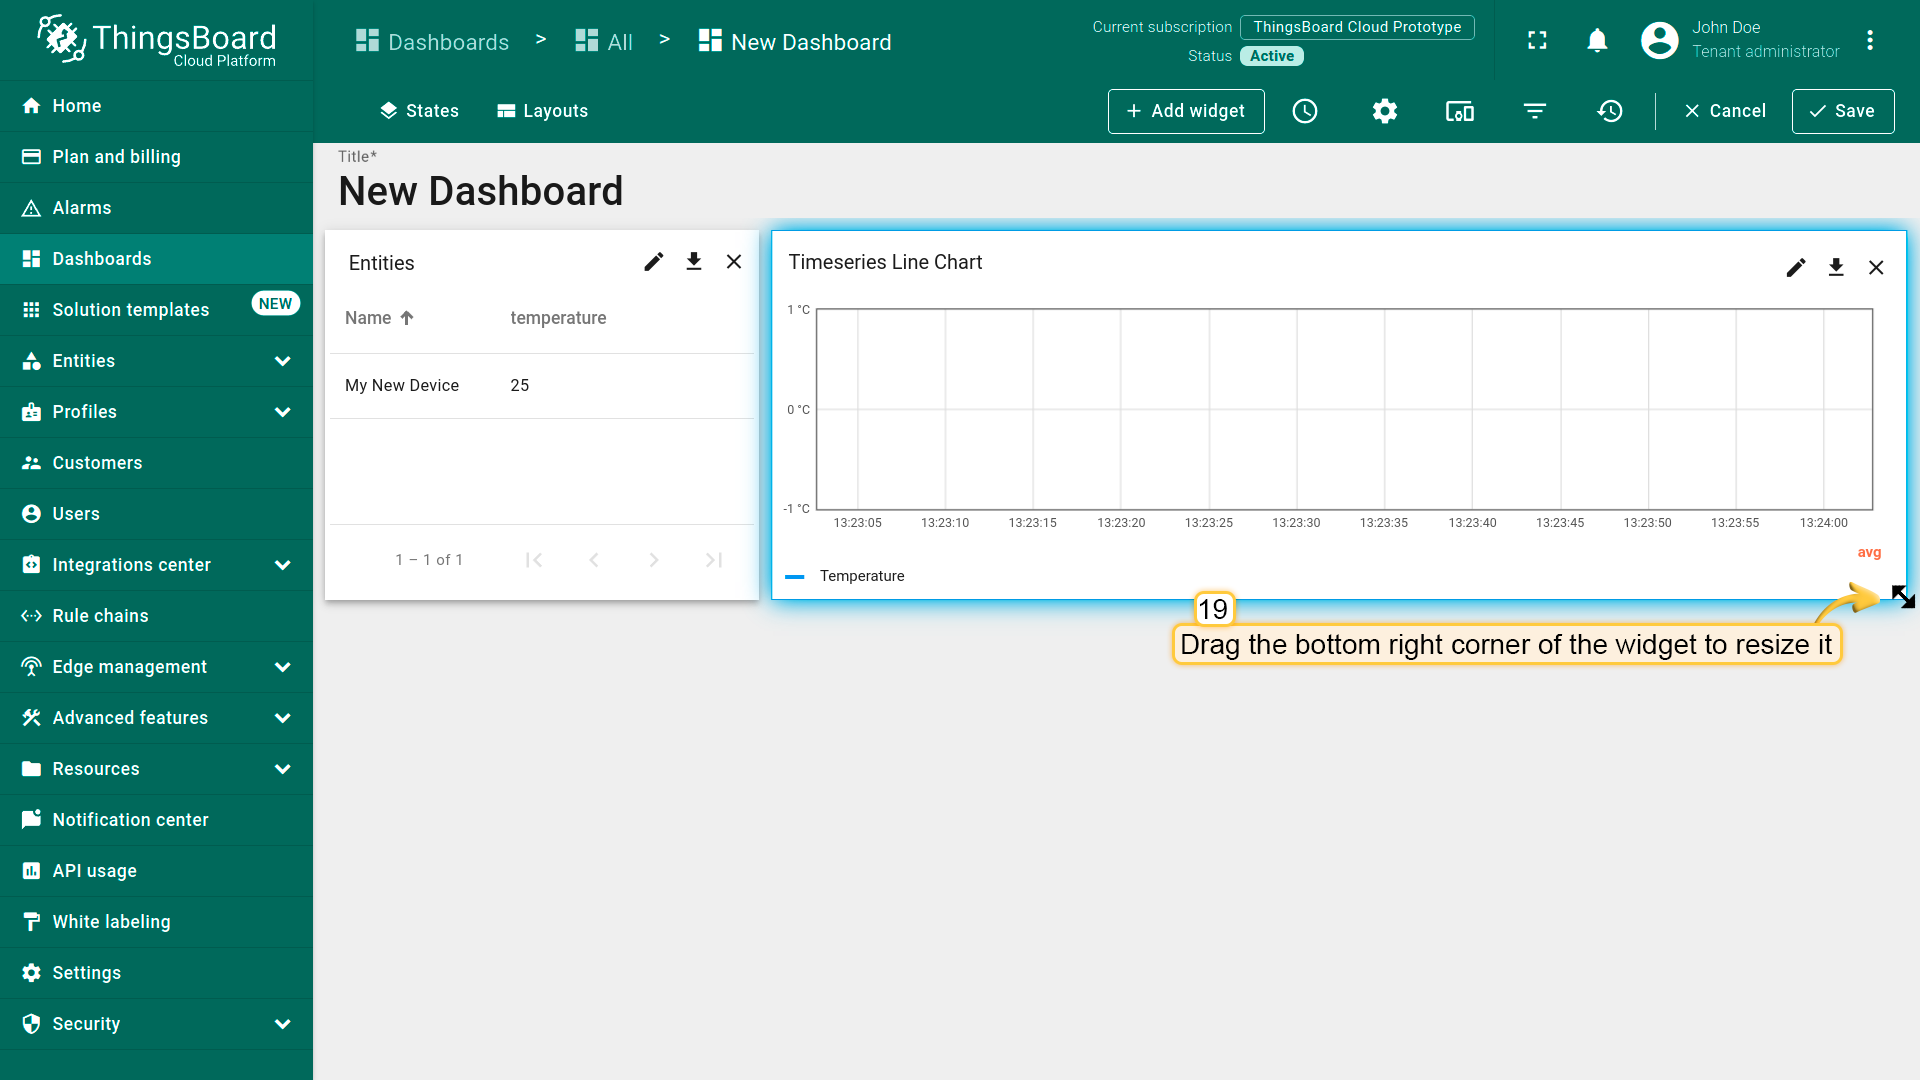
- Resize the "Time series Line Chart" widget. Just drag the bottom right corner of the widget;
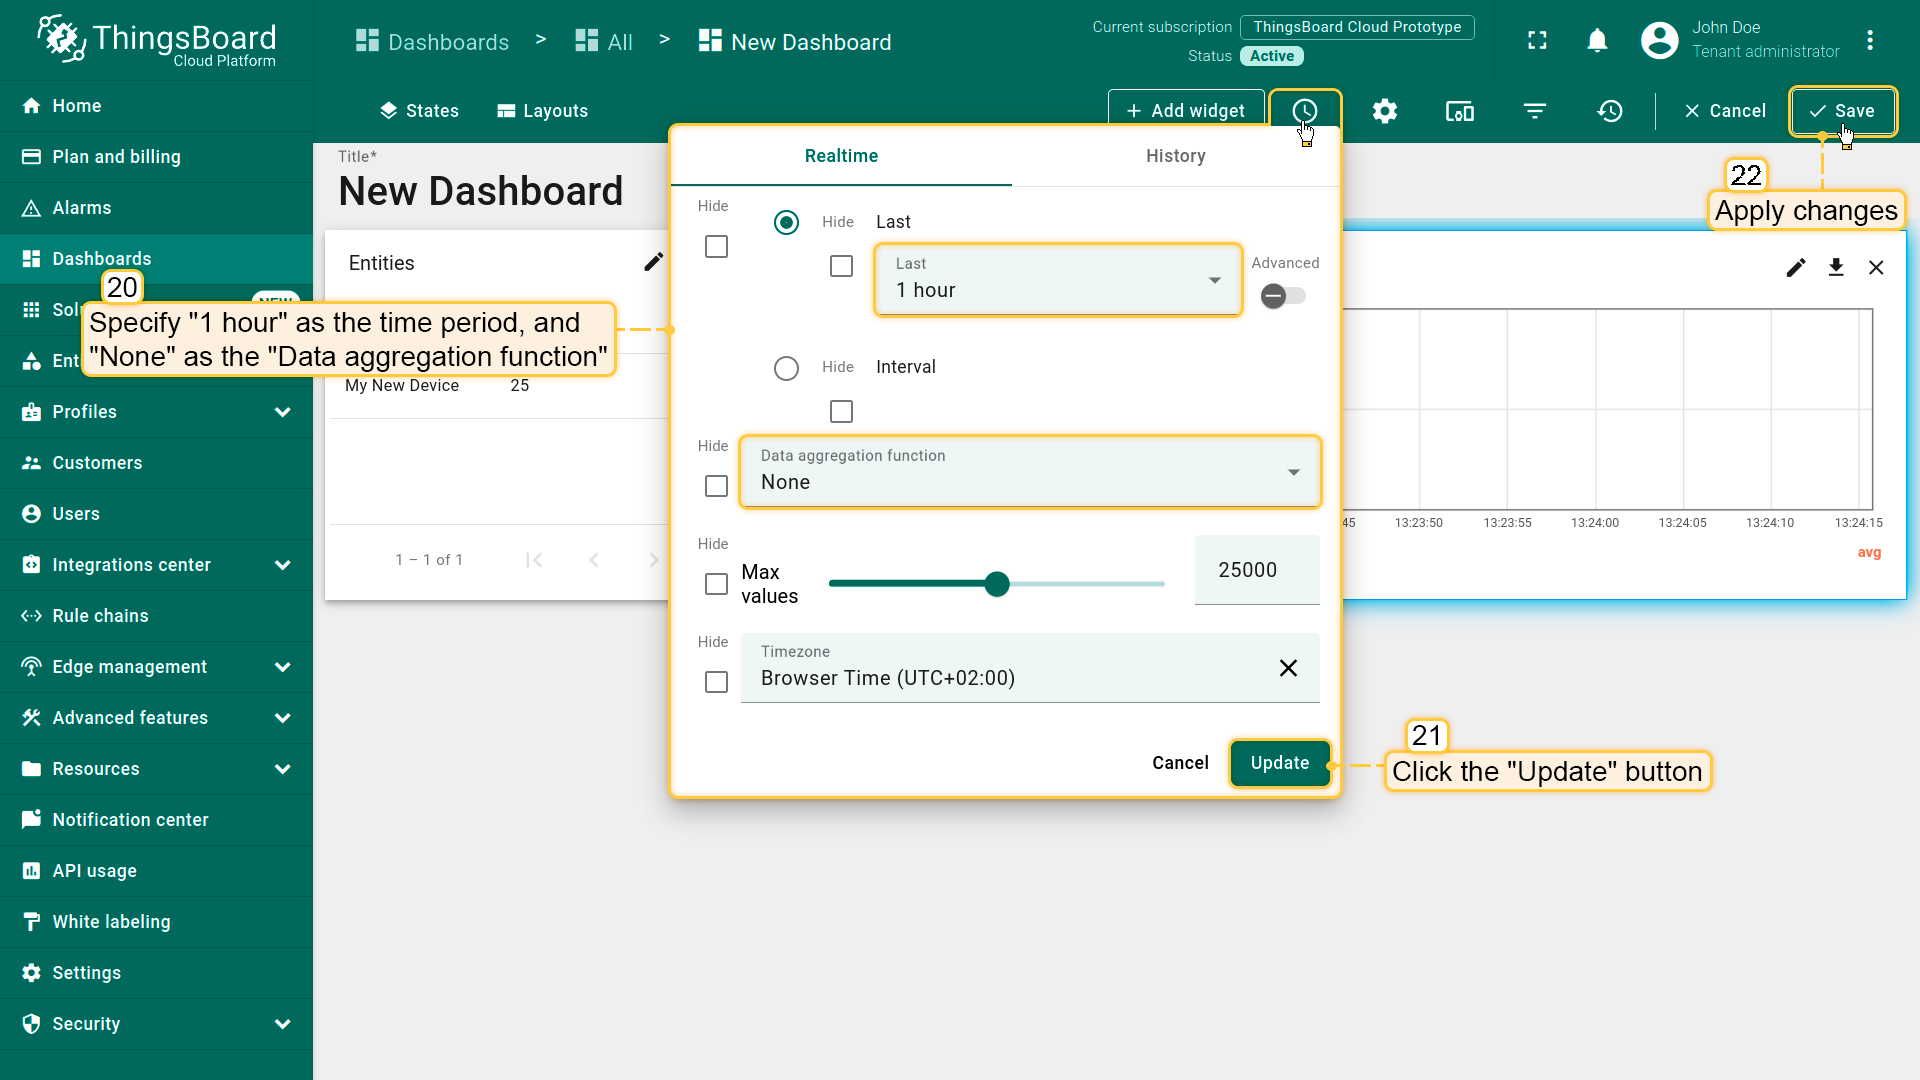
- Click the "Edit time window" icon. Specify "1 hour" as the time period and "None" as the "Data aggregation function". Click "Update" button. Apply all changes by clicking "Save" button in the upper right corner of the screen.
- Congratulations! You have successfully configured the dashboard. Now, when you send a new telemetry reading, it will immediately appear in the table.


Step 5. Provision Dashboard to Klyff Edge
To provision dashboard to Edge we need to open Edge dashboards on Klyff Professional Edition server and assign the newly created dashboard. Once this dashboard is assigned we are going to open Klyff Edge UI to see the same dashboard on the Edge.
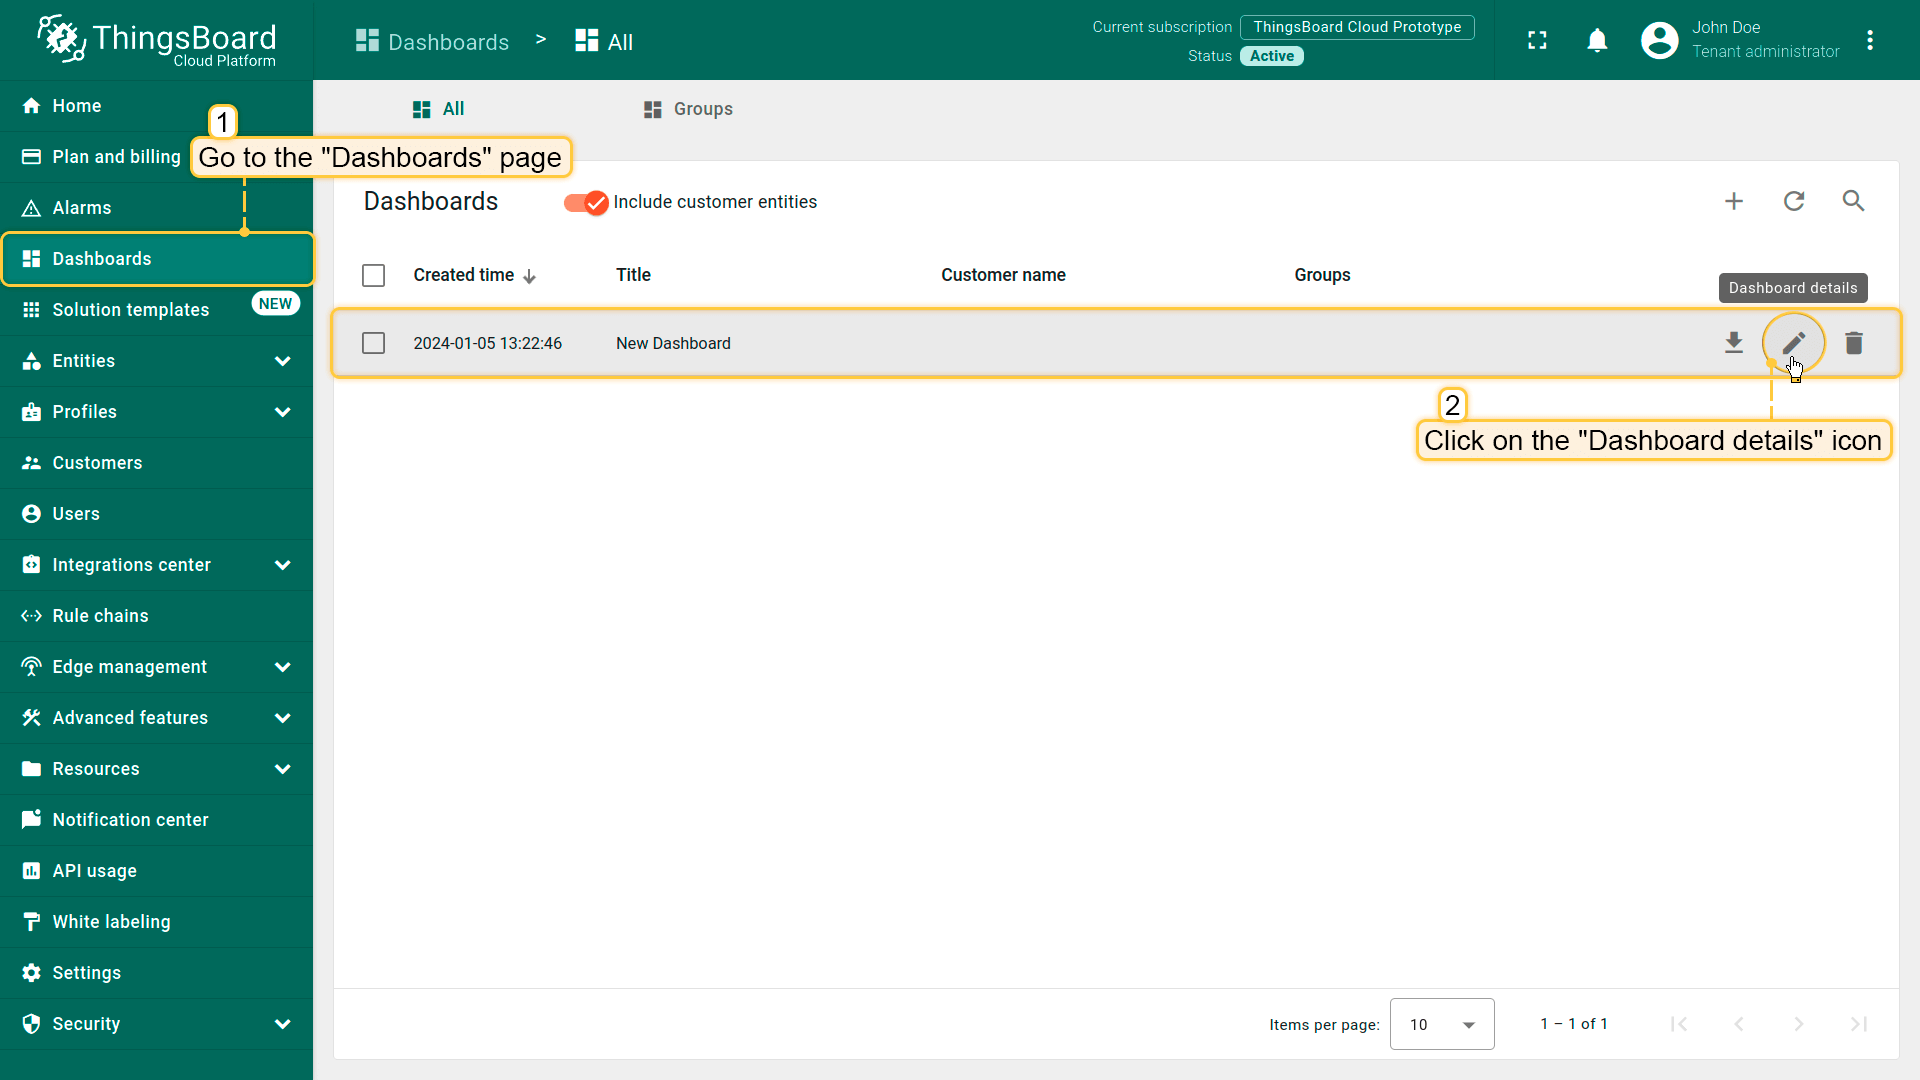
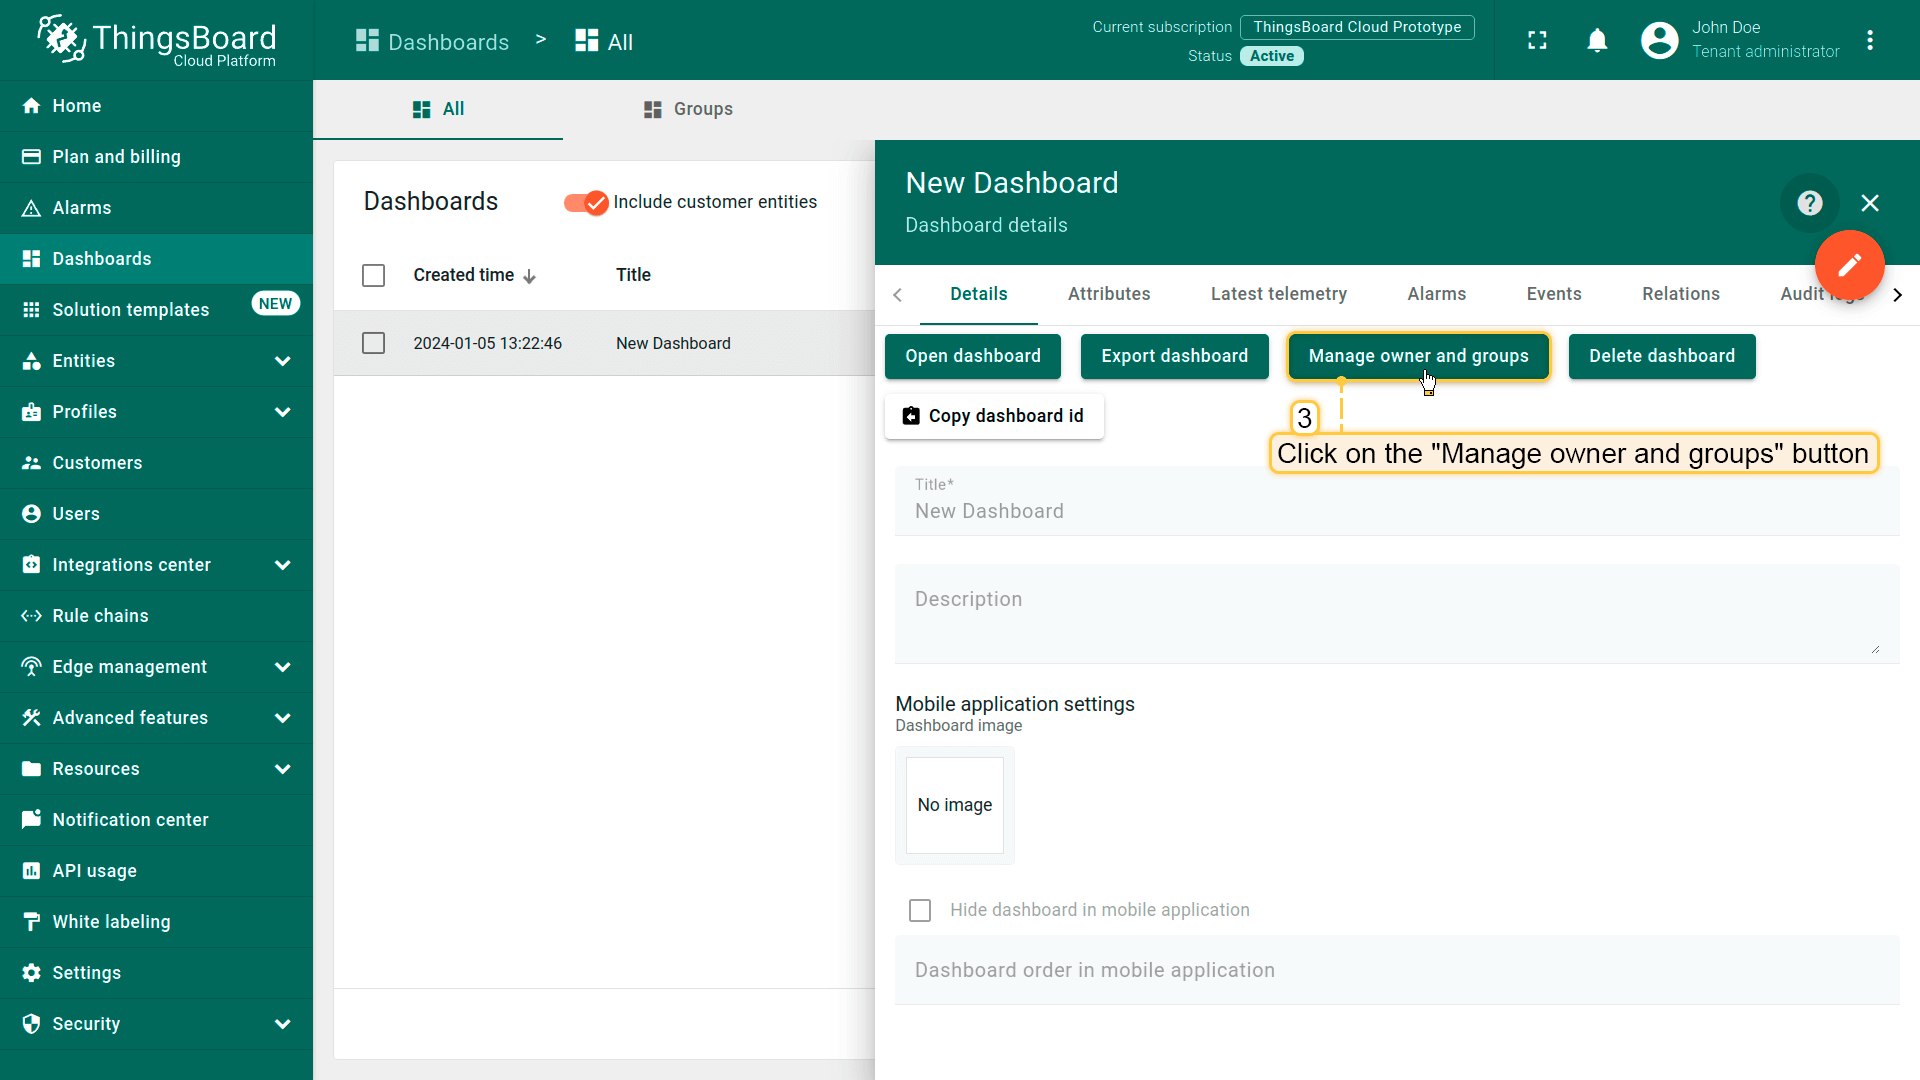
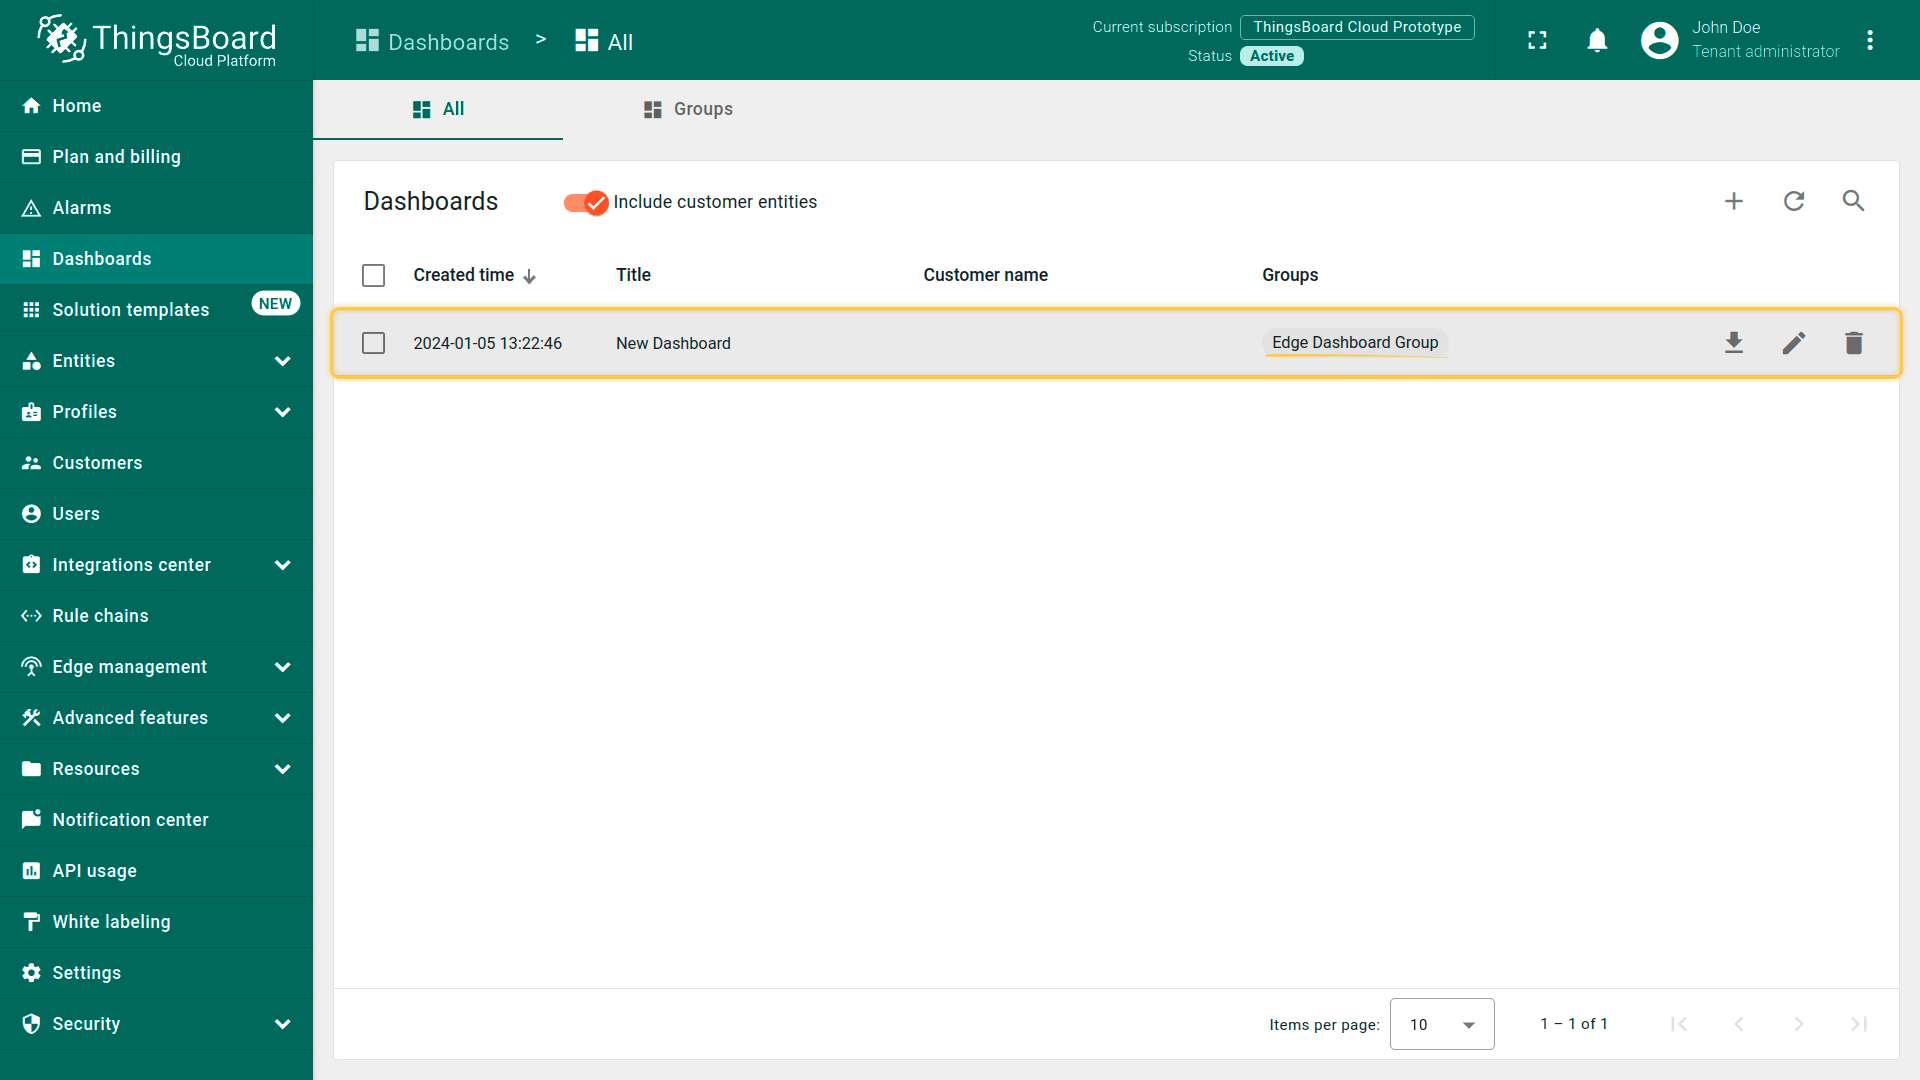
- Open "Dashboards" page on the Klyff Professional Edition server. Click on the "Dashboard details" icon of the "New Dashboard" to view details;
- Click on the "Manage owner and groups" button;
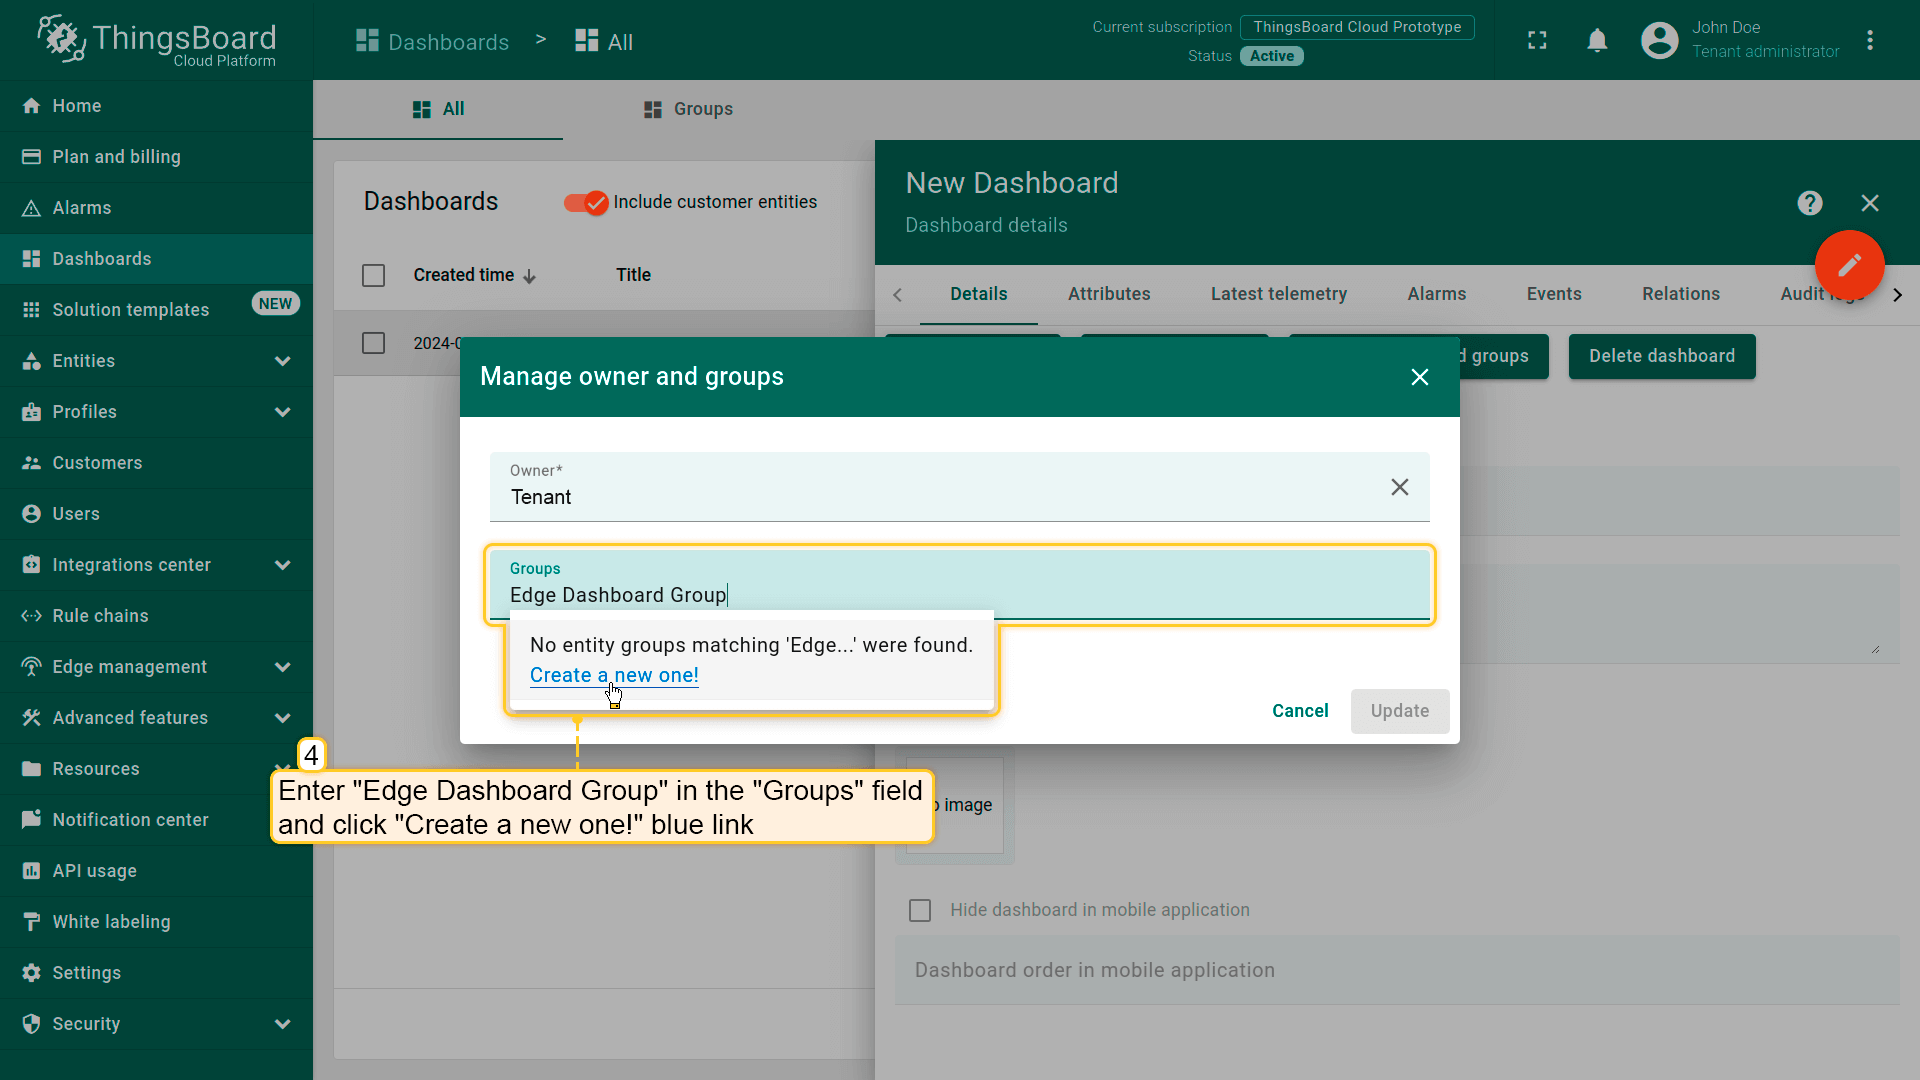
- Now we need to create a new dashboard group and add the previously created dashboard to it. Enter a name for the new dashboard group (for example, "Edge Dashboard Group") in the "Groups" fields and click "Create a new one!" blue link;
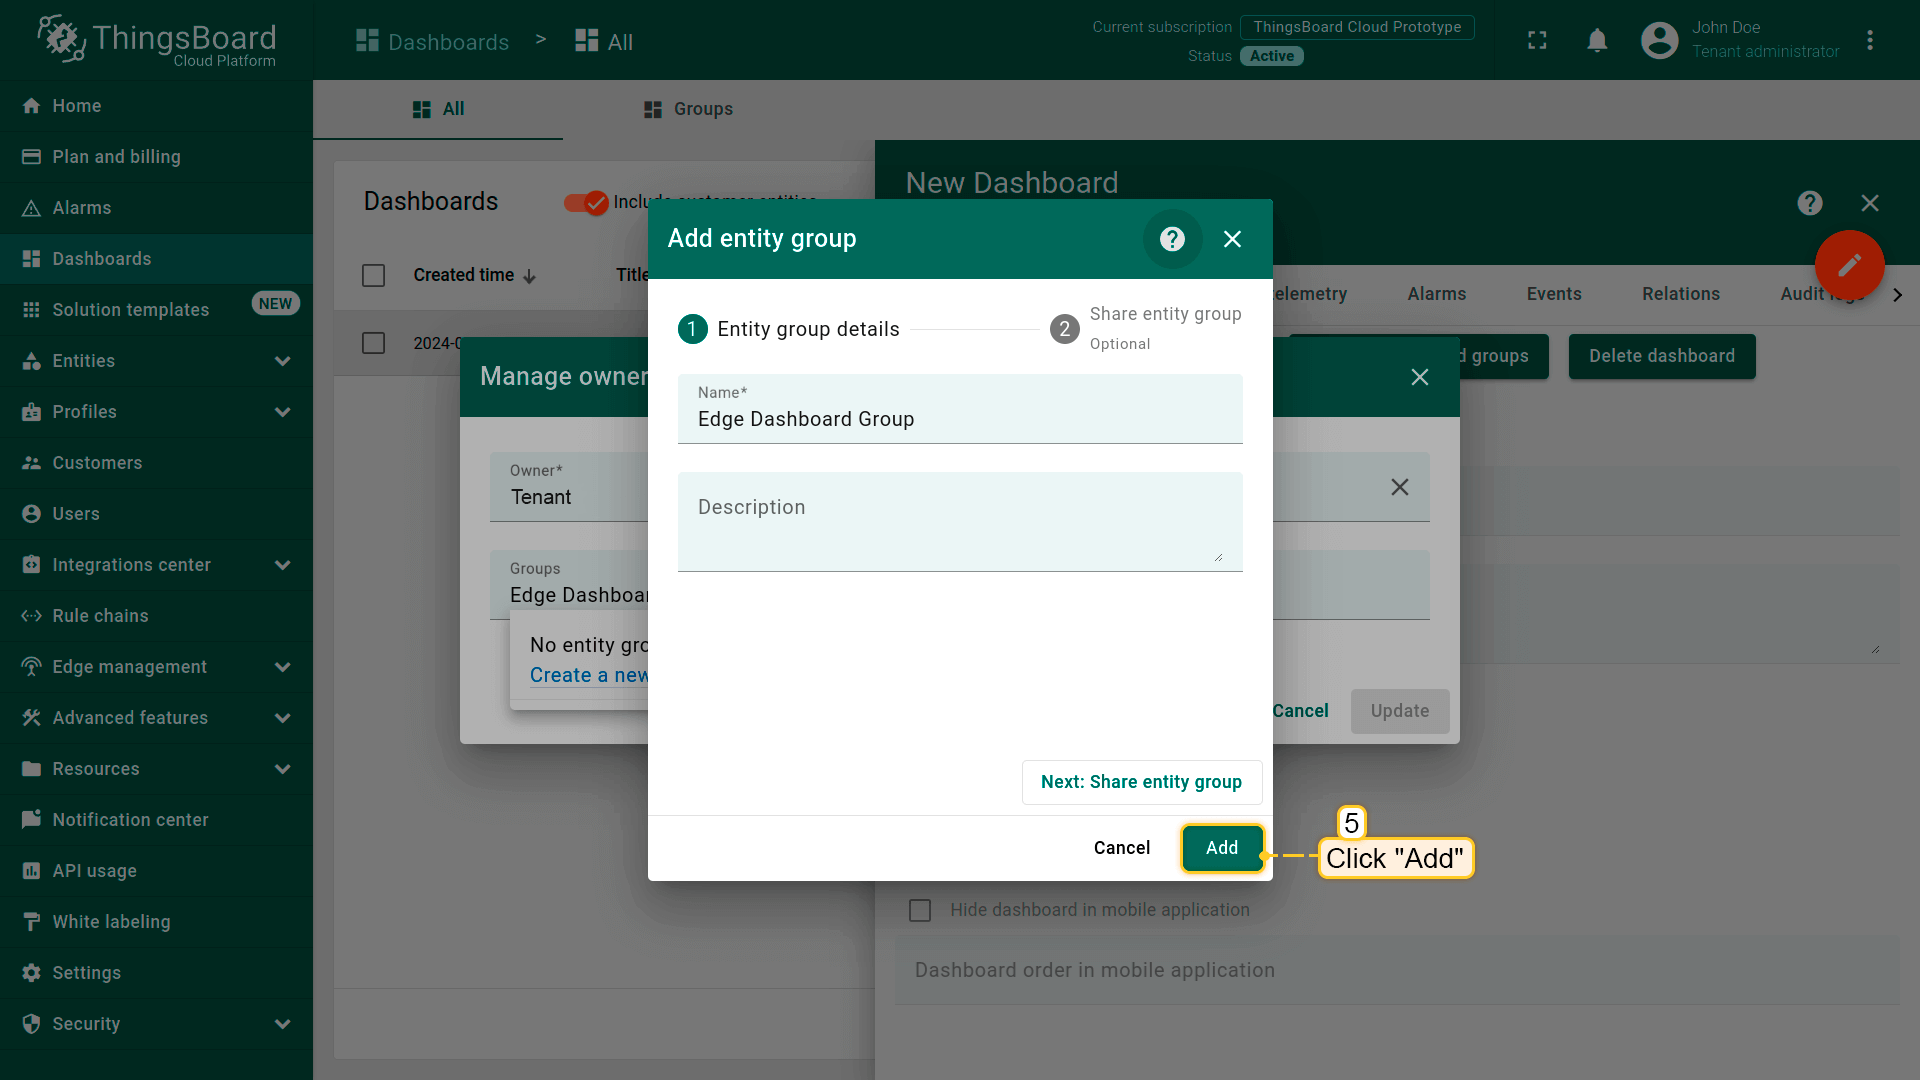
- In the "Add entity group" window, click the "Add" button to create new dashboard group;
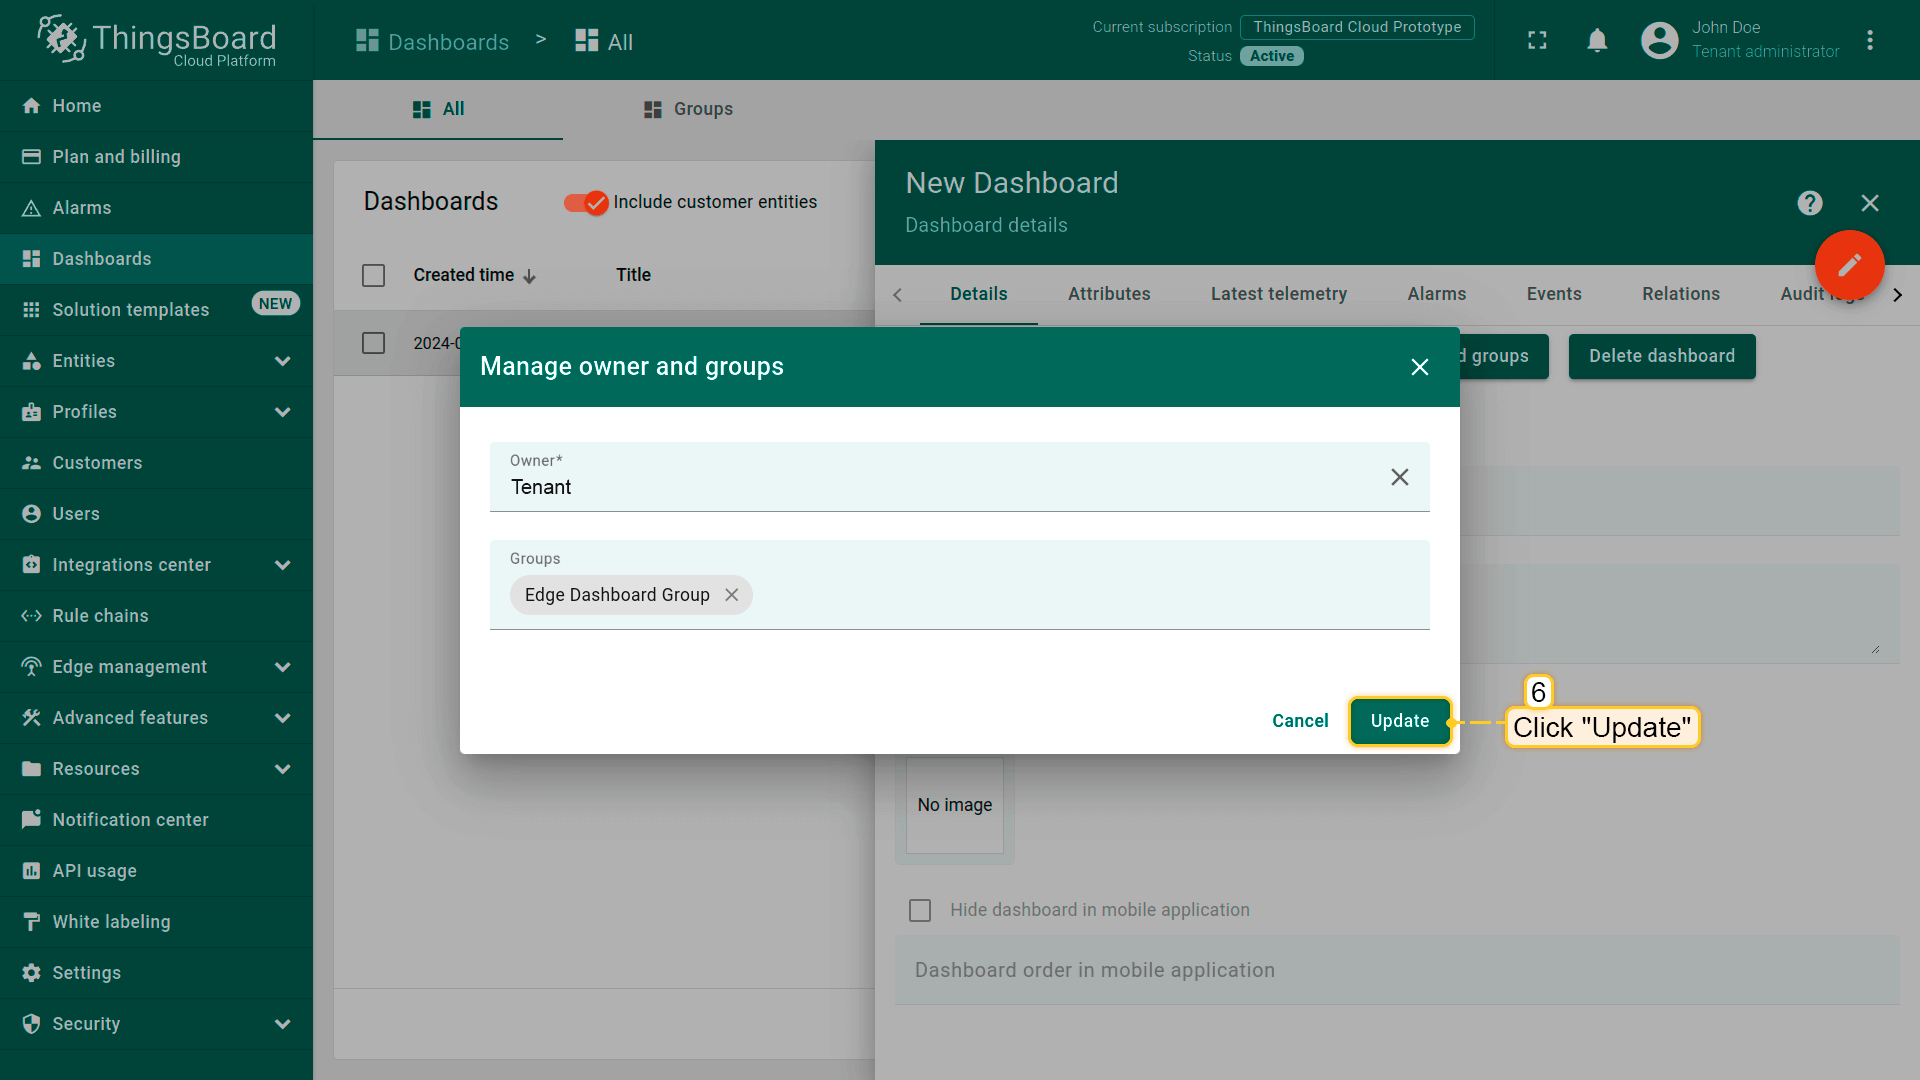
- Newly created "Edge Dashboard Group" appeared in the "Groups" field. Click the "Update" button;
- Verify that "Edge Dashboard Group" is available in the "Groups" field;
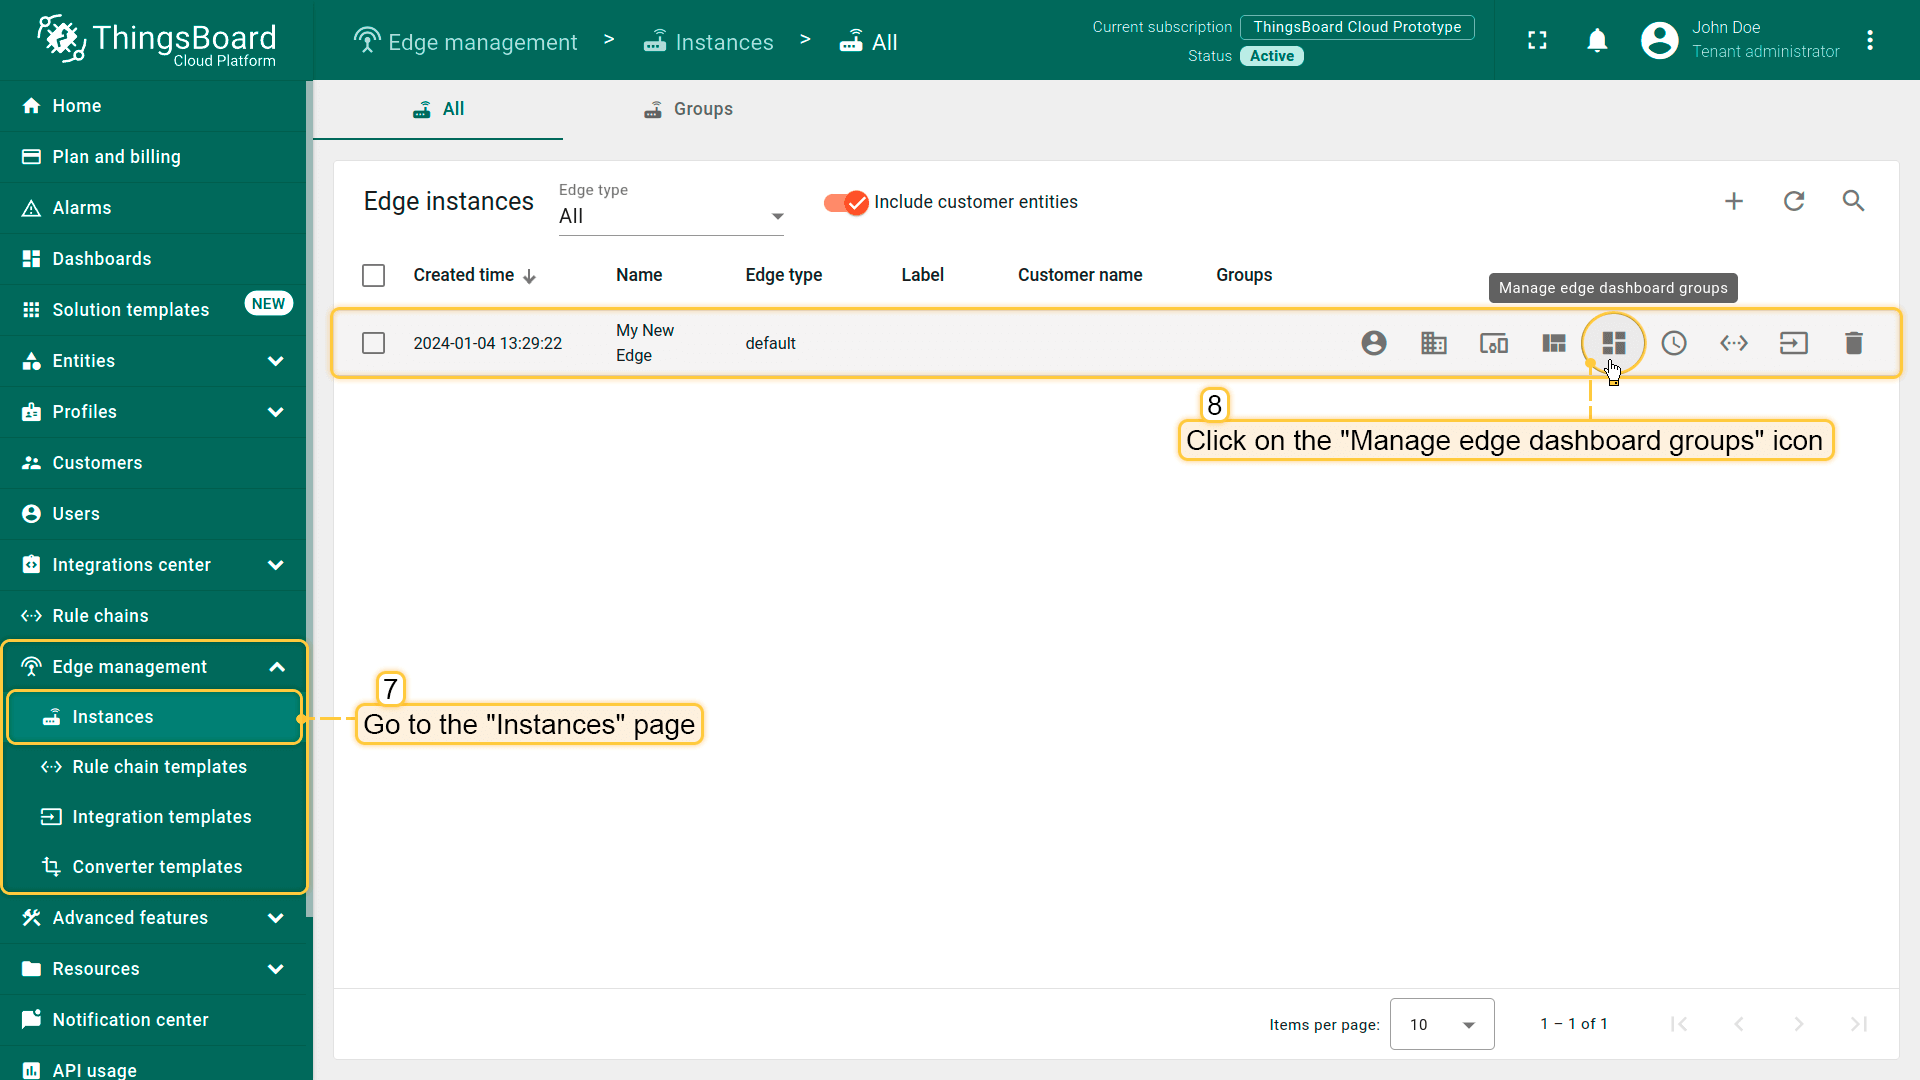
- Now, open the "Edge management" section -> "Instances" page. Click on the "Manage edge dashboard groups" icon of the edge instance to view dashboards that are already assigned to this Edge;
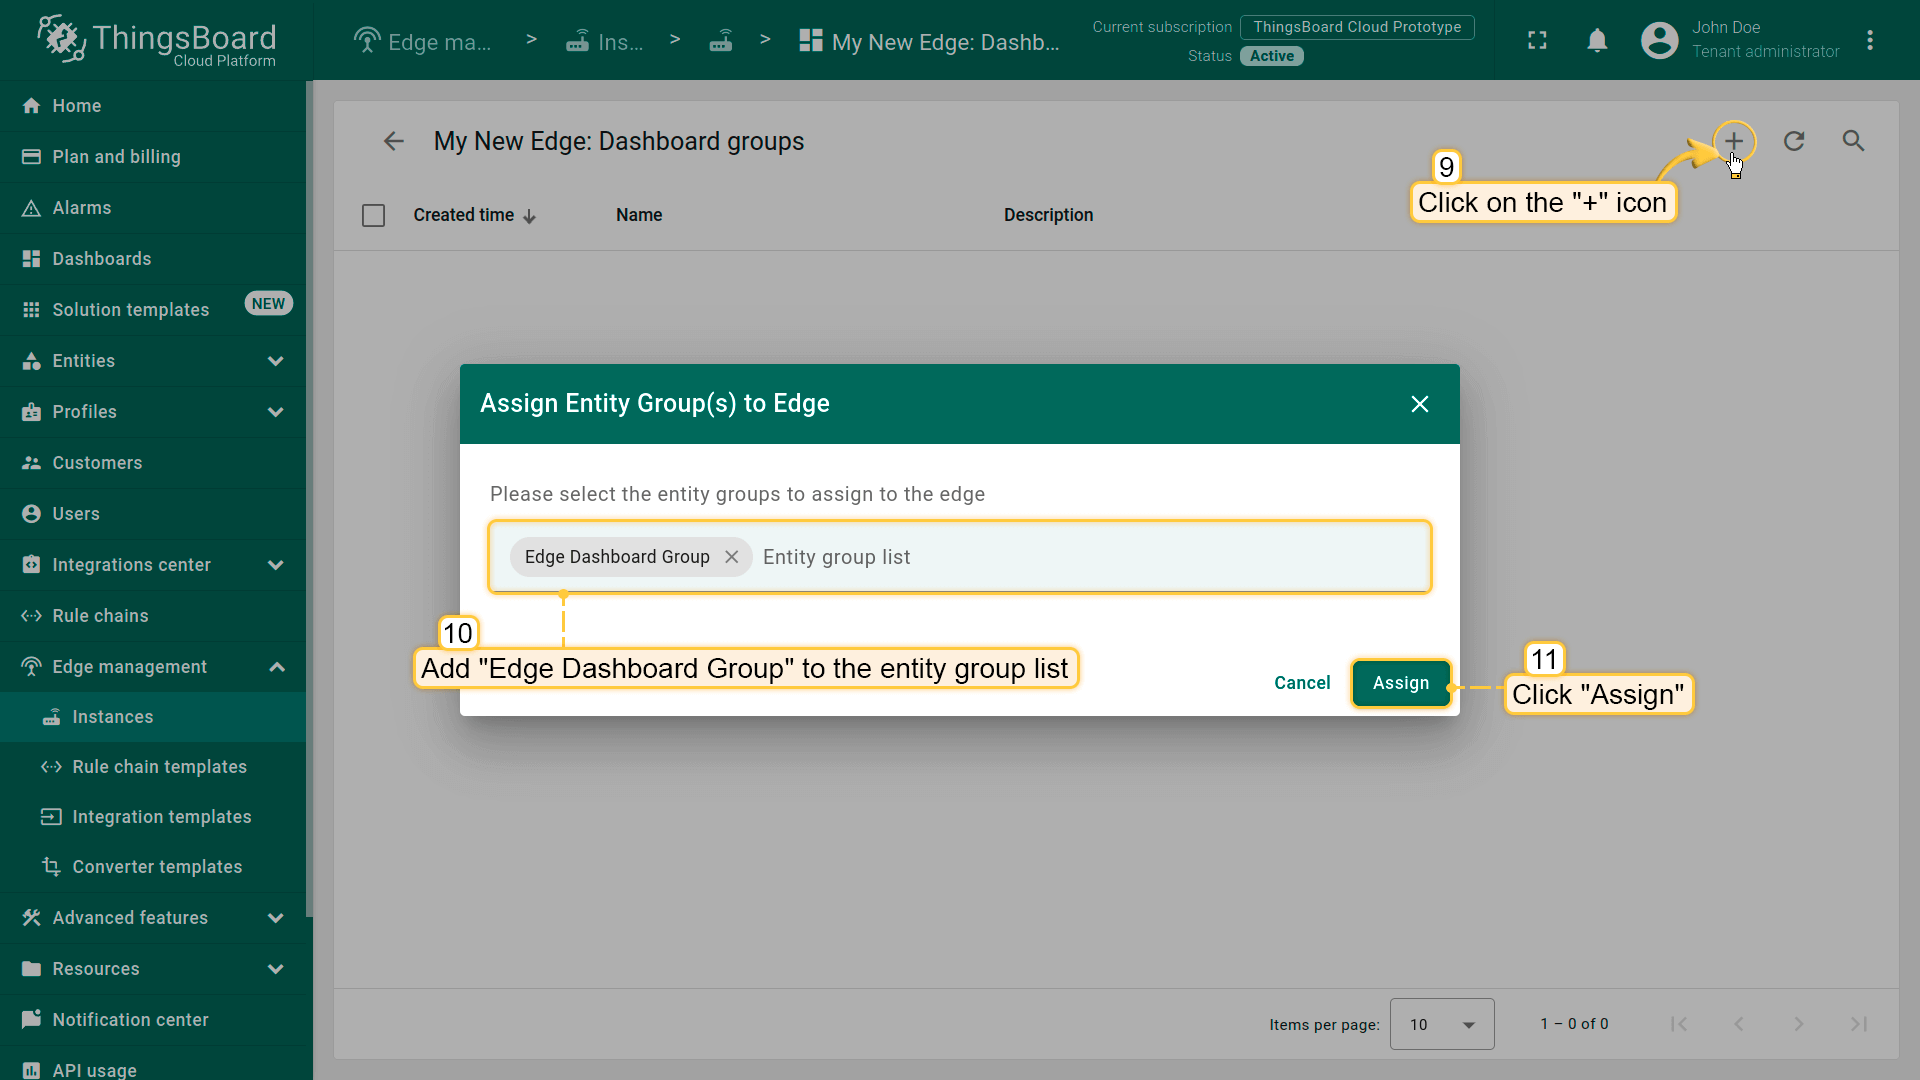
- To assign dashboard groups to the Edge, click on the "+" icon and select "Edge Dashboard Group" from the list, and click "Assign" button. This dashboard group will be provisioned to the edge.
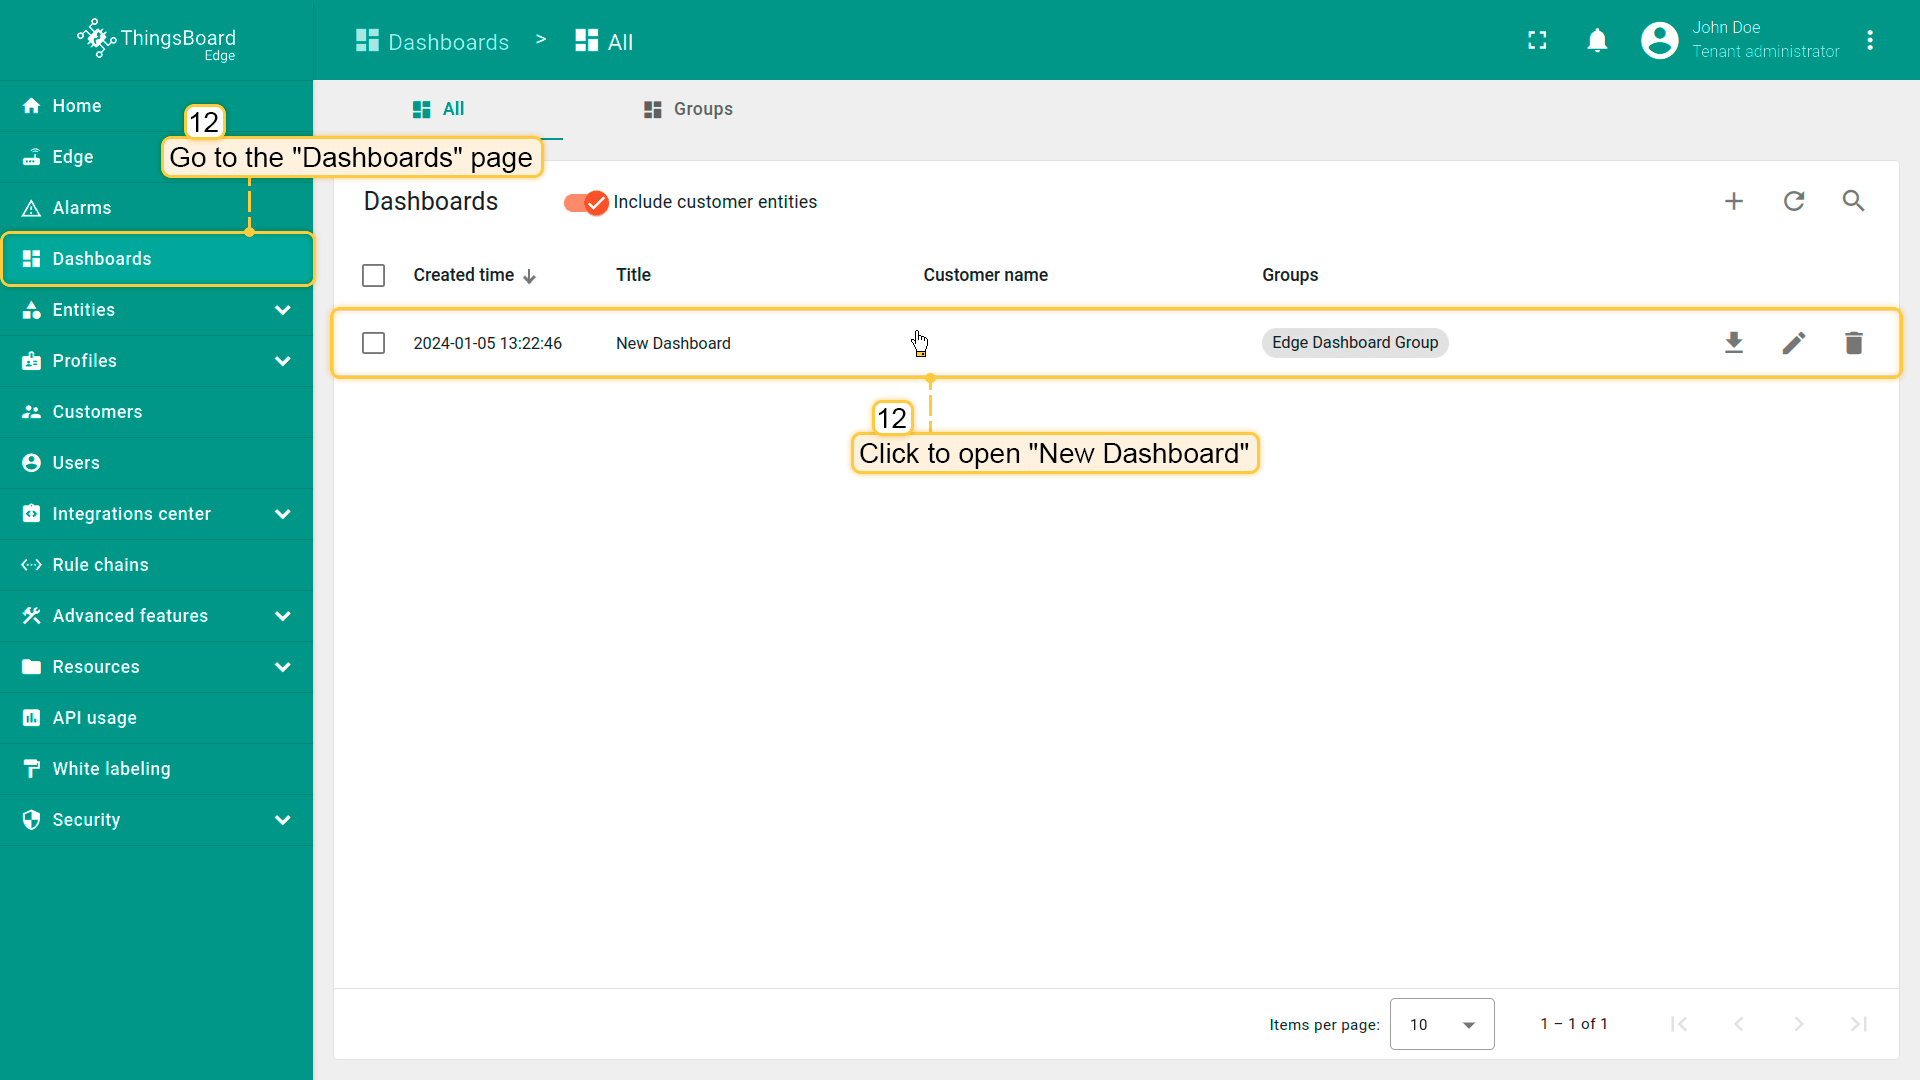
Now, open Klyff Edge UI using the URL EDGE_URL to verify that dashboard is accessible.
- Open the "Dashboards" page in the Klyff Edge UI. Open "My New Dashboard".
- Verify that you see the same widgets that you have added on the cloud and temperature readings from the device.
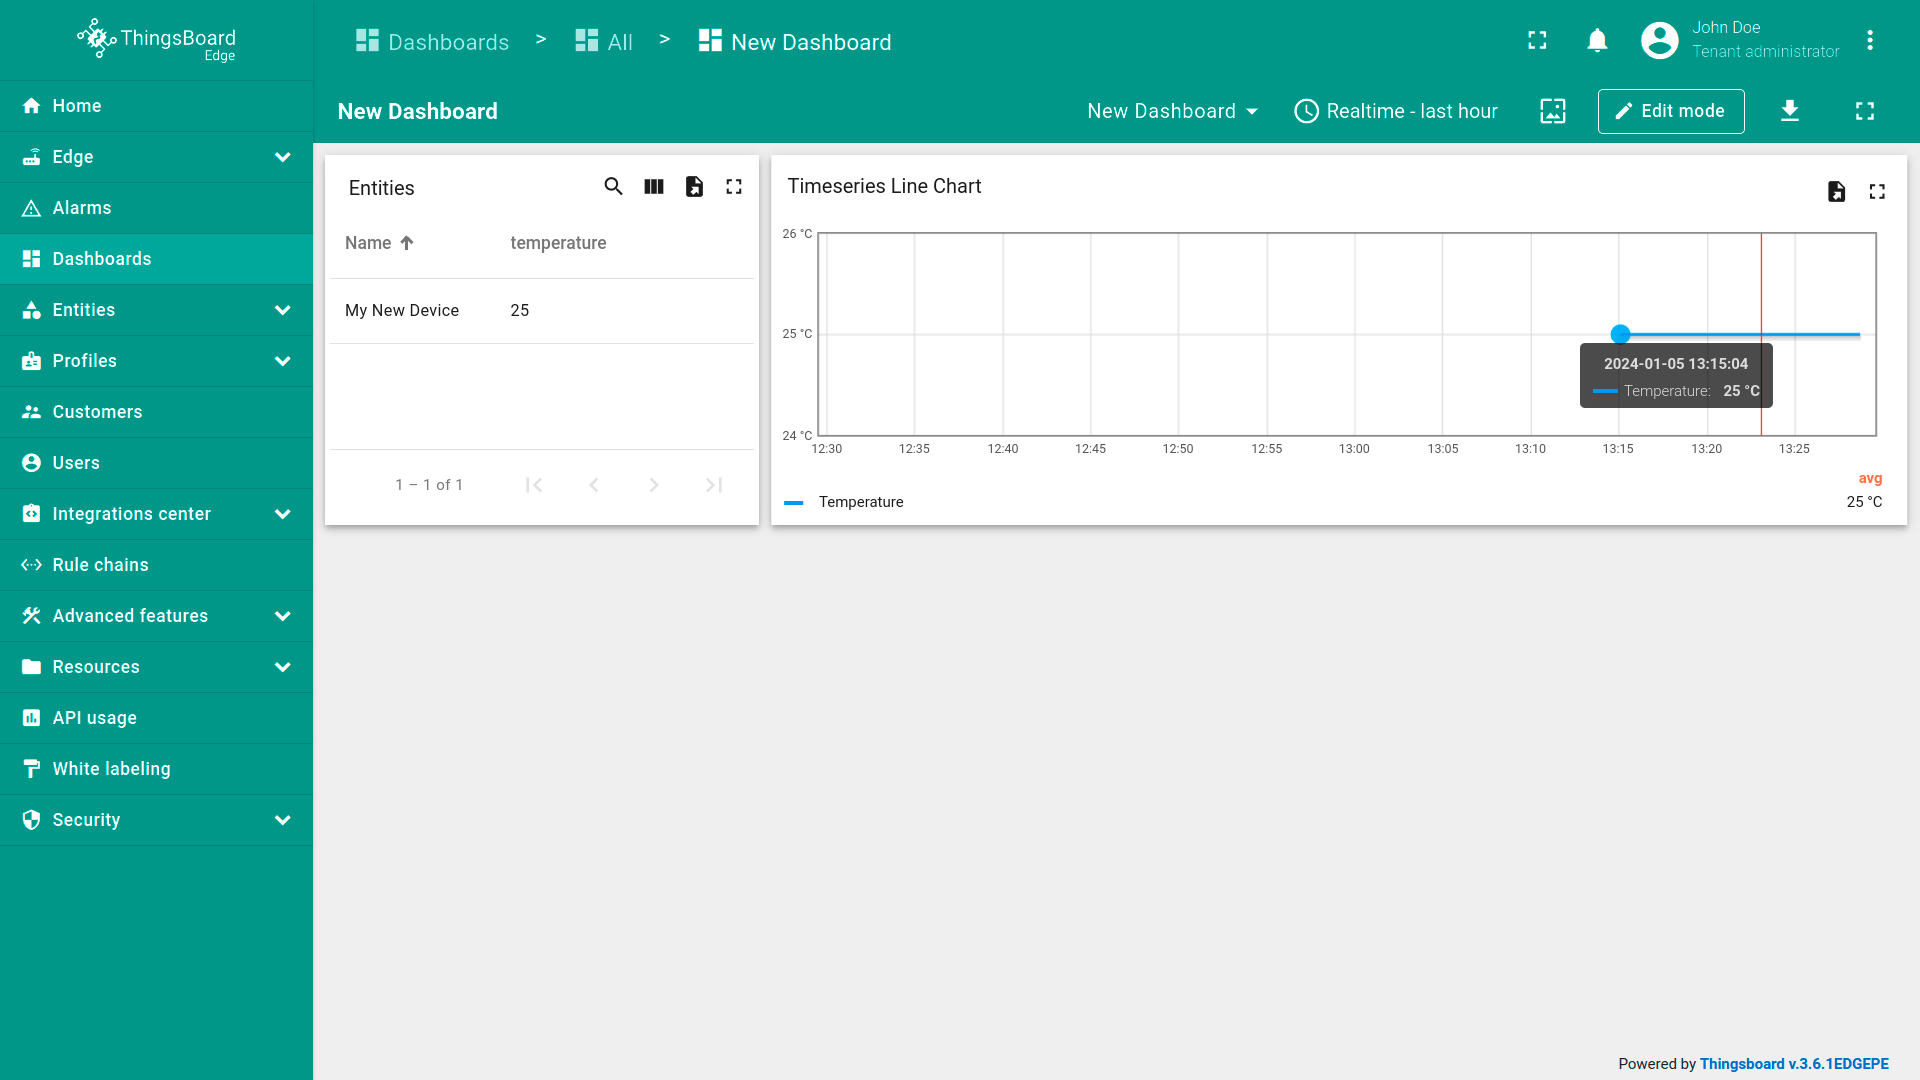
Congratulations! Dashboard has been provisioned to the Edge. Now you can send new telemetry reading, and it will immediately appear in the chart on the Edge.
Your feedback
Don’t hesitate to star Klyff Edge on github to help us spread the word. If you have some questions about this sample - post it on the forum.
Next steps
-
Installation guides - Learn how to setup Klyff Edge on various available operating systems and connect to Klyff CE server.
-
Edge Rule Engine:
-
Rule Chain Templates - Learn how to use Klyff Edge Rule Chain Templates.
-
Provision Rule Chains from cloud to edge - Learn how to provision edge rule chains from cloud to edge.
-
- Security:
- gRPC over SSL/TLS - Learn how to configure gRPC over SSL/TLS for communication between edge and cloud.
-
Features:
-
Edge Status - Learn about Edge Status page on Klyff Edge.
-
Cloud Events - Learn about Cloud Events page on Klyff Edge.
-
-
Use cases:
-
Manage alarms and RPC requests on edge devices - This guide will show how to generate local alarms on the edge and send RPC requests to devices connected to edge:
-
Data filtering and traffic reduce - This guide will show how to send to cloud from edge only filterd amount of device data:
-
- Roadmap - Klyff Edge roadmap.