Only Professional Edition supports Platform Integrations feature.
Use Klyff Cloud or install your own platform instance.
- Overview
- How it works?
- Deployment options
- Data Converters
- Debug mode
- Platform Integrations vs IoT Gateway
- Feature Roadmap
- See Also
- Next steps
Overview
Klyff Platform integrations feature was designed for two primary use cases / deployment options:
- Connect existing NB IoT, LoRaWAN, SigFox and other devices with specific payload formats directly to Klyff platform.
- Stream data from devices connected to existing IoT Platforms to enable real-time interactive dashboards and efficient data processing.
Both use cases have few things in common. There is a server-side component in the deployment topology that prevents direct access to device and provides set of APIs to interact with the device in the field instead. The payload format of the device is not well-defined. Often two devices that have similar sensors have different payload formats depending on a vendor or even software version.
The job of Klyff Integration is to provide secure and reliable API bridge between core platform features (telemetry collection, attributes and RPC calls) and specific third-party platform APIs.
How it works?
At the moment Klyff supports various integration protocols. Most popular are HTTP, MQTT and OPC-UA. Platform also support integration with specific LoRaWAN Network servers, Sigfox backend, various NB IoT devices using raw UDP and TCP integrations. AWS IoT, IBM Watson and Azure Event Hub allows to subscribe to the data feed from devices via MQTT or AMQP.
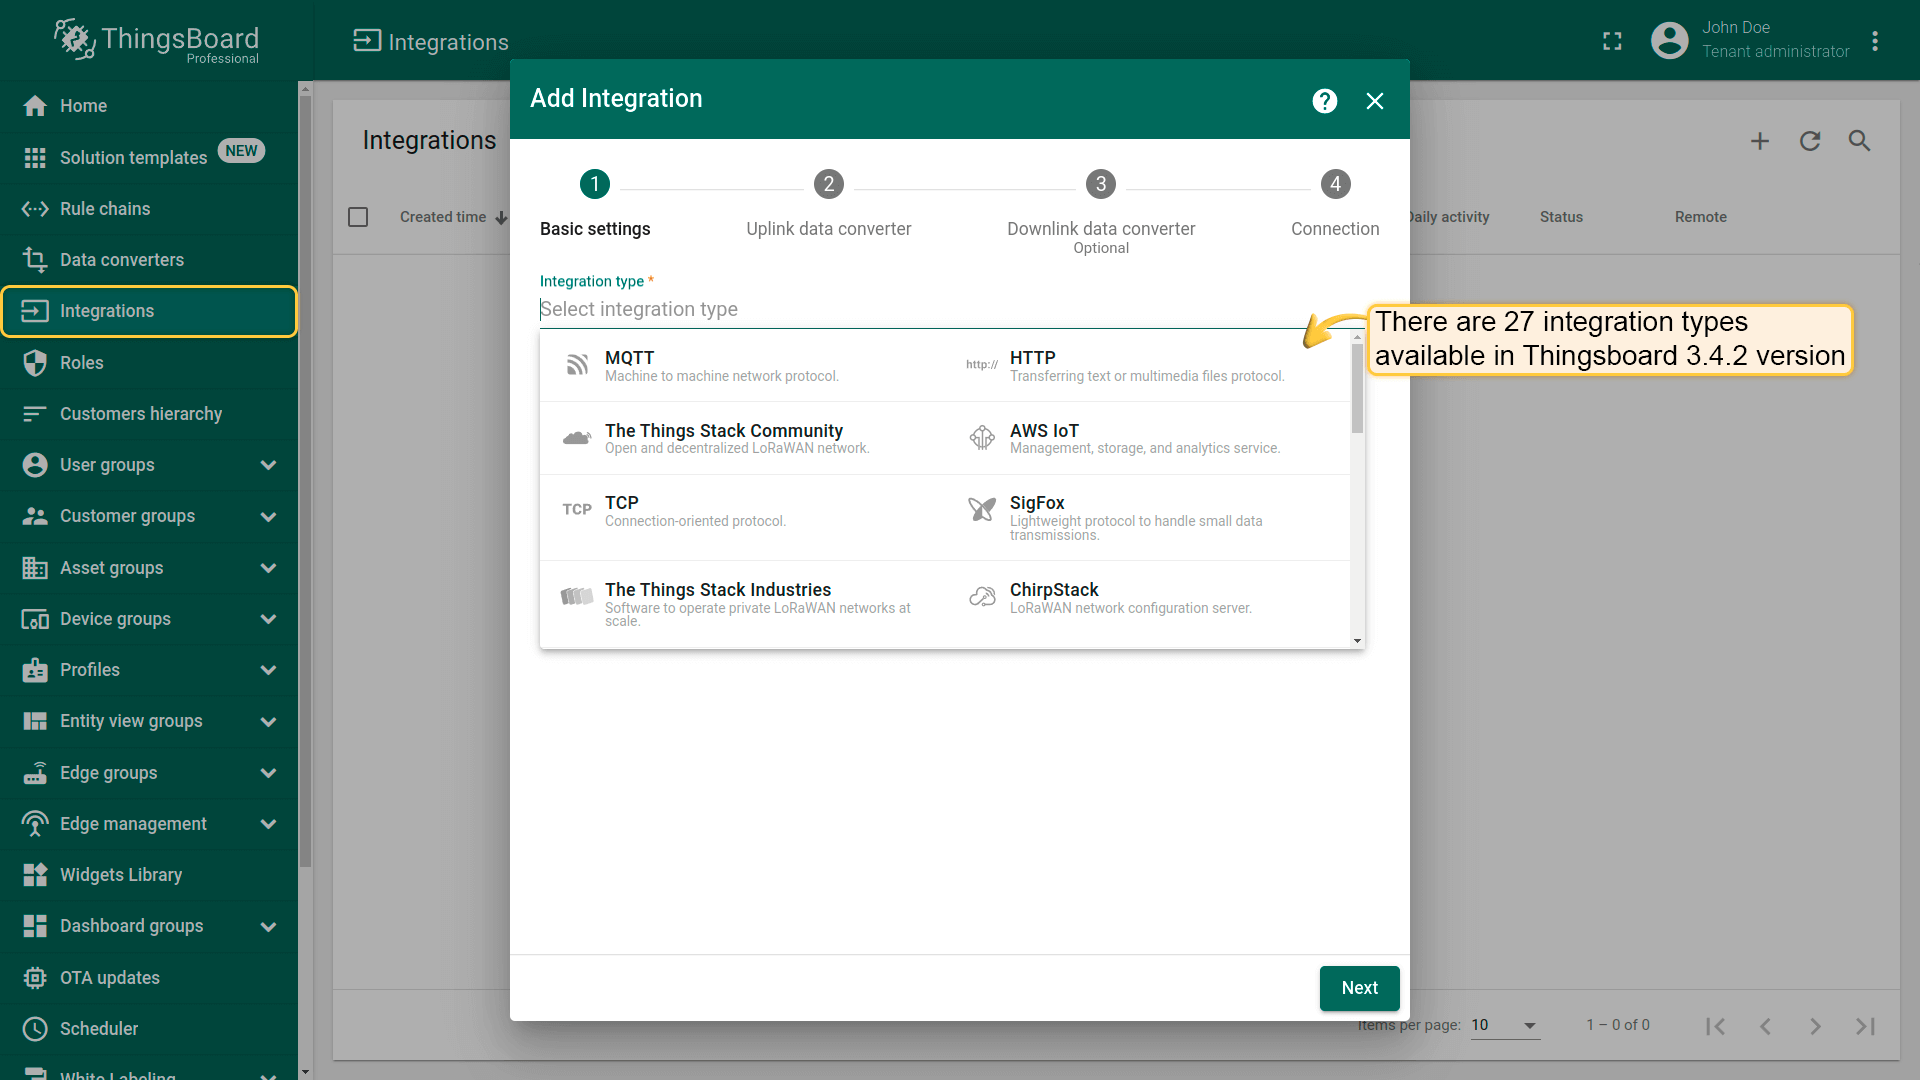
The list of platform integrations is constantly growing, however, the general integration concepts are the same and explained below.
Once message arrives from External Platform to Klyff it passes validation according to platform specific payload format and security rules. Once message is validated Klyff Integration invokes assigned Uplink Data Converter to extract sub-set of meaningful information out of the incoming message. The message is basically transformed from device and platform specific payload to the format that Klyff uses.
Since TB PE v2.0, Rule Engine is also able to push Downlink messages to the integrations. The example of such message may be:
- notification about shared attribute (configuration) update;
- notification about oneway RPC call to trigger some action on the device;
- any custom message from the rule engine.
The most common use cases are:
- changing data upload frequency based on shared attribute value change
- triggering firmware update procedure based on shared attribute value change
- changing device state based on rpc call;
Once message is pushed by the rule engine, Klyff invokes assigned Downlink Data Converter and transforms the rule engine message to the specific data format that is used by the Integration.
Deployment options
Klyff Integration has two deployment options: embedded and remote. See details and architecture diagrams below.
Embedded integrations
Embedded integration is running in the main Klyff server process. Basically it is part of a monolith deployment scenario.
Pros:
- simplifies deployment of new integration (just few clicks on Klyff UI);
- minimize latency for message delivery;
Cons:
- consume resources allocated to main Klyff process: network connections, OS threads and CPU cycles;
- low level of isolation;
- can’t access local MQTT brokers or OPC-UA servers if Klyff is deployed in the cloud.
Remote integrations
Remote integration become available since Klyff PE v2.4.1 and enables new deployment scenario. One can install remote integration in the local network and stream data to the cloud.
Let’s assume you have local MQTT broker or OPC-UA server deployed on-premises. Those brokers and/or servers don’t have dedicated external IP address, so Klyff instance in the cloud can’t connect to them directly. However, you can install remote integration close to this server, in the same local network. This integration will connect to the broker/server, pull the data and store it in the local file system. Remote integration will stream the data to the Klyff instance deployed in the cloud once the internet connection is available.
Pros:
- enables integration with servers deployed in the local network;
- isolates the integration process from main Klyff process;
Cons:
- requires installation of a separate package;
Learn how to configure integration to run remotely using this guide.
Data Converters
Data Converters is a part of the Platform Integrations feature. There are Uplink and Downlink data converters.
Uplink Data Converter
The main function of Uplink Data Converter is to parse payload of the incoming message and transform it to format that Klyff uses.
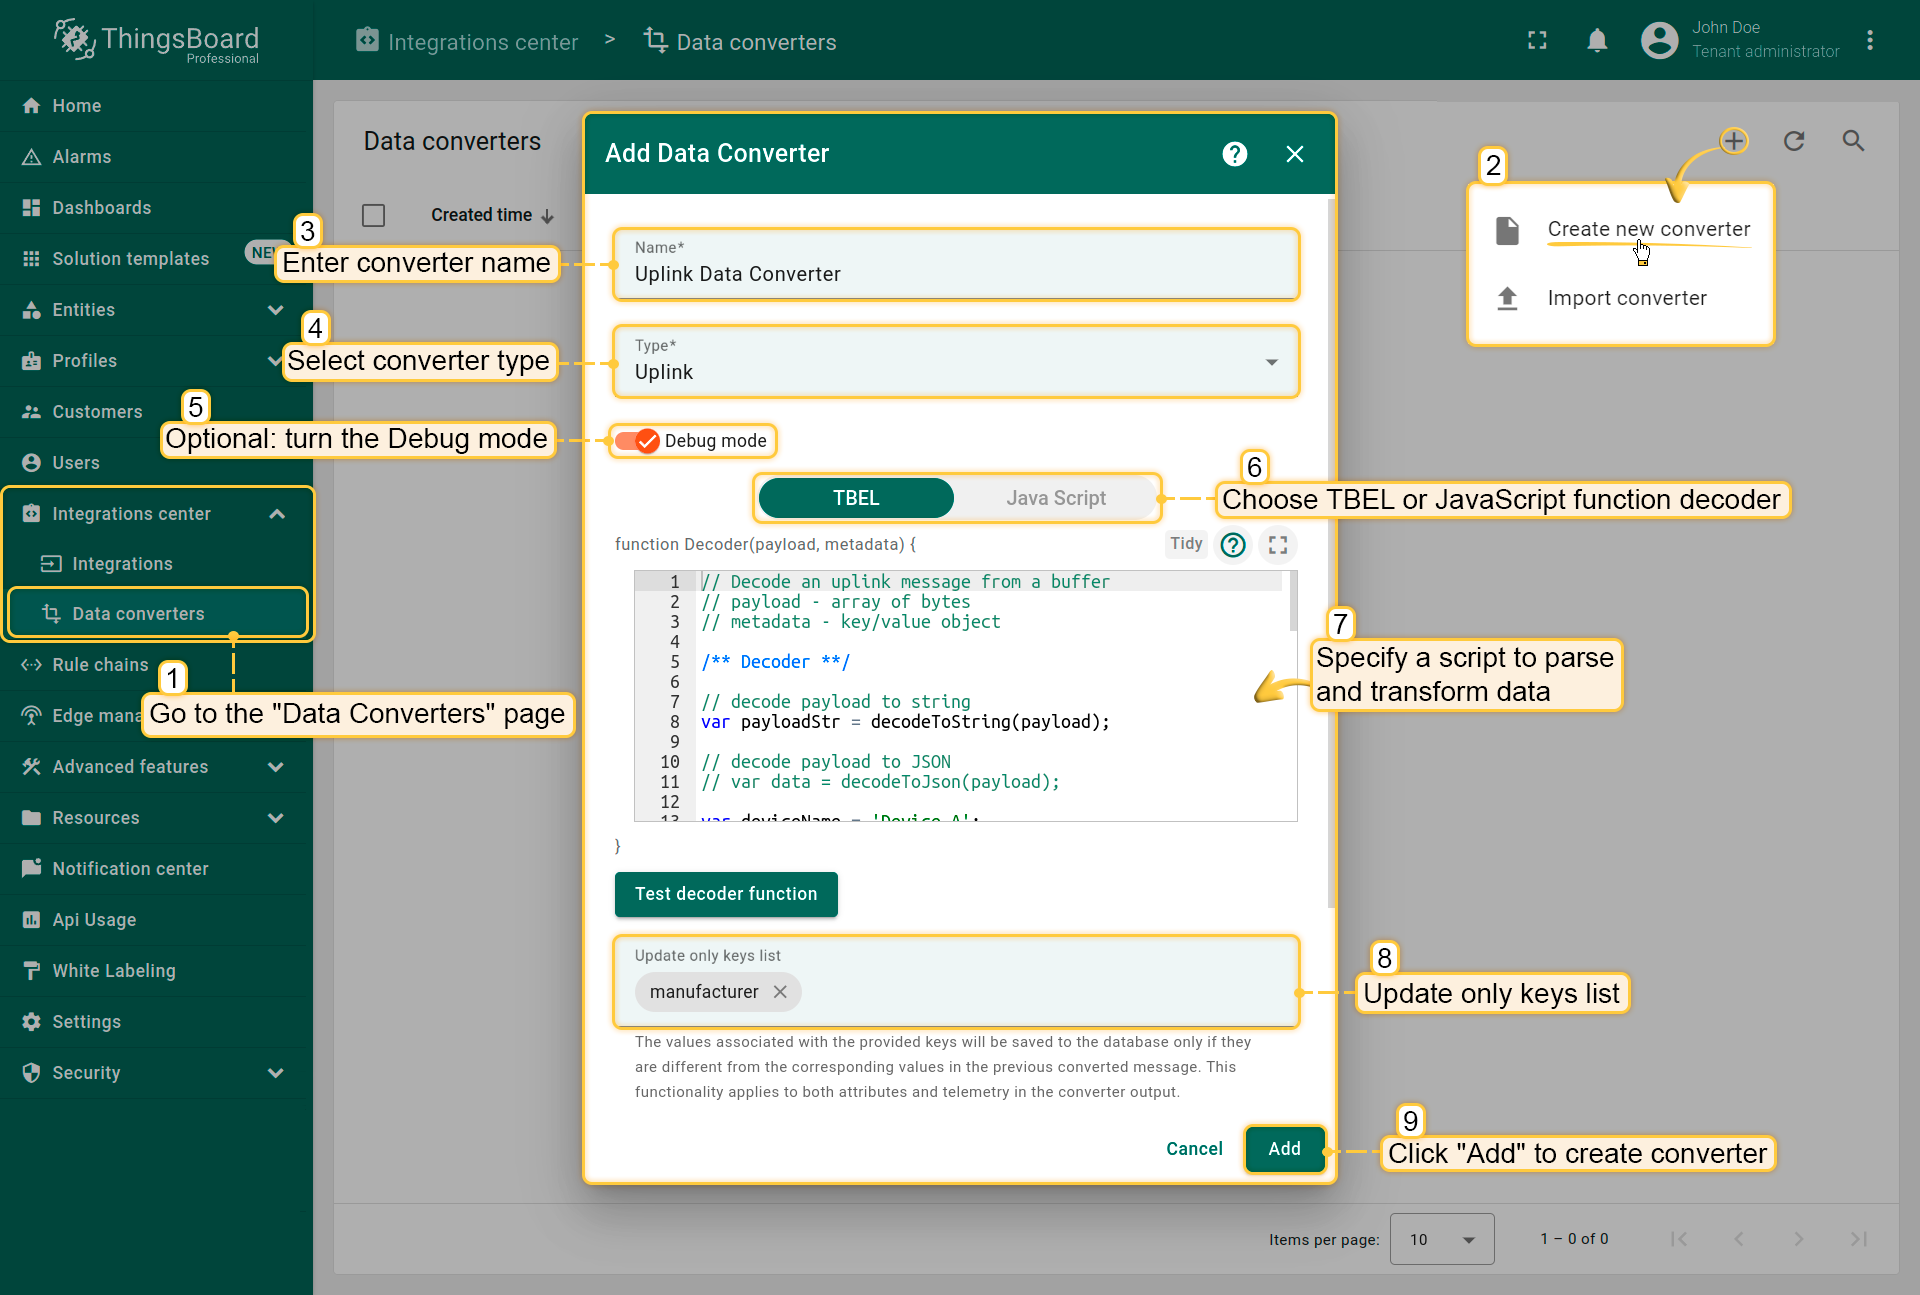
To create an Uplink Converter go to Data Converters section and Click Add new data converter —> Create new converter. Enter converter name, select its type, specify a script to parse and transform data. Optional you can turn the Debug mode. Click “Add” to create converter.
Uplink Converter is basically a user defined function with the following signature:
1
function Decoder(payload, metadata);
Payload
Payload is one of the following content types: JSON, TEXT, Binary(Base64) and is specific to your Integration type.
Default Uplink Converter is dummy, but contains few helper functions to transform incoming payload:
1
2
3
4
5
6
7
8
9
10
function decodeToString(payload) {
   return String.fromCharCode.apply(String, payload);
}

function decodeToJson(payload) {
   // covert payload to string.
   var str = decodeToString(payload);
   // parse string to JSON
   return JSON.parse(str);
}
There are also btoa and atob functions available to decode Binary(Base64) payload.
Metadata
Metadata is a key-value map with some integration specific fields. You can configure additional metadata for each integration in the integration details. For example, you can put device type as an additional Integration metadata parameter and use it to automatically assign corresponding device type to new devices.
Converter output
Converter output should be a valid JSON document with the following structure:
1
2
3
4
5
6
7
8
9
10
11
12
13
14
15
{
    "deviceName": "Device A",
    "deviceType": "thermostat",
    "customerName": "Company Name",
    "groupName": "Thermostats",
    "attributes": {
        "model": "Model A",
        "serialNumber": "SN-111",
        "integrationName": "Test integration"
    },
    "telemetry": {
        "temperature": 42,
        "humidity": 80
    }
}
NOTE:
The only mandatory parameters in the output JSON are deviceName and deviceType. Starting version 2.4.2, Klyff also supports assetName and assetType instead of deviceName and deviceType.
NOTE:
Starting version 2.4.2, Klyff also support optional customerName and groupName. Those parameters will cause Klyff to automatically create customer and/or entity group and assign those entities to the customer and/or group.
Converter may also output array of device values and/or contain timestamps in the telemetry values. For example:
1
2
3
4
5
6
7
8
9
10
11
12
13
14
15
16
17
18
19
20
21
22
23
24
25
26
27
28
29
30
31
32
33
34
35
36
37
38
39
[
    {
        "deviceName":"SN-111",
        "deviceType":"thermostat",
        "attributes":{
            "model":"Model A"
        },
        "telemetry":[
            {
                "ts":1527863043000,
                "values":{
                    "battery":3.99,
                    "temperature":27.05
                }
            },
            {
                "ts":1527863044000,
                "values":{
                    "battery":3.98,
                    "temperature":27.06
                }
            }
        ]
    },
    {
        "assetName":"OF-123",
        "assetType":"office",
        "attributes":{
            "model":"Model A"
        },
        "telemetry":{
            "ts":1527863041000,
            "values":{
                "battery":3.99,
                "temperature":27.05
            }
        }
    }
]
Update only keys field
To avoid constant updates for telemetry attributes or keys, you can use the “Update only keys list” field.
Any keys provided in this field that exist in the telemetry or attribute arrays in the message after conversion will not be updated if the values associated with those keys have not changed from their previous values.
Please note that in a cluster setup, values, associated with keys specified in the “Update only keys list” field may be updated more than once if a message is received by a different integration executor nodes.
The same behavior is expected if the converter configuration has been updated.
Example
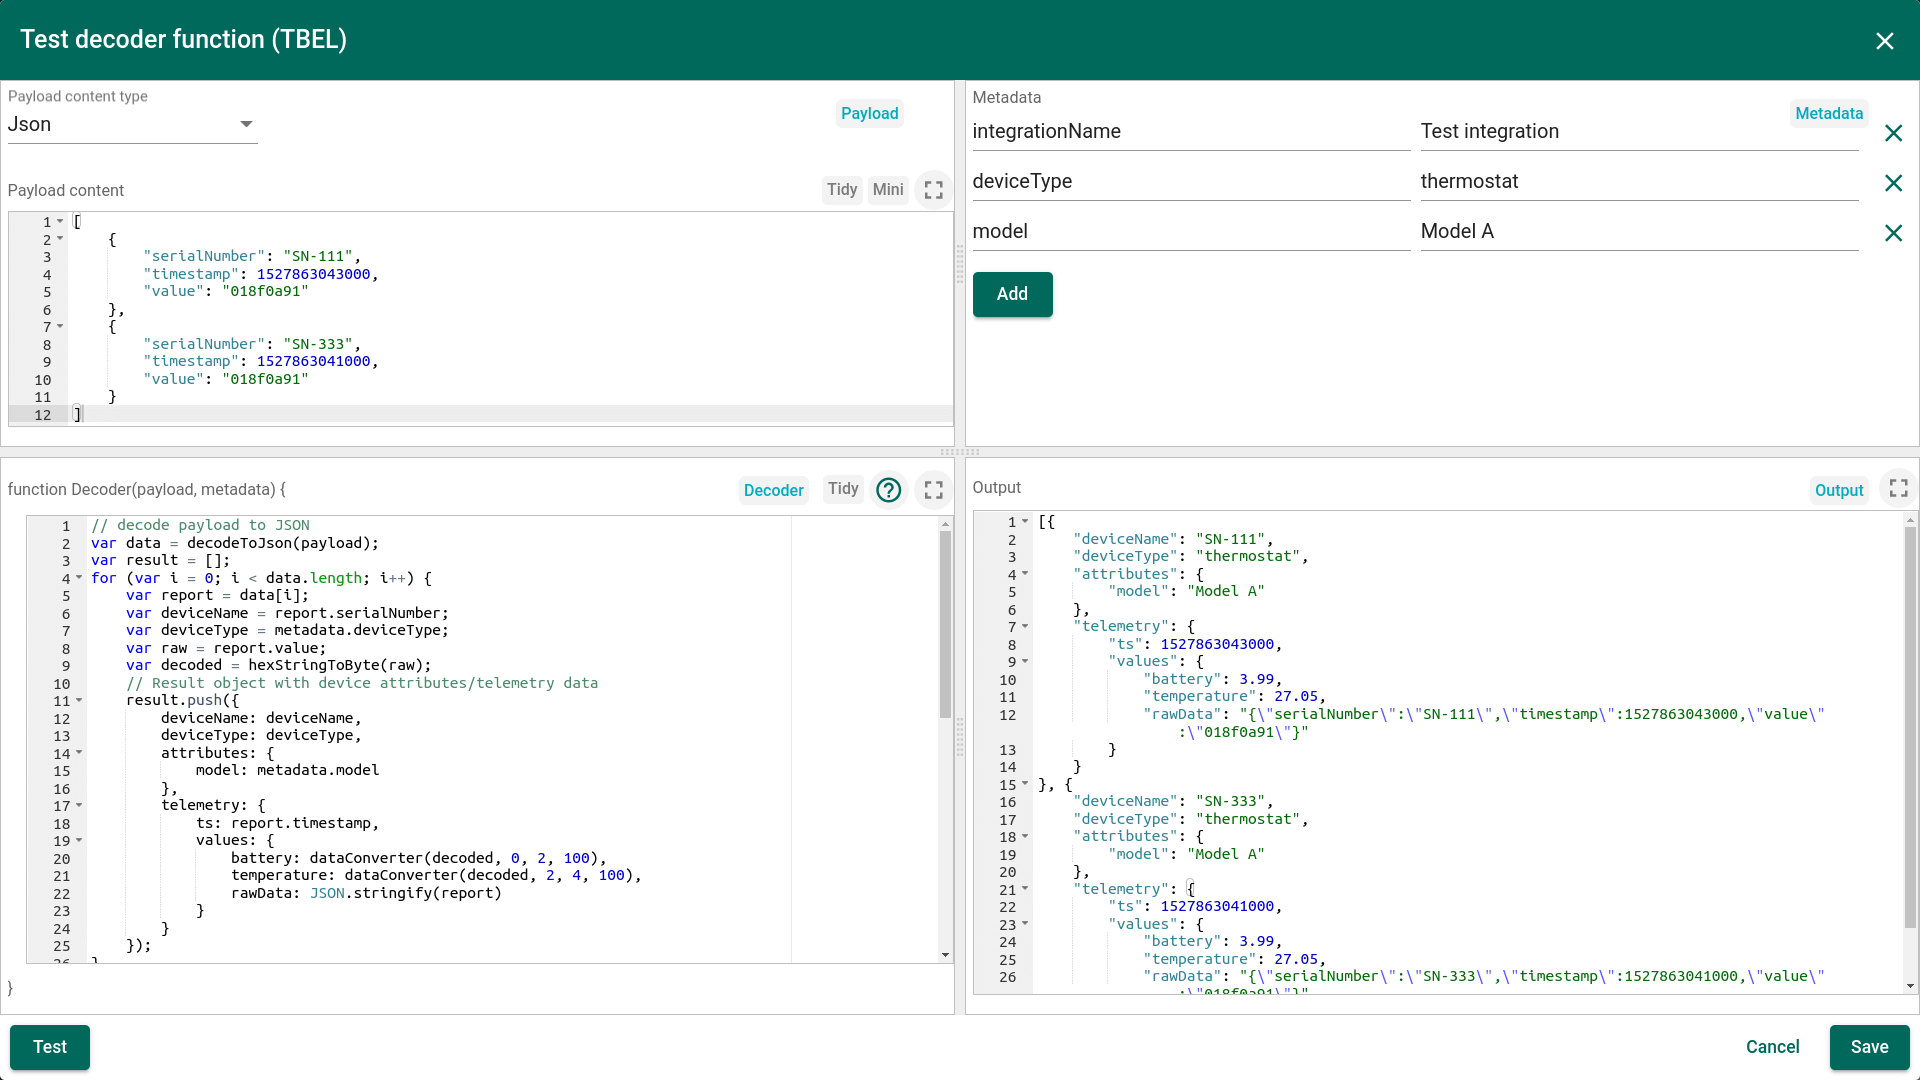
Let’s assume a complex example where payload is encoded in hex “value” field and there is a timestamp associated with each record. First two bytes of “value” field contain battery and second two bytes contain temperature. See payload example and metadata on a screen shoot below.
One can use either TBEL (Klyff expression language) or JavaScript to develop user defined functions. We recommend utilizing TBEL as it’s execution in Klyff is much more efficient compared to JS.
The full source code of TBEL function used in converter: |
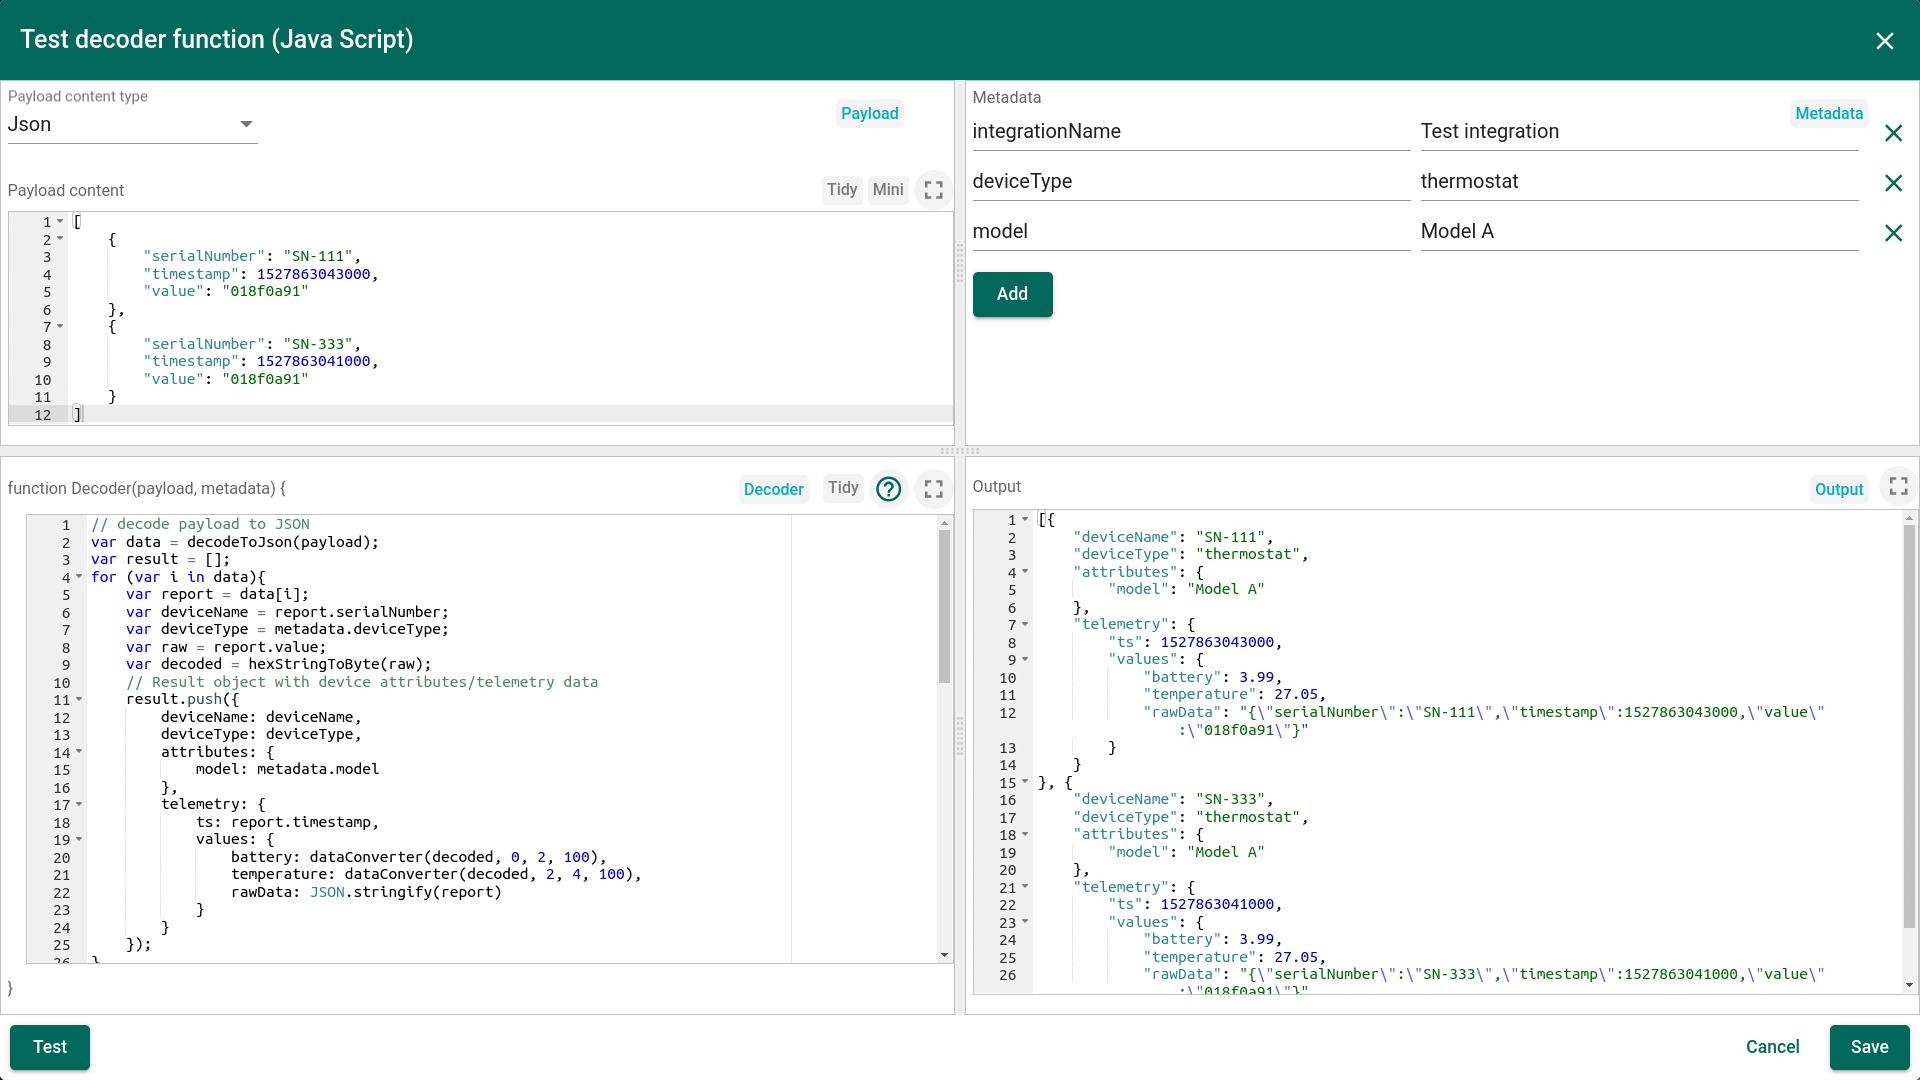
The full source code of javascript function used in converter: |
See video tutorial below for step-by-step instruction how to setup Uplink Data Converter.
Downlink Data Converter
The main function of Downlink Data Converter is to transform the incoming rule engine message and its metadata to the format that is used by corresponding Integration.
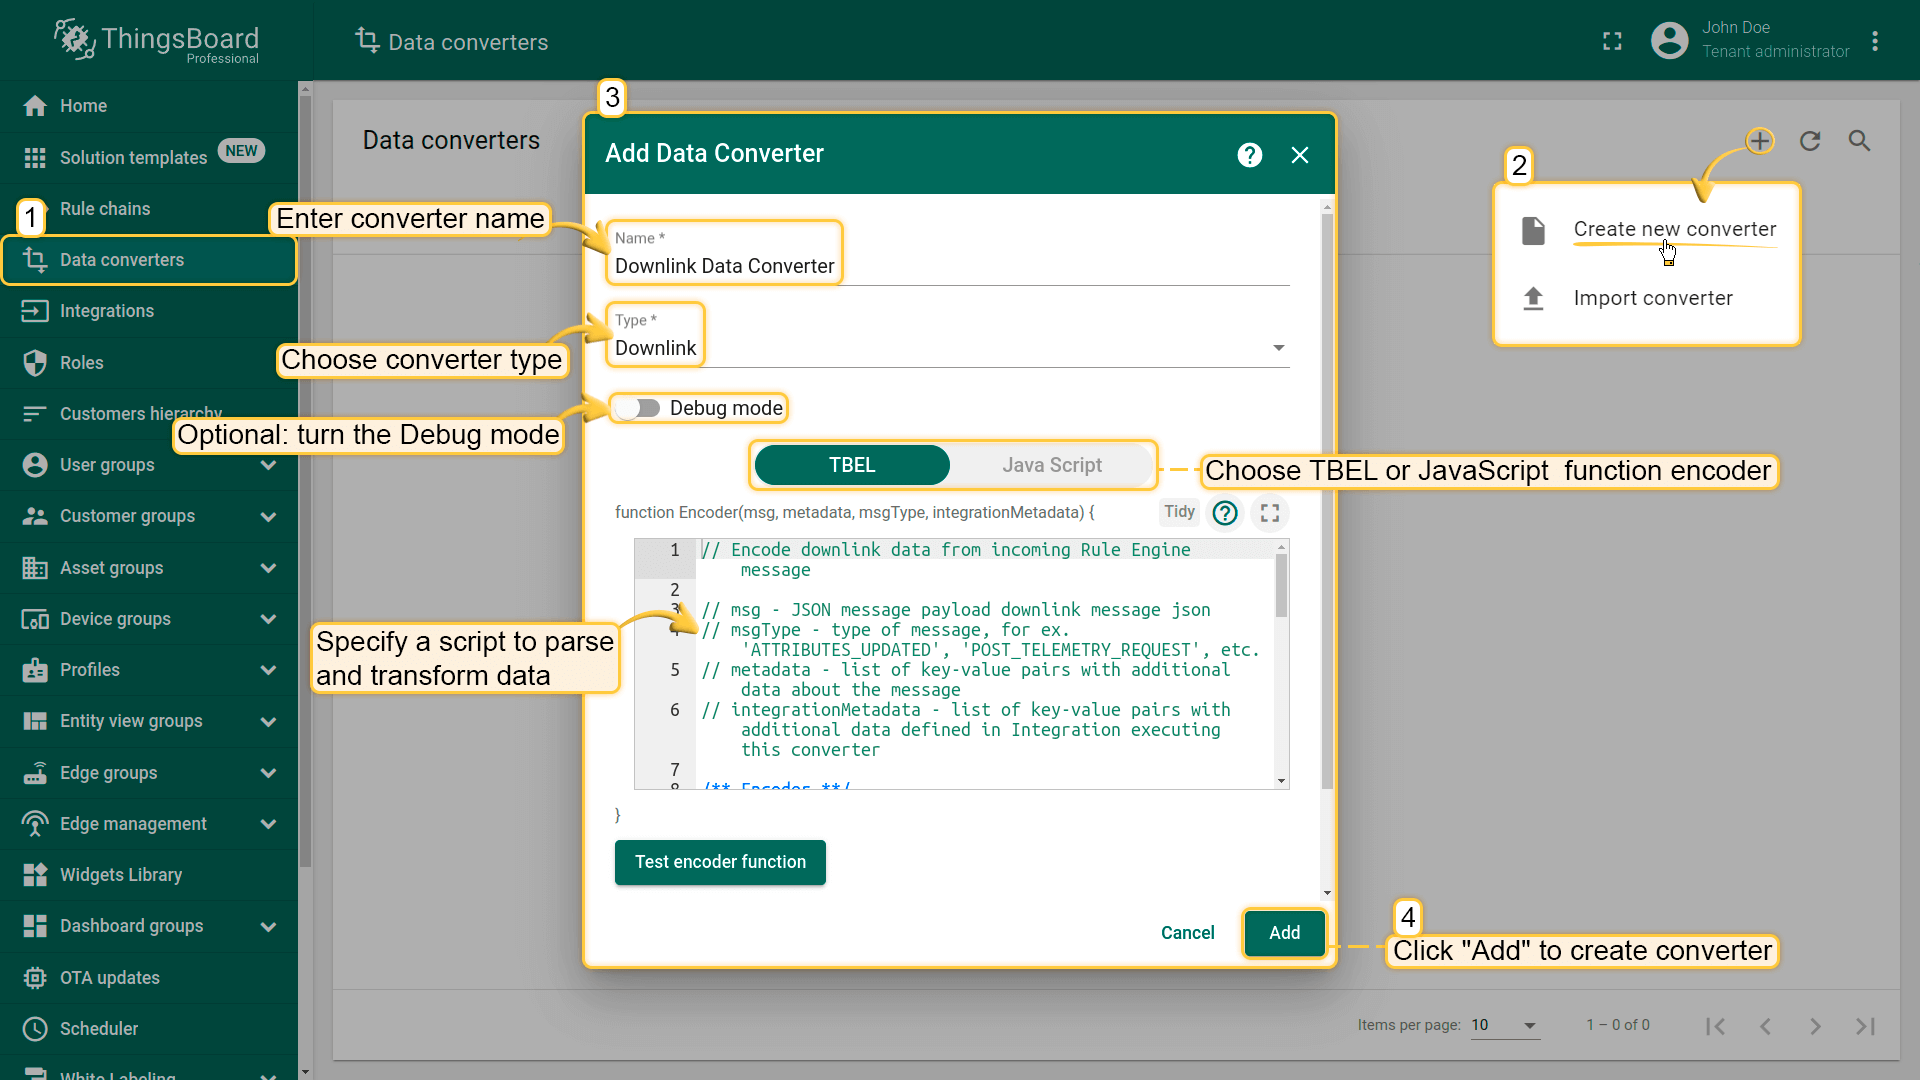
To create a Downlink Converter go to Data Converters section and Click Add new data converter —> Create new converter. Enter converter name, select its type, specify a script to parse and transform data. Optional you can turn the Debug mode. Click “Add” to create converter.
Downlink Converter is basically a user defined function with the following signature:
1
function Encoder(msg, metadata, msgType, integrationMetadata);
Where
- msg - JSON with rule engine msg
- metadata - list of key-value pairs with additional data about the message (produced by the rule engine)
- msgType - Rule Engine message type. See predefined message types for more details.
- integrationMetadata - key-value map with some integration specific fields. You can configure additional metadata for each integration in the integration details.
Converter output
Converter output should be a valid JSON document with the following structure:
1
2
3
4
5
6
7
{
    "contentType": "JSON",
    "data": "{\"tempFreq\":60,\"firmwareVersion\":\"1.2.3\"}",
    "metadata": {
        "topic": "temp-sensor/sensorA/upload"
    }
}
Where
- contentType - JSON, TEXT or BINARY (Base64 string) and is specific to your Integration type.
- data - data string according to the content type
- metadata - list of key-value pairs with additional data about the message. For example, topic to use for MQTT integration, etc.
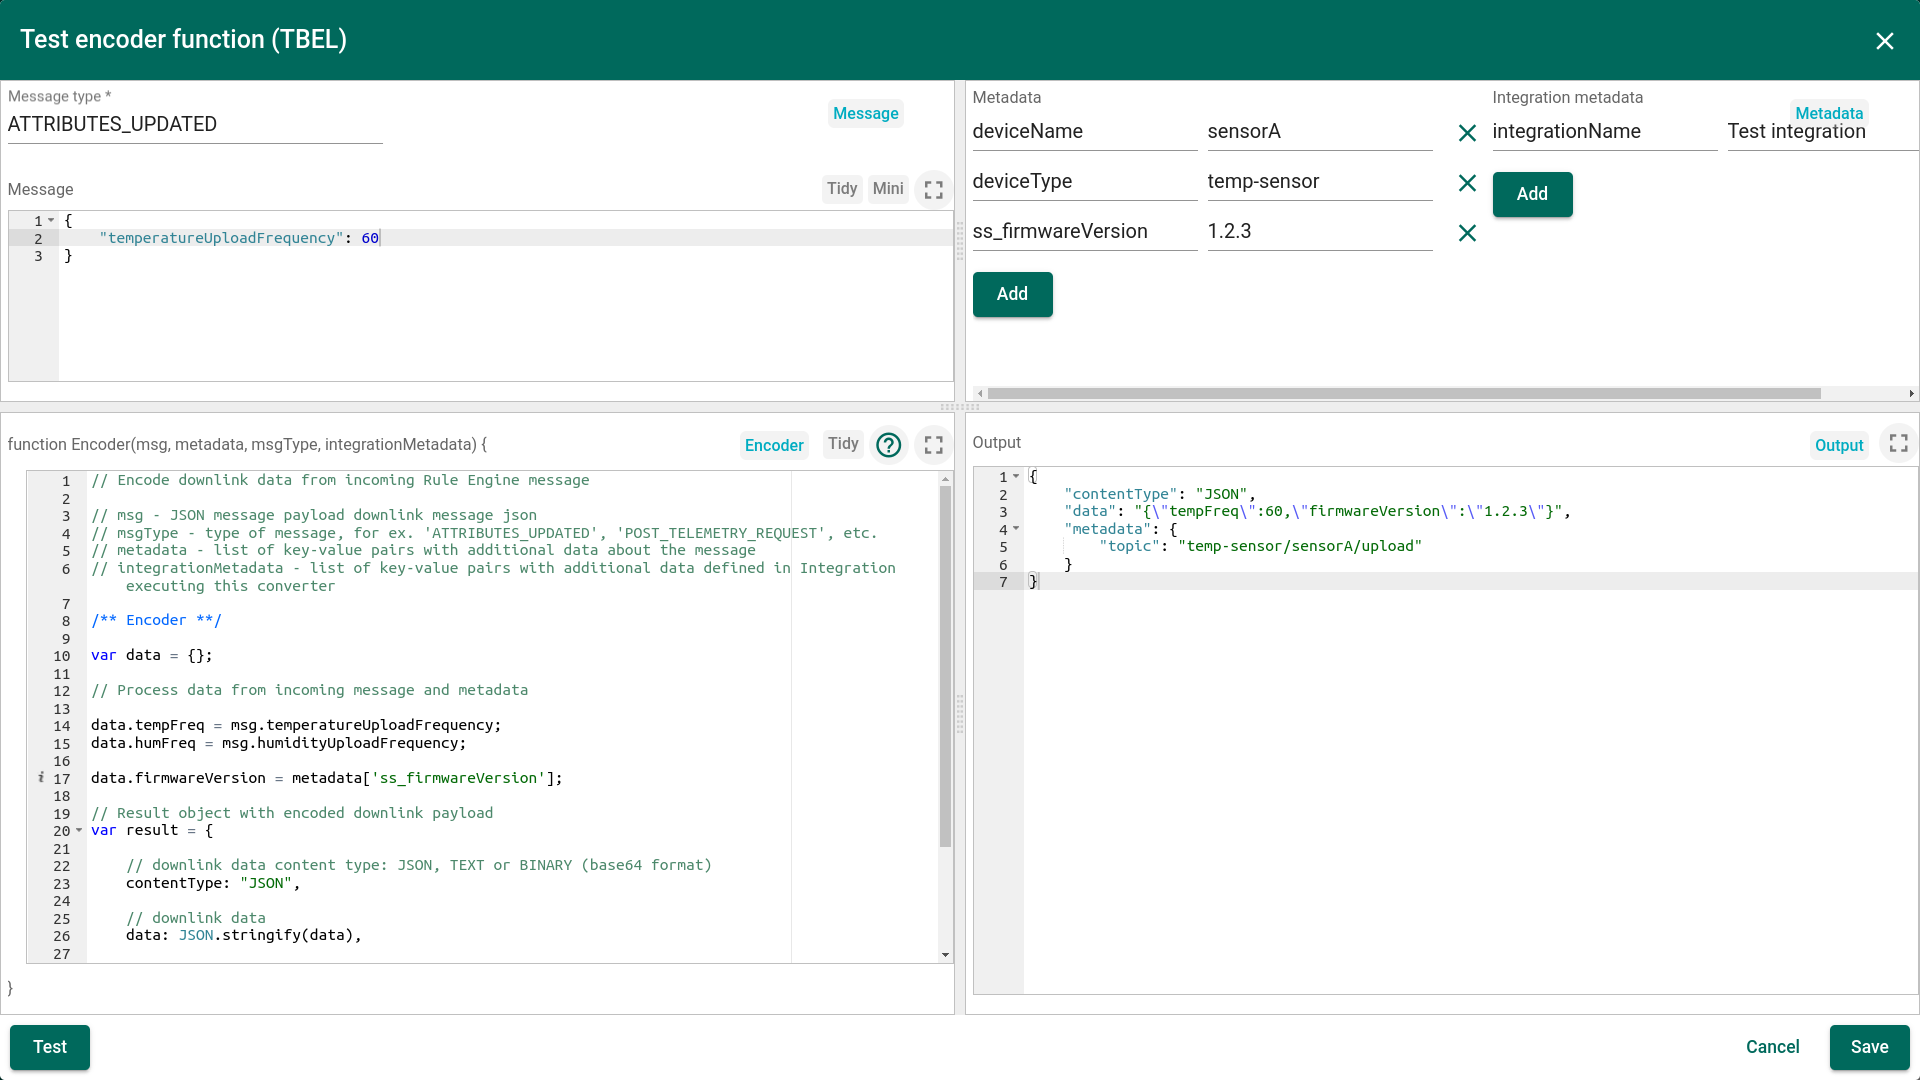
Example
Let’s assume an example where temperature and humidity upload frequency attributes are updated via Klyff REST API and you would like to push this update to an external MQTT broker (TTN, Mosquitto, AWS IoT, etc). You may also want to include the “firmwareVersion” attribute value that was configured long time ago and is not present in this particular request. The topic to push the update should contain the device name.
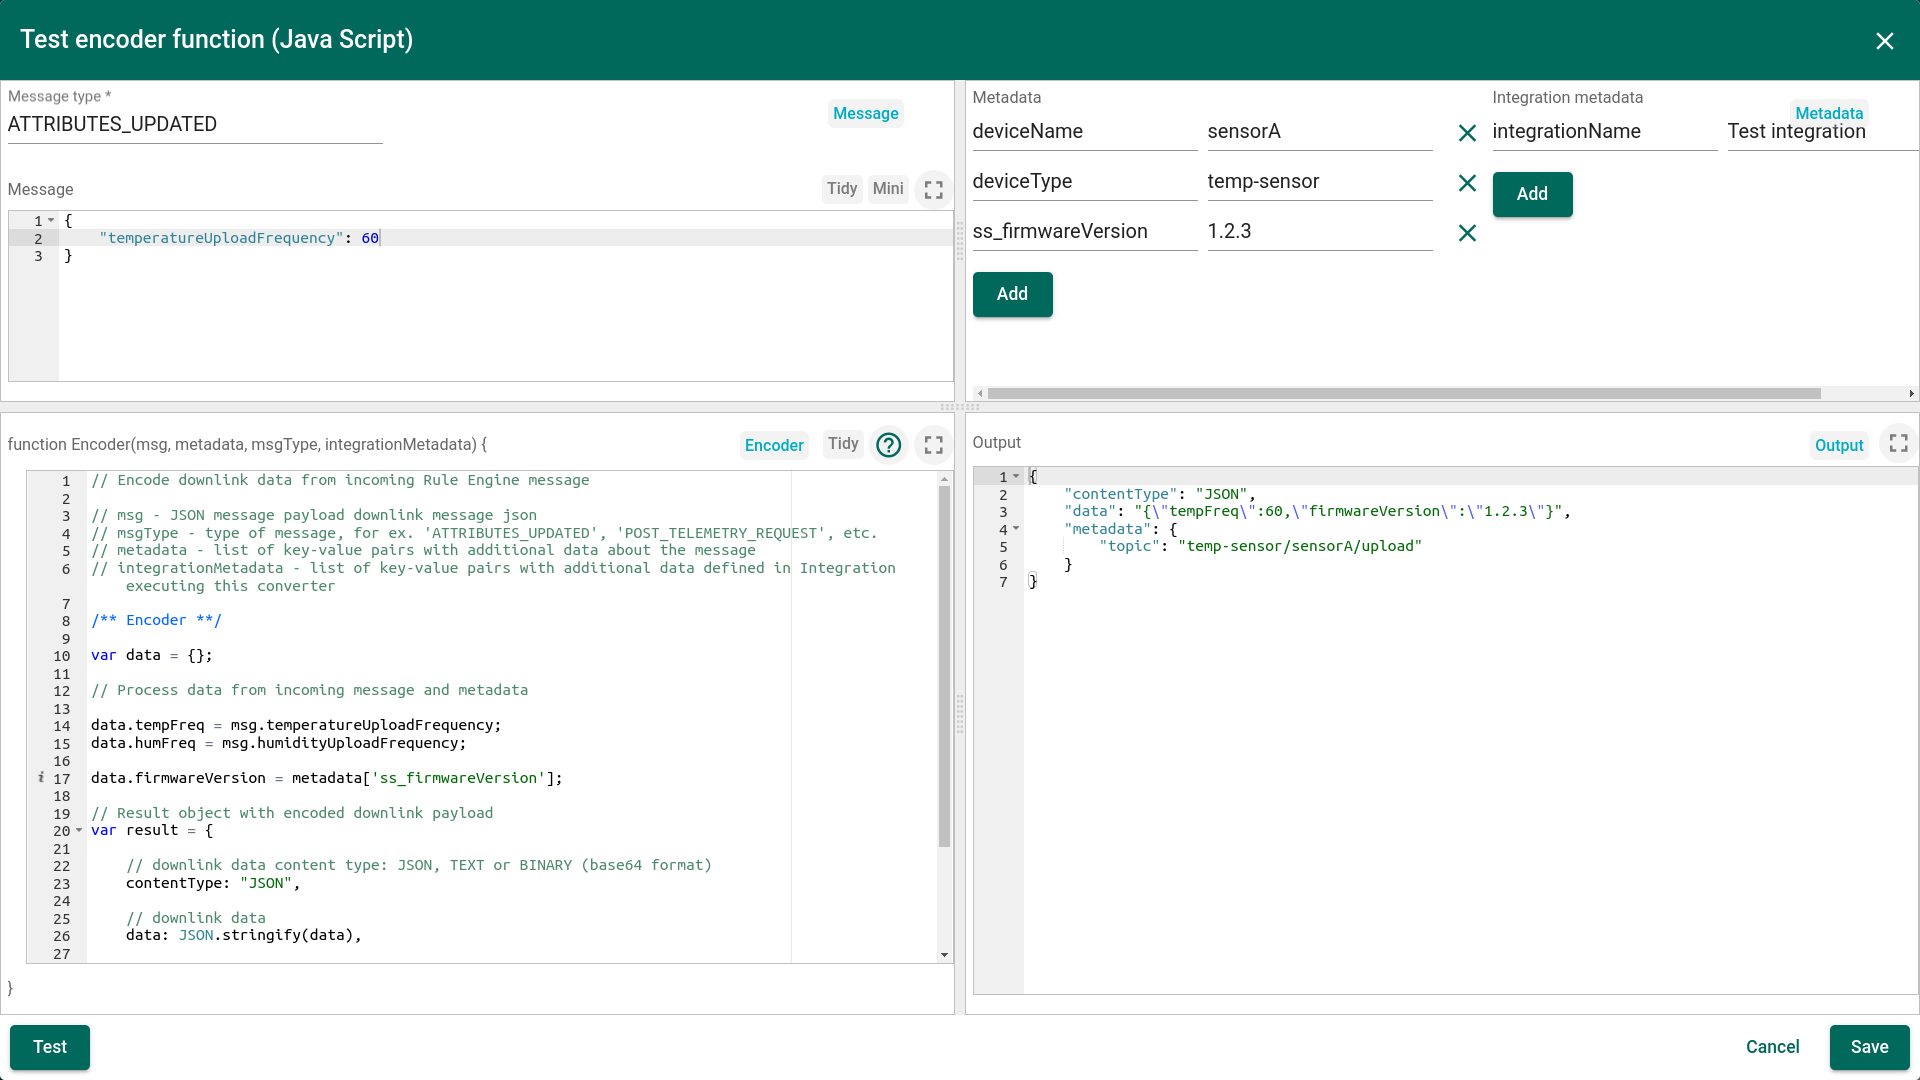
One can use either TBEL (Klyff expression language) or JavaScript to develop user defined functions. We recommend utilizing TBEL as it’s execution in Klyff is much more efficient compared to JS.
The full source code of TBEL function used in converter: |
The full source code of javascript function used in converter: |
In order to invoke the downlink processing by the integration, tenant administrator should configure the rule chain similar to the one below:
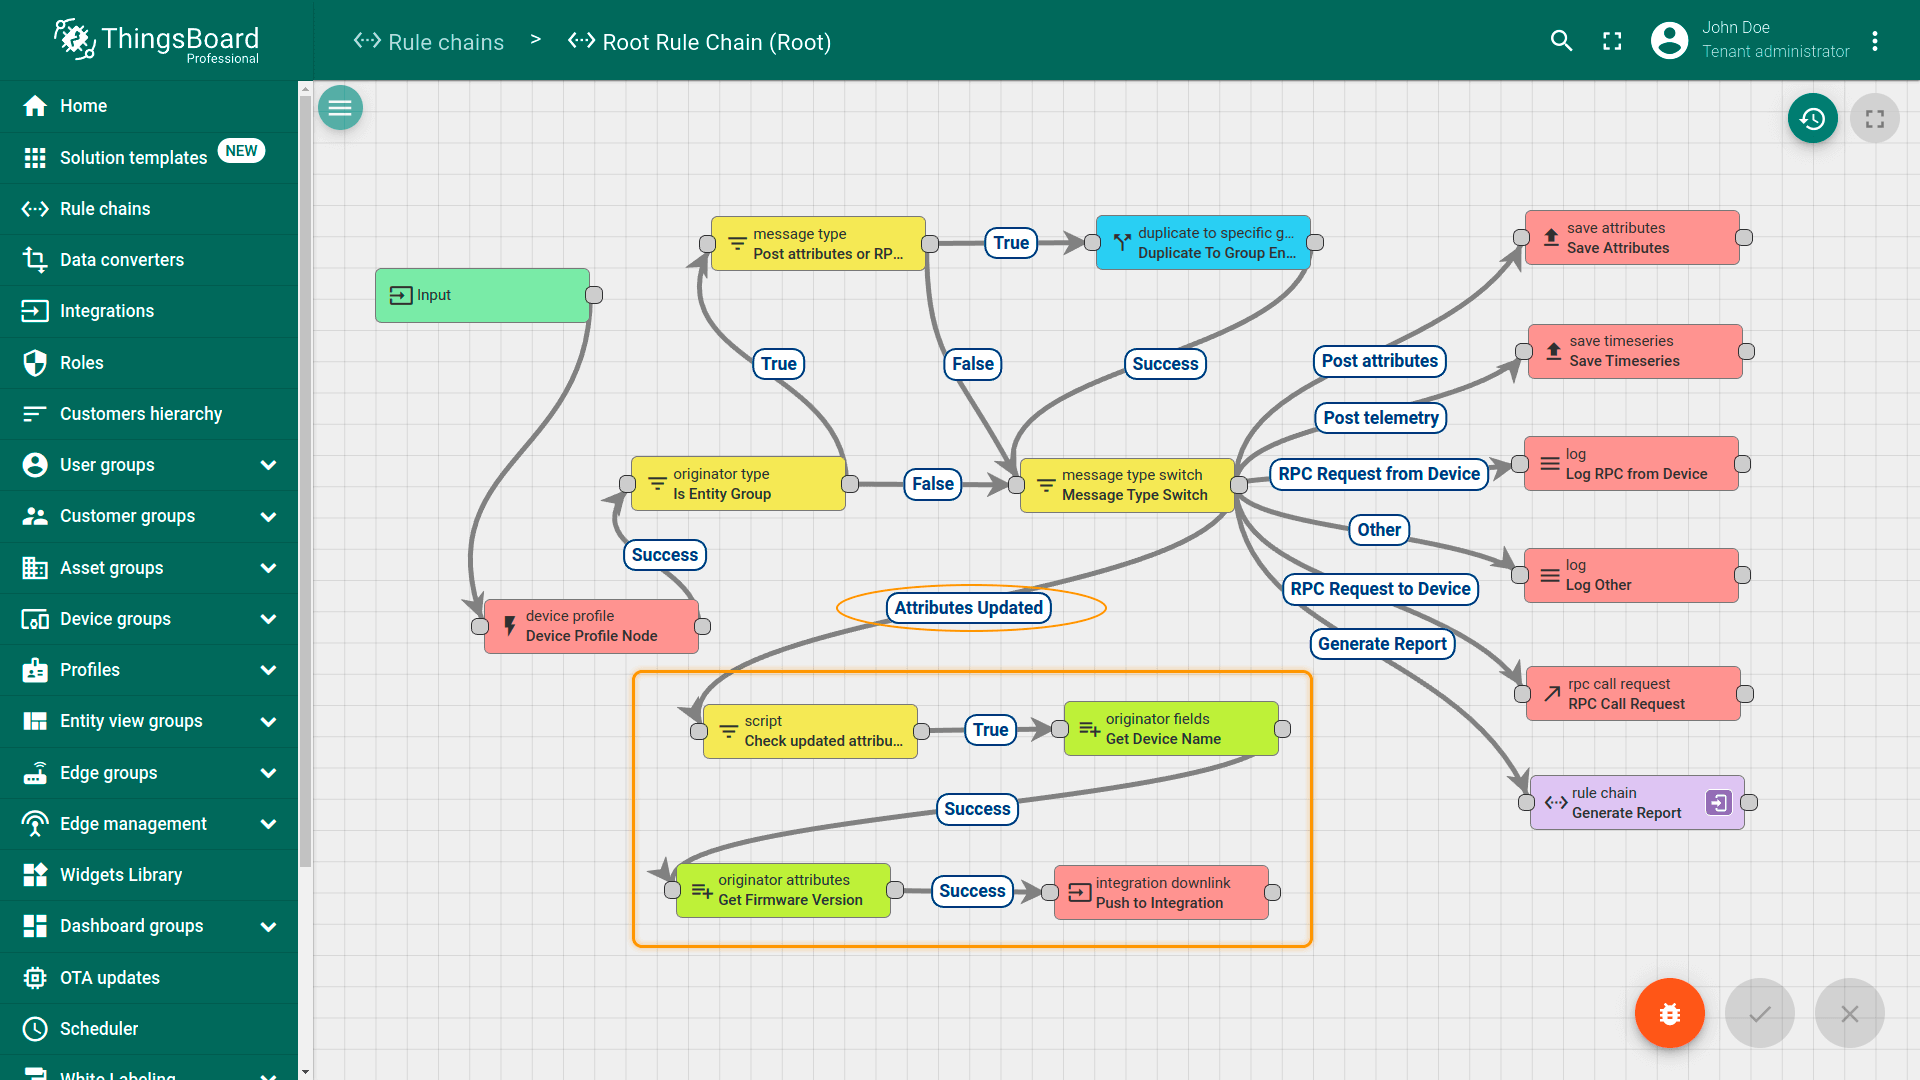
The full rule chain configuration is available here.
Synchronous vs Asynchronous Downlinks
Most of the integrations are able to process downlink messages to devices asynchronously. For example, each message pushed by the rule engine to MQTT based integration is immediately pushed to the corresponding external MQTT broker.
However, some integrations, like SigFox or generic HTTP integration are not able to push message asynchroniously. These integrations, due to the nature of underlying HTTP protocol, are only able to push downlink information synchronously in reply to uplink message request. In this case, the last downlink message originated by rule engine will be stored in the queue until the new uplink message arrives for particular device.
Debug mode
This feature allows to persis:
- incoming messages from thirdparty system;
- metadata values;
- the results of data converter;
- results of the payload processing.
It enables rapid development of converters and configuration of integrations. This feature allows to validate your configuration setup and should be used only for debug purposes, since it dramatically impacts performance.
Platform Integrations vs IoT Gateway
Experienced Klyff users may notice that functionality of Integrations feature partially overlap with functionality of IoT Gateway. However, there are key differences between these two systems/features:
- IoT Gateway is designed for local network deployments, Integrations are designed for server-to-server integrations.
- IoT Gateway is designed to support < 1000 devices, while Integrations are designed for high throughput, scalability and cluster deployments as part of Klyff server.
- Gateway recompilation and restart is required to add custom payload decoder while Integration Converter is a JS function that may be modified in real time.
As you can see, both systems are important and applicable in different use cases.
Feature Roadmap
Usage statistics
We plan to log statistics for amount of messages processed by each integration with possible limitations of messages processed on a tenant / system levels.
More integrations and protocols
We plan to provide specific integrations for different platforms, and also for different communication protocols, like gRPC.
More data converters
We plan to collect and maintain data converters for most popular devices on the market to simplify integration path even more. Please note that you can share your converters with community and send them to us to make part of official Klyff distributive.
Contact us to suggest missing feature for your use case.
See Also
Explore guides and video tutorials related to specific integrations:
- HTTP
- MQTT
- AWS IoT
- AWS Kinesis
- IBM Watson IoT
- Azure Event Hub
- Azure IoT Hub
- Actility ThingPark
- TheThingsIndustries
- SigFox
- OceanConnect
- TheThingsStack
- OPC-UA
- TCP
- UDP
- Custom
- LORIOT
- Kafka
- ChirpStack
- CoAP
Next steps
-
Getting started guides - These guides provide quick overview of main Klyff features. Designed to be completed in 15-30 minutes.
-
Installation guides - Learn how to set up Klyff on various available operating systems.
-
Data visualization - These guides contain instructions on how to configure complex Klyff dashboards.
-
Data processing & actions - Learn how to use Klyff Rule Engine.
-
IoT Data analytics - Learn how to use rule engine to perform basic analytics tasks.
-
Hardware samples - Learn how to connect various hardware platforms to Klyff.
-
Advanced features - Learn about advanced Klyff features.